Building a Unified Bastion Entry with Teleport
TIPThis is an older article originally stored in Notion, now migrated to the blog.
After recently deploying a large number of virtual machines, I often needed to connect to servers from different entry points. This not only increased management overhead, but also introduced security and maintenance issues. A unified, secure, and auditable bastion host became highly necessary. After evaluating multiple options, Teleport turned out to be the ideal choice.
Don’t ask why I’m not using jumpserver—because it just looks too ugly.
Teleport is an integrated access platform that centrally manages SSH, Kubernetes, databases, internal applications, desktop access, and more. It provides a unified access entry, along with zero-trust access, security auditing, short-lived certificates, SSO integration, and other capabilities.
This article walks through Teleport’s concepts and core features, then shows how to deploy it with Docker and enroll nodes, so you can build your own bastion system end to end.
What is Teleport?
Teleport is an open source Infrastructure Access Platform. Its core idea is to use a unified proxy entry point to mediate access to all internal resources, including:
- SSH
- Kubernetes
- Databases
- Internal web applications
- Windows Remote Desktop
- Workload Identity
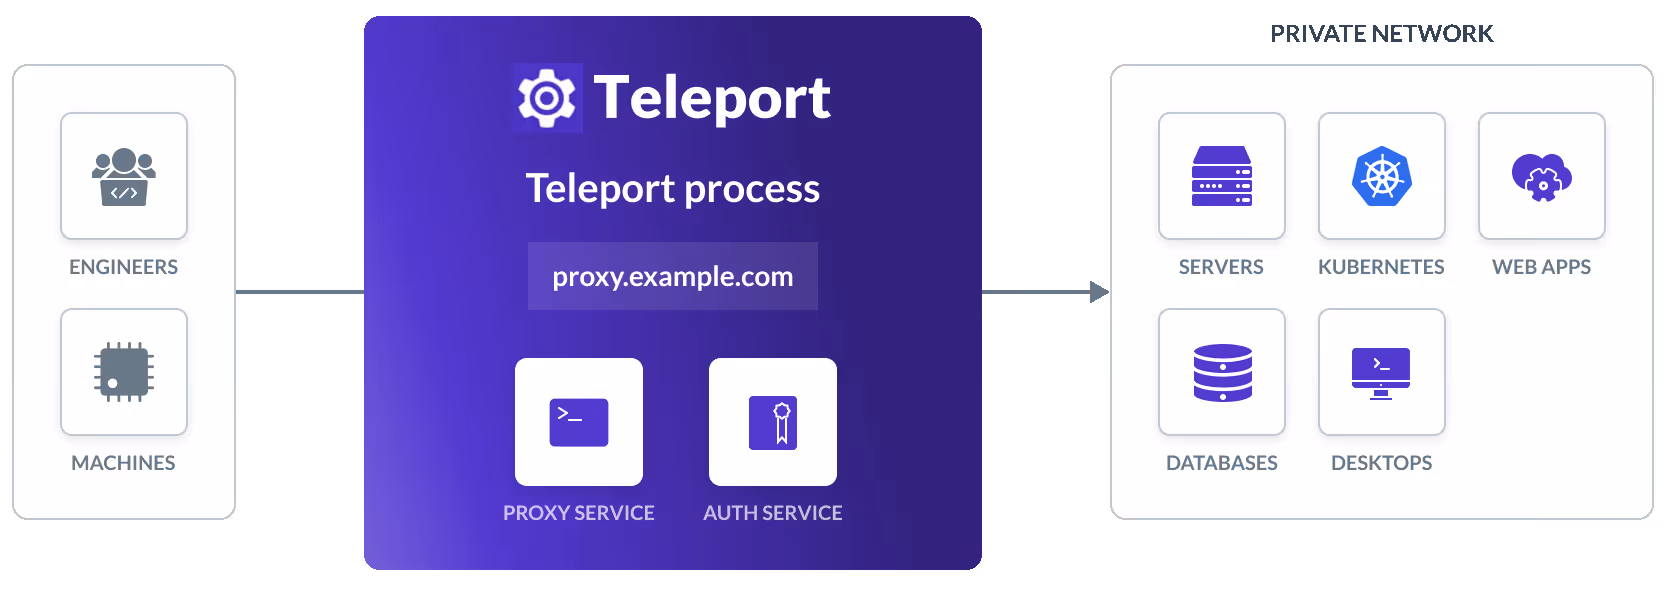
Teleport is composed of several main components:
-
Auth Service
Responsible for authentication, authorization, certificate management, RBAC policies, etc. -
Proxy Service
Exposes a single external entry point (usually 443 or 3080); all access goes through the Proxy. -
Node/Kube/DB/Application/Desktop Agent
Agents deployed on target resources to bring them into the Teleport cluster.
Teleport’s core value lies in:
Identity Security
- Short-lived certificates instead of long-lived SSH keys.
- Eliminates shadow access and standing privileges.
- Strengthens RBAC-based access control.
Unified Access Plane
- All access enters through the Proxy Service.
- Supports SSO, MFA, and Device Trust.
- Centralized recording of all sessions and audit logs.
Core Feature Modules
1. Secure SSH Access
- Use short-lived certificates instead of long-lived SSH keys
- Session recording and playback
- Centralized access control
- Compatible with traditional SSH tooling (via
tsh)
2. Kubernetes Access Control
- Use Teleport identities and RBAC to centrally manage multiple K8s clusters
- Audit
kubectlsessions - Access multiple clusters without managing individual kubeconfig files
3. Database Access
- Supports PostgreSQL, MySQL, etc.
- Database connections are proxied through Teleport Proxy
- Audit database queries
- No need to store static DB credentials locally
4. Internal Application and Desktop Access
- Application Service can proxy internal web applications
- Desktop Service can proxy RDP to provide secure Windows desktop access
5. Workload Identity
- Automatically issues short-lived certificates/JWTs for service-to-service calls
- Follows the SPIFFE standard
- Supports automatic rotation
Typical Use Cases
- Cross-team operations and management: Centrally manage all SSH/K8s/DB access with full session auditability.
- Zero-trust architecture: Every access is based on real-time authentication and authorization.
- Hybrid and multi-cloud environments: Private resources stay non-exposed and connect to Teleport via reverse tunnels.
- CI/CD integration: Use APIs or Terraform to manage access policies and certificate issuance.
Deploying Teleport with Docker
The following example is suitable for personal or lightweight environments. For production, you should additionally consider:
- TLS certificates (ACME/manual)
- Persistent storage
- High availability configuration
Reference docs: https://goteleport.com/docs/
1. Prepare Configuration Directories
mkdir -p teleport/data teleport/config teleport/certs2. Generate the Teleport Configuration File
docker run --hostname localhost --rm \ --entrypoint=/usr/local/bin/teleport \ public.ecr.aws/gravitational/teleport-distroless:17.4.8 \ configure --roles=proxy,auth > ./teleport/config/teleport.yamlModify the proxy_service section as needed:
proxy_service: enabled: "yes" web_listen_addr: 0.0.0.0:3080 tunnel_listen_addr: 0.0.0.0:3024 listen_addr: 0.0.0.0:3023 public_addr: - localhost:3080 https_key_file: /etc/teleport/certs/server-key.pem https_cert_file: /etc/teleport/certs/server.pem acme: {}If you need TLS, you can generate certificates yourself using cfssl.
3. Start the Teleport Service
docker run -d --restart=always \ --hostname localhost --name teleport \ -v ~/Applications/teleport/config:/etc/teleport \ -v ~/Applications/teleport/data:/var/lib/teleport \ -v ~/Applications/teleport/certs:/etc/teleport/certs \ -p 3025:3025 -p 3080:3080 -p 3023:3023 \ public.ecr.aws/gravitational/teleport-distroless:17.4.84. Check Status
docker exec teleport tctl status5. Create the First User
docker exec teleport tctl users add admin \ --roles=editor,access \ --logins=root,ubuntuCopy the invitation link from the output and open it in your browser to set the password and MFA.
6. Log in to the Teleport Web UI
https://<server-ip>:3080Browsers will warn about self-signed certificates; you can ignore this in test environments.
Logging into the Cluster with tsh
After installing tsh:
tsh login --proxy=<IP-or-domain>:3080 --user=adminConnect to a node:
tsh ssh ubuntu@node-aEnrolling Other Servers into Teleport
Method 1: Generate Script from the Web UI (Recommended)
- Open the Teleport Web UI
- Click Add Resource / Enroll New Server
- Copy the generated script, for example:
sudo bash -c "$(curl -kfsSL https://<IP>:3080/scripts/<token>/install-node.sh)"Run this script on the target node to automatically join it to the cluster.
Method 2: Manually Generate a Token with tctl
docker exec teleport tctl nodes add --ttl=5m --roles=node --format=jsonThen install Teleport on the target node and configure the token and auth_server address manually.
Verify that Nodes Have Joined
In the Web UI, or by running:
tsh lsYou should now see the newly enrolled server resources and be able to SSH into them directly.