Deploying a Multi-Node Looking Glass Panel NetMirror with Docker
Recently, a customer asked us to run quad-network monitoring tests. After searching around for a Looking Glass panel, we realized that most of the existing projects on the market are old PHP-based solutions: outdated UIs, limited features, or abandoned for years — none of them really meet the needs of modern network operations or multi-line visibility.
So we decided to build our own and teamed up with a few friends to develop an all-new Looking Glass project — NetMirror. Our goal is to provide IDC operators, one-man ops engineers, and network enthusiasts with a more modern and user-friendly solution.
Special thanks to wikihost-opensource and Hybula, whose projects inspired many of our design and architecture decisions.
What is NetMirror?
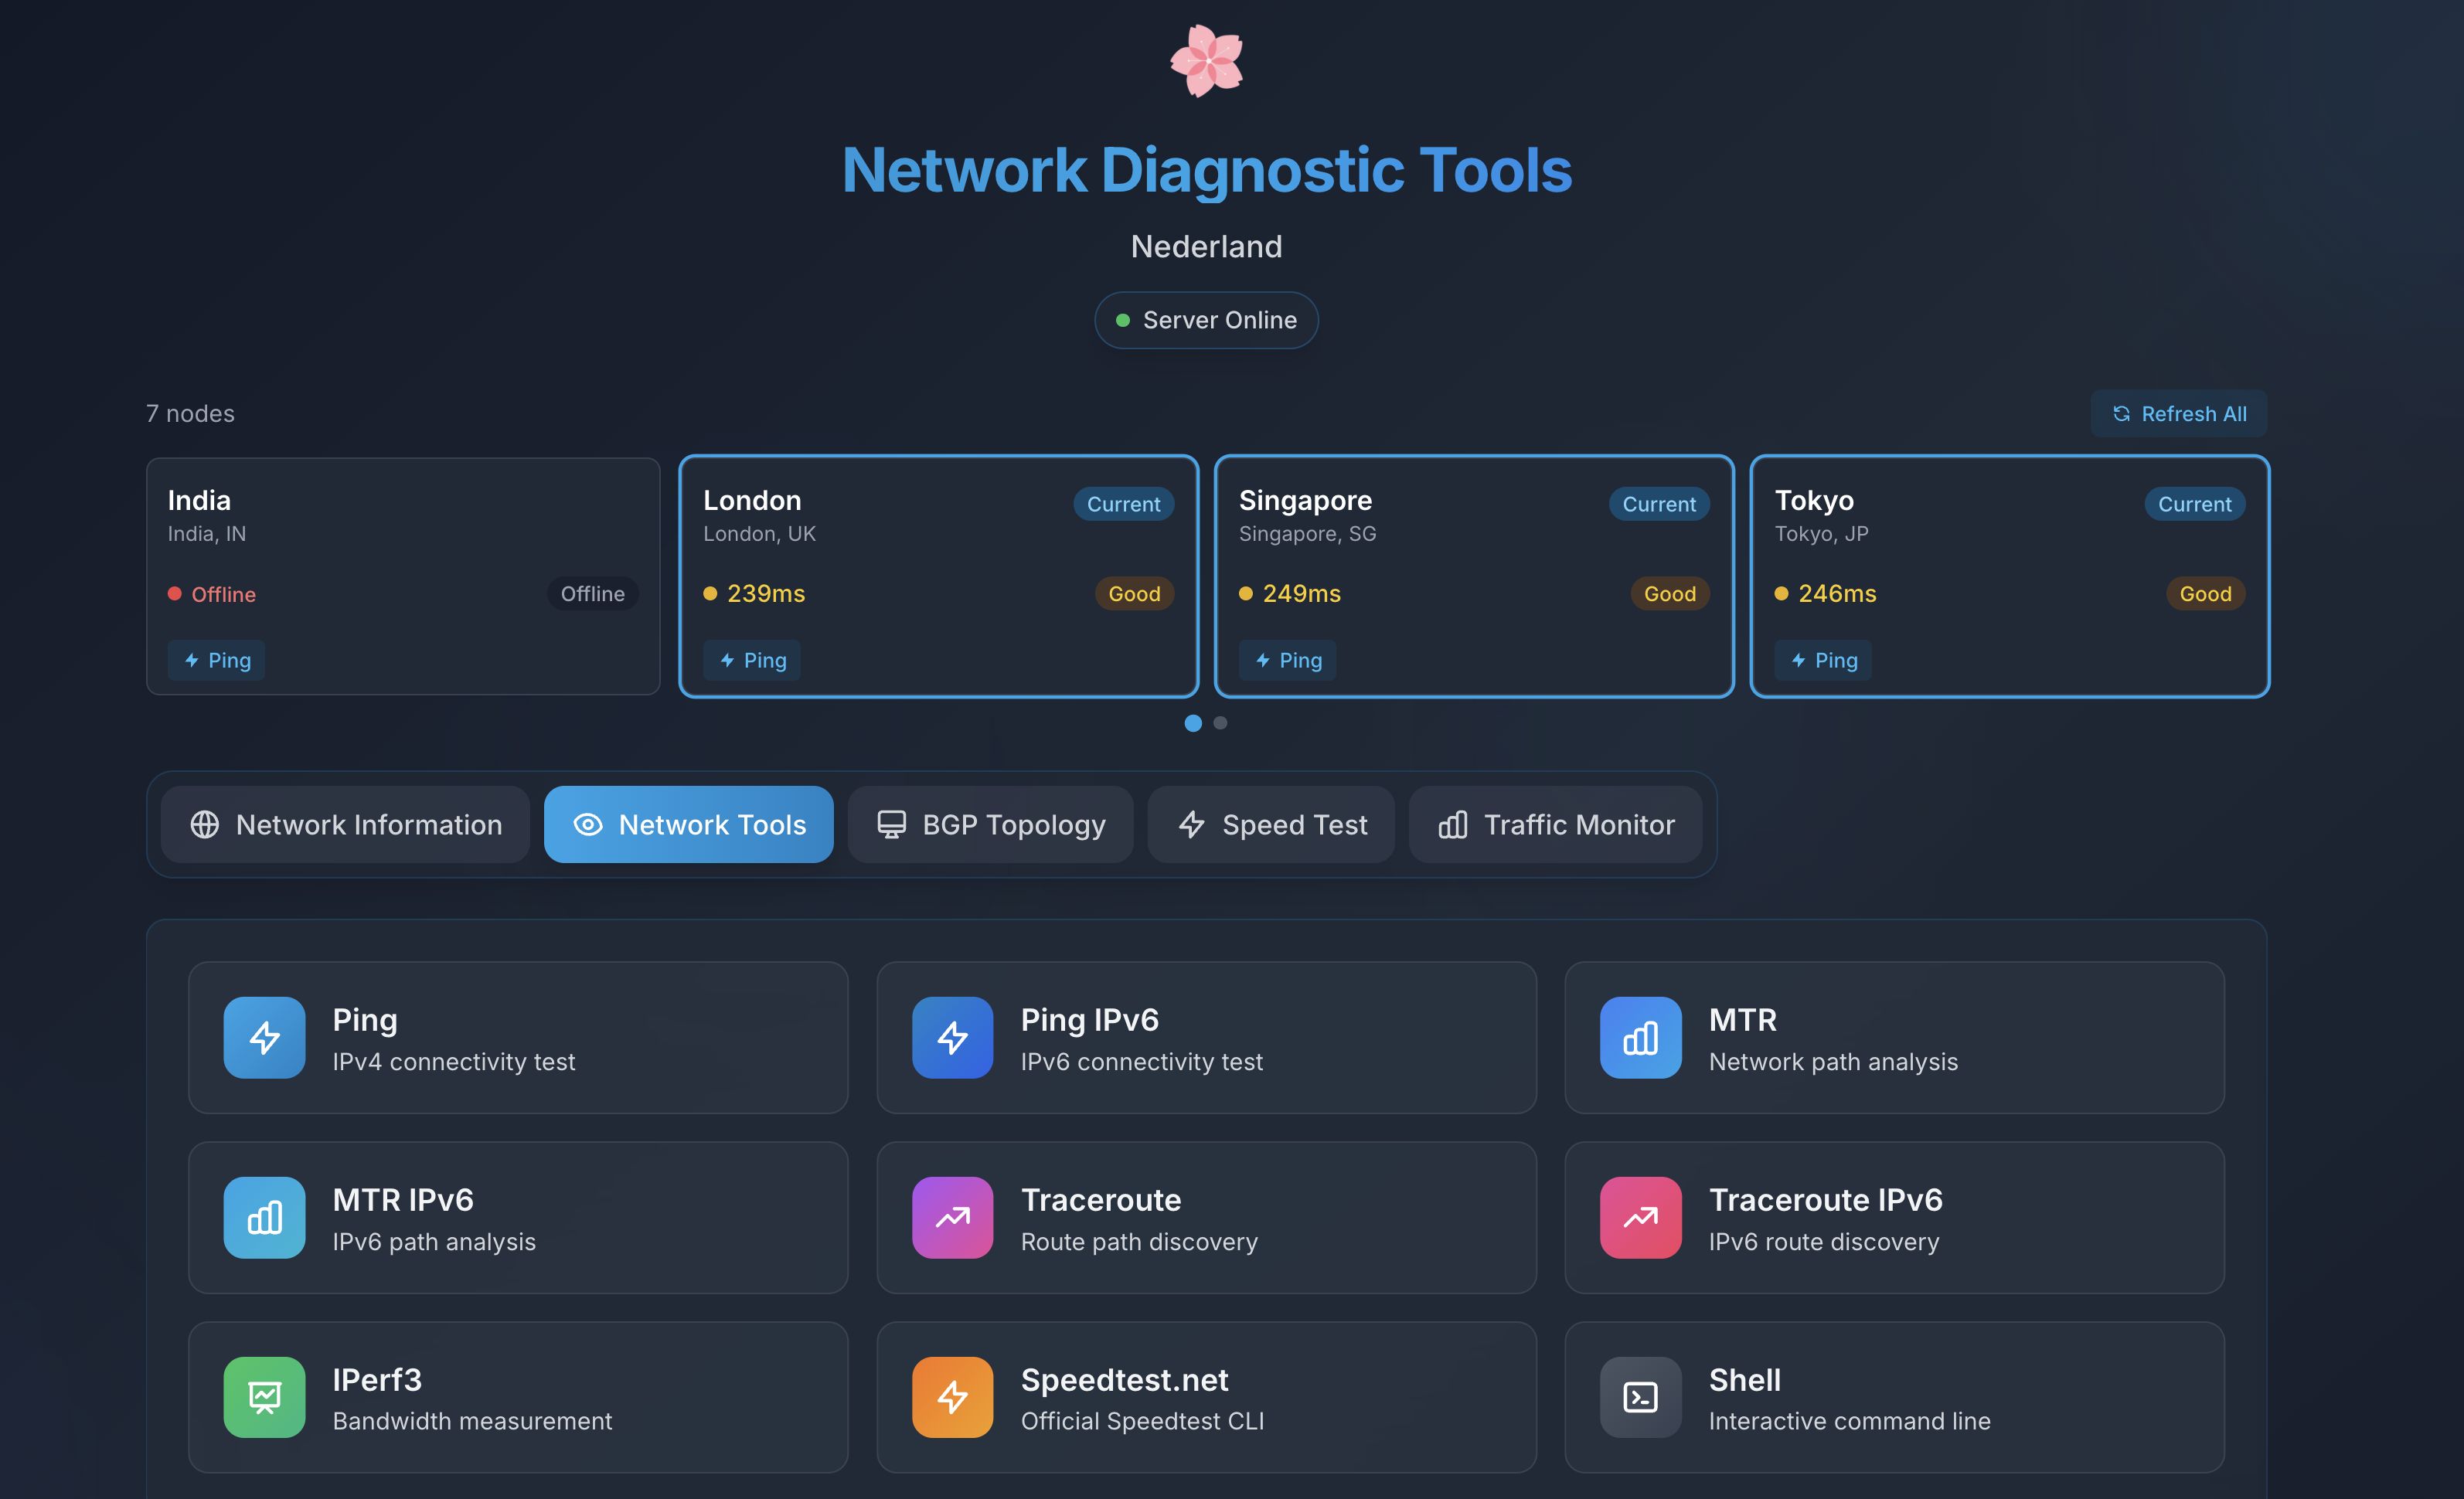
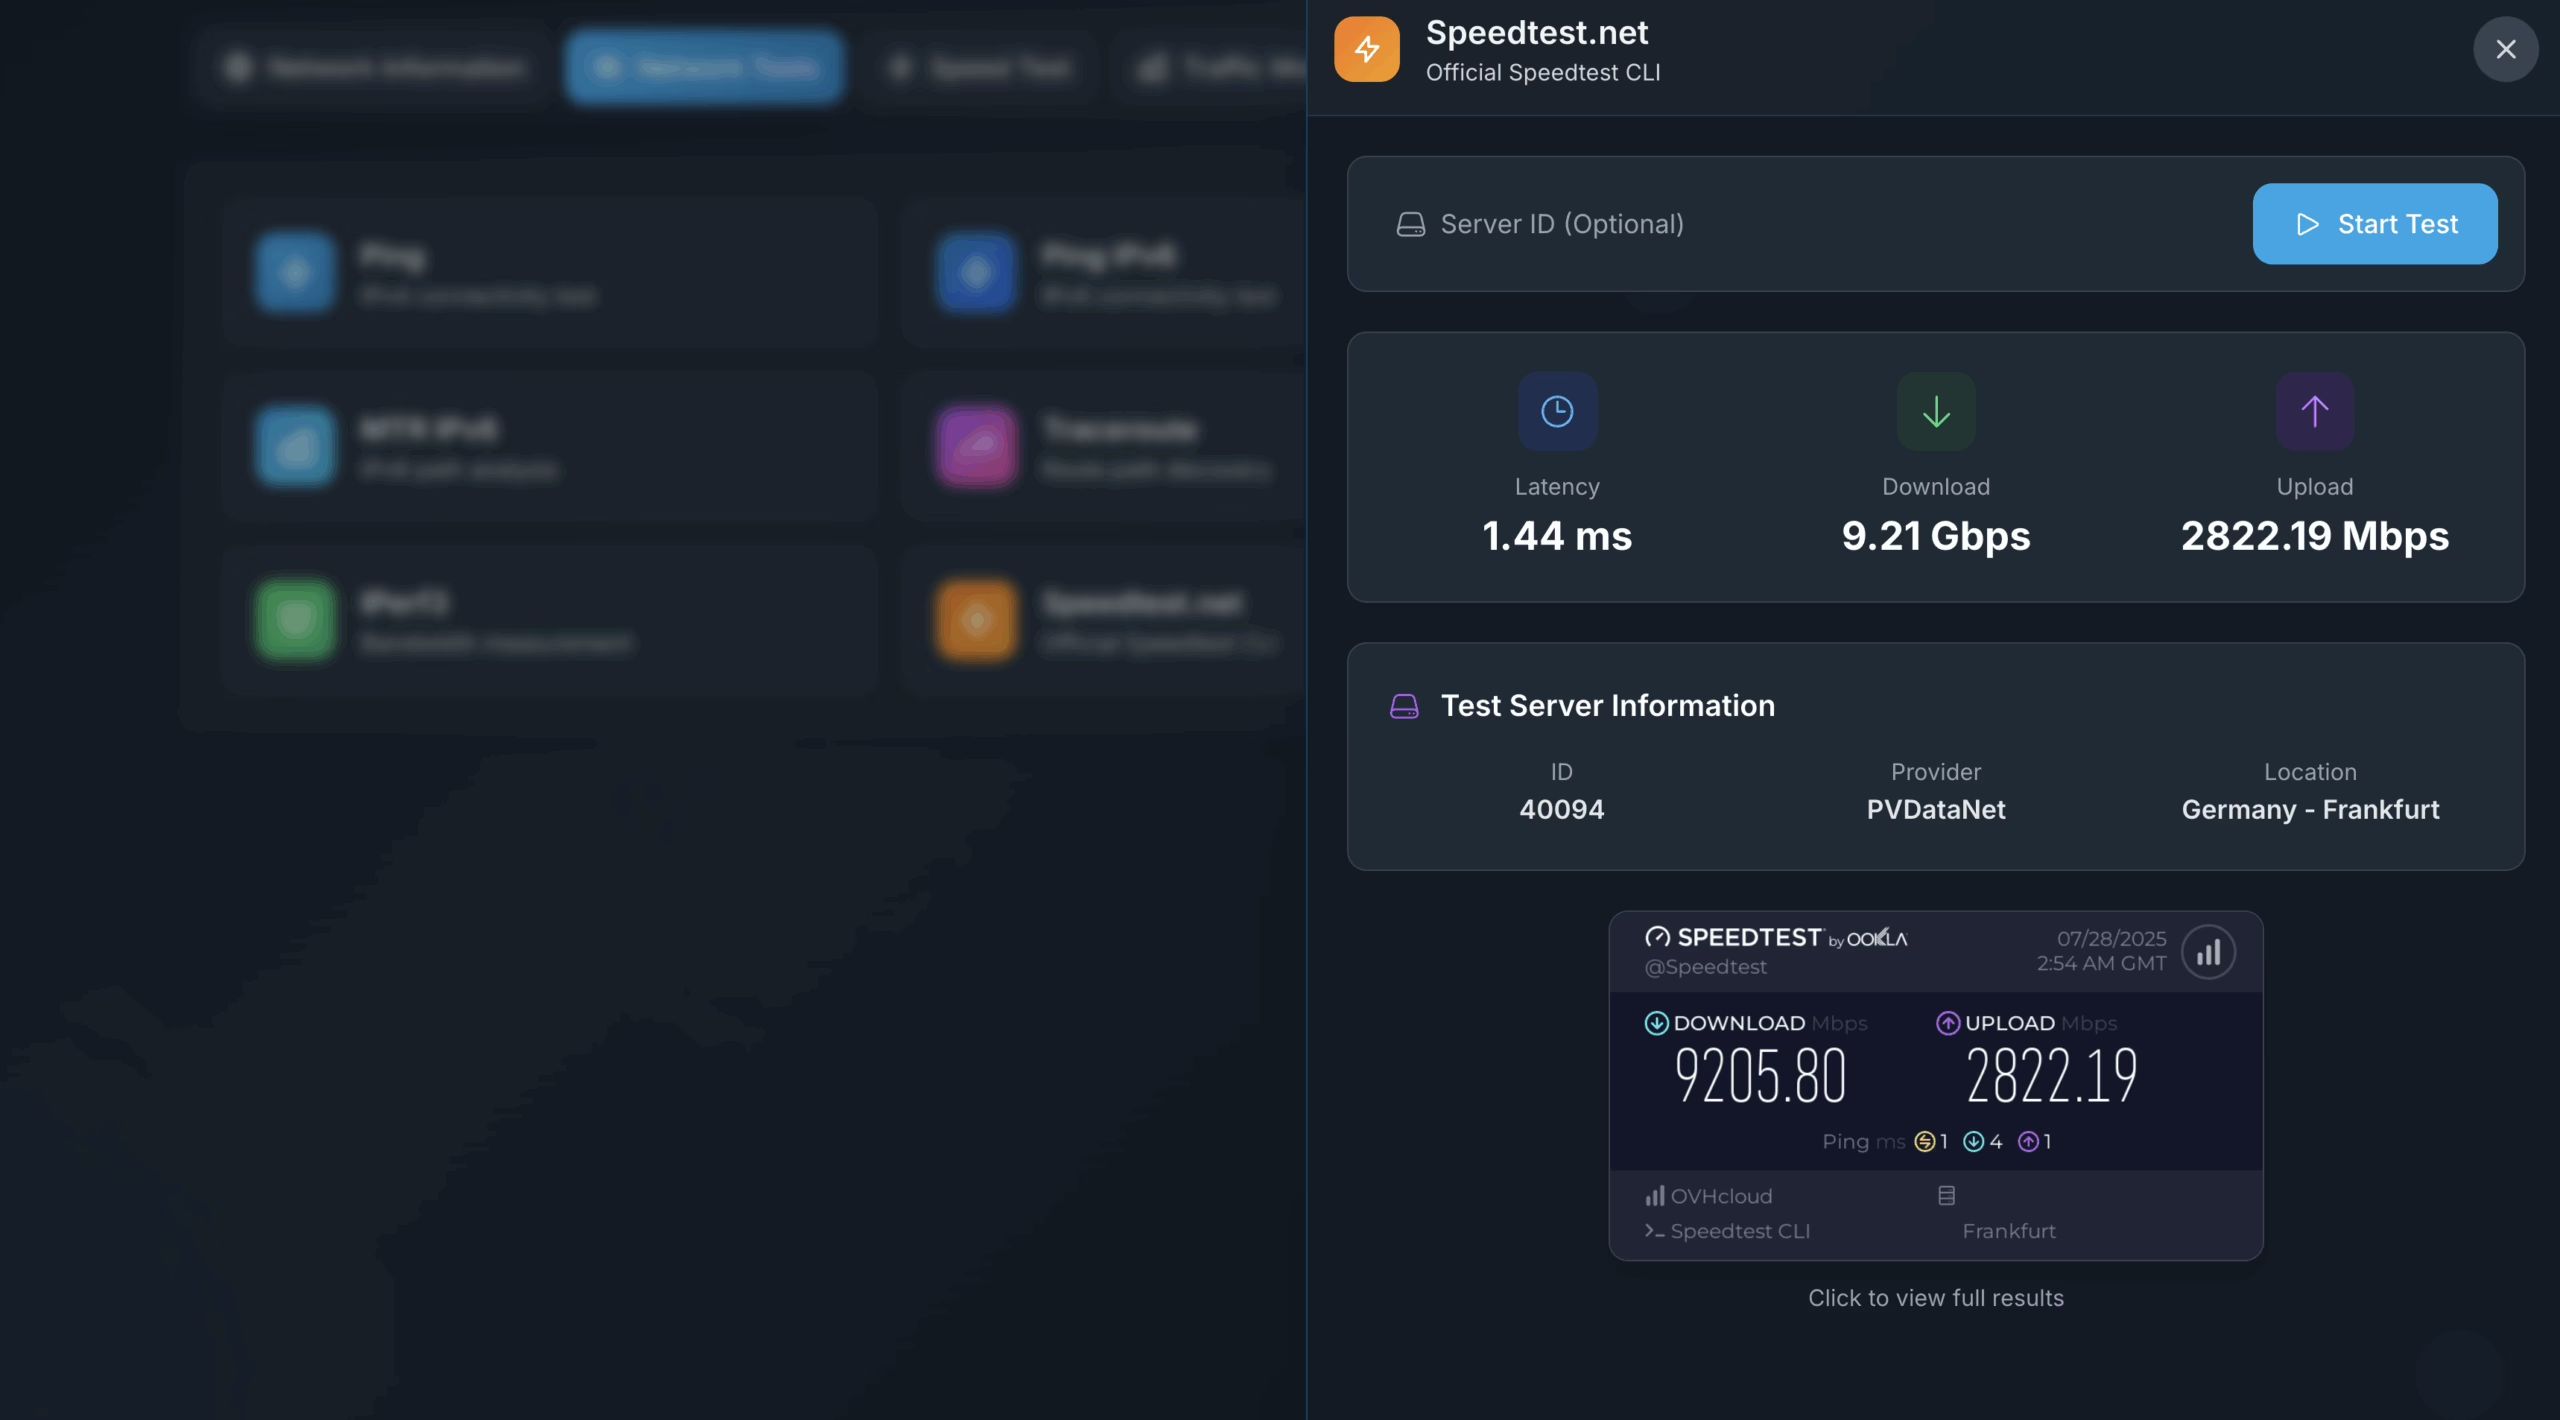
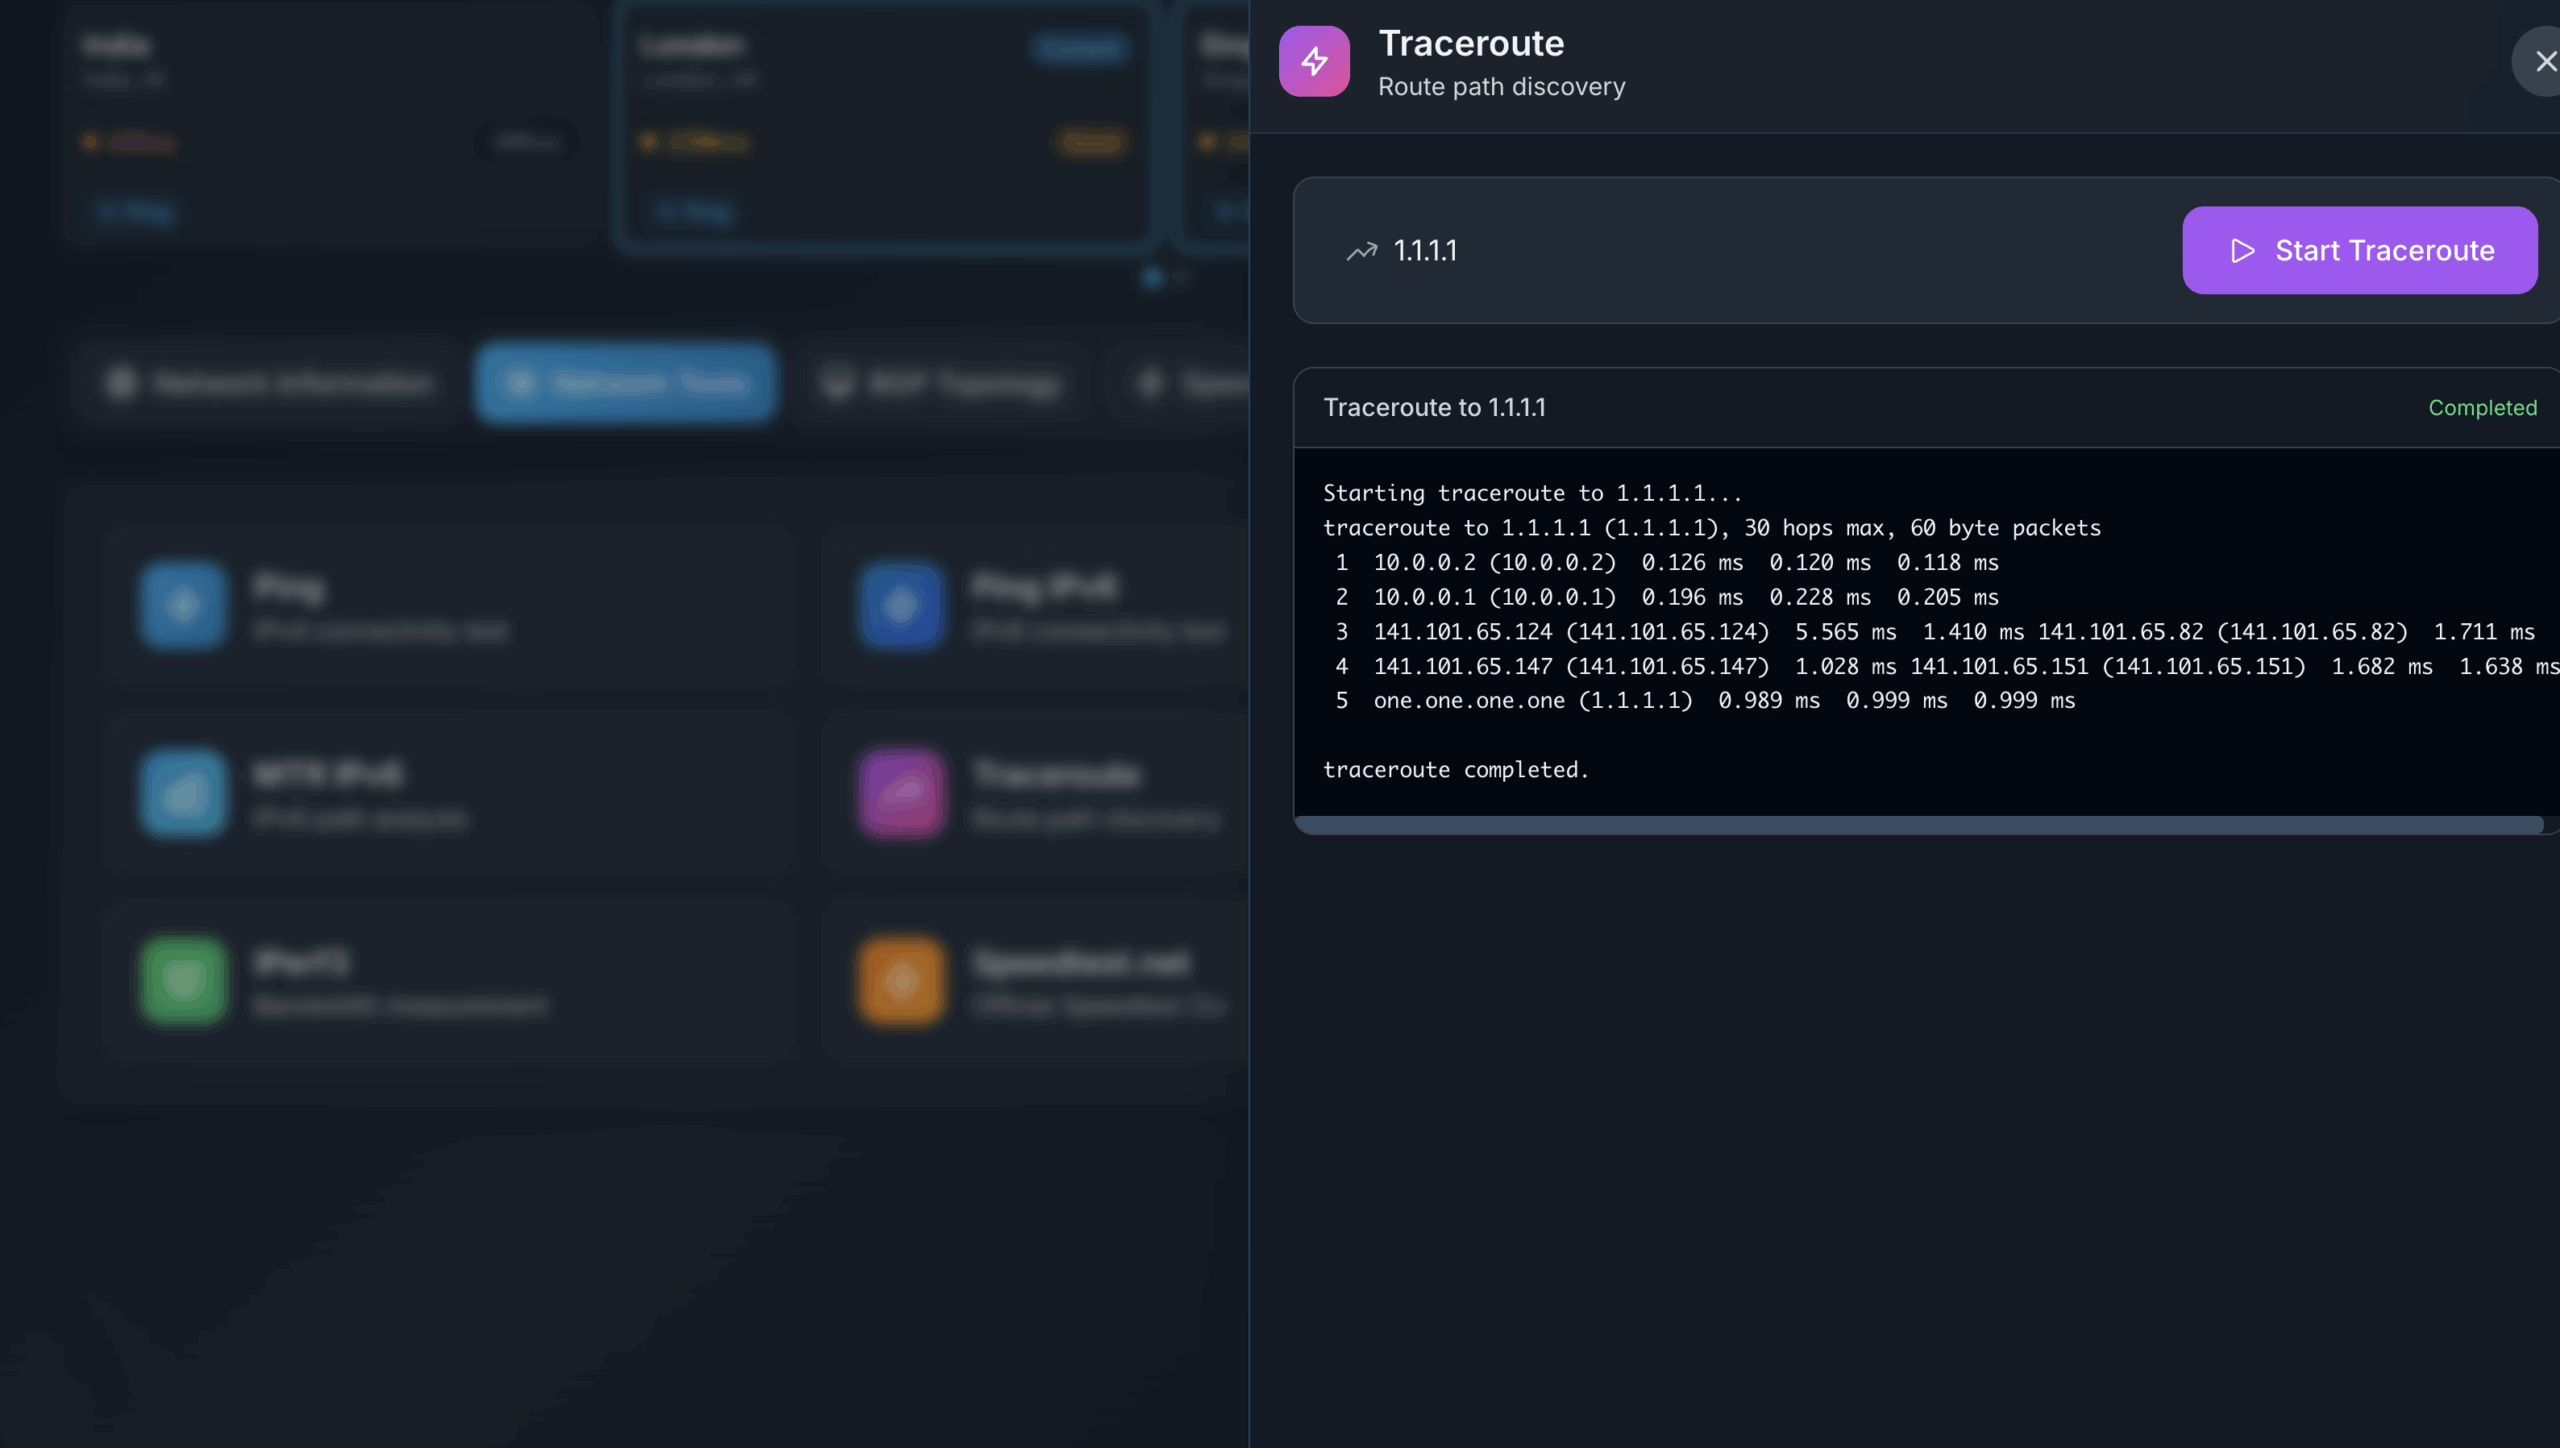
NetMirror is a feature-rich, visually appealing, modern Looking Glass server panel designed to display and test the status of multi-line network nodes. It supports common network diagnostic tools such as ping, traceroute, mtr, speedtest, etc., and can present nodes from multiple regions in a unified interface, making it easy for users to compare performance and reachability across different routes.
Official Demo
Open-source repo: https://github.com/catcat-blog/NetMirror (stars are welcome!)
✨ Features
-
Modern UI: Responsive interface built with Vue 3 + TailwindCSS.
-
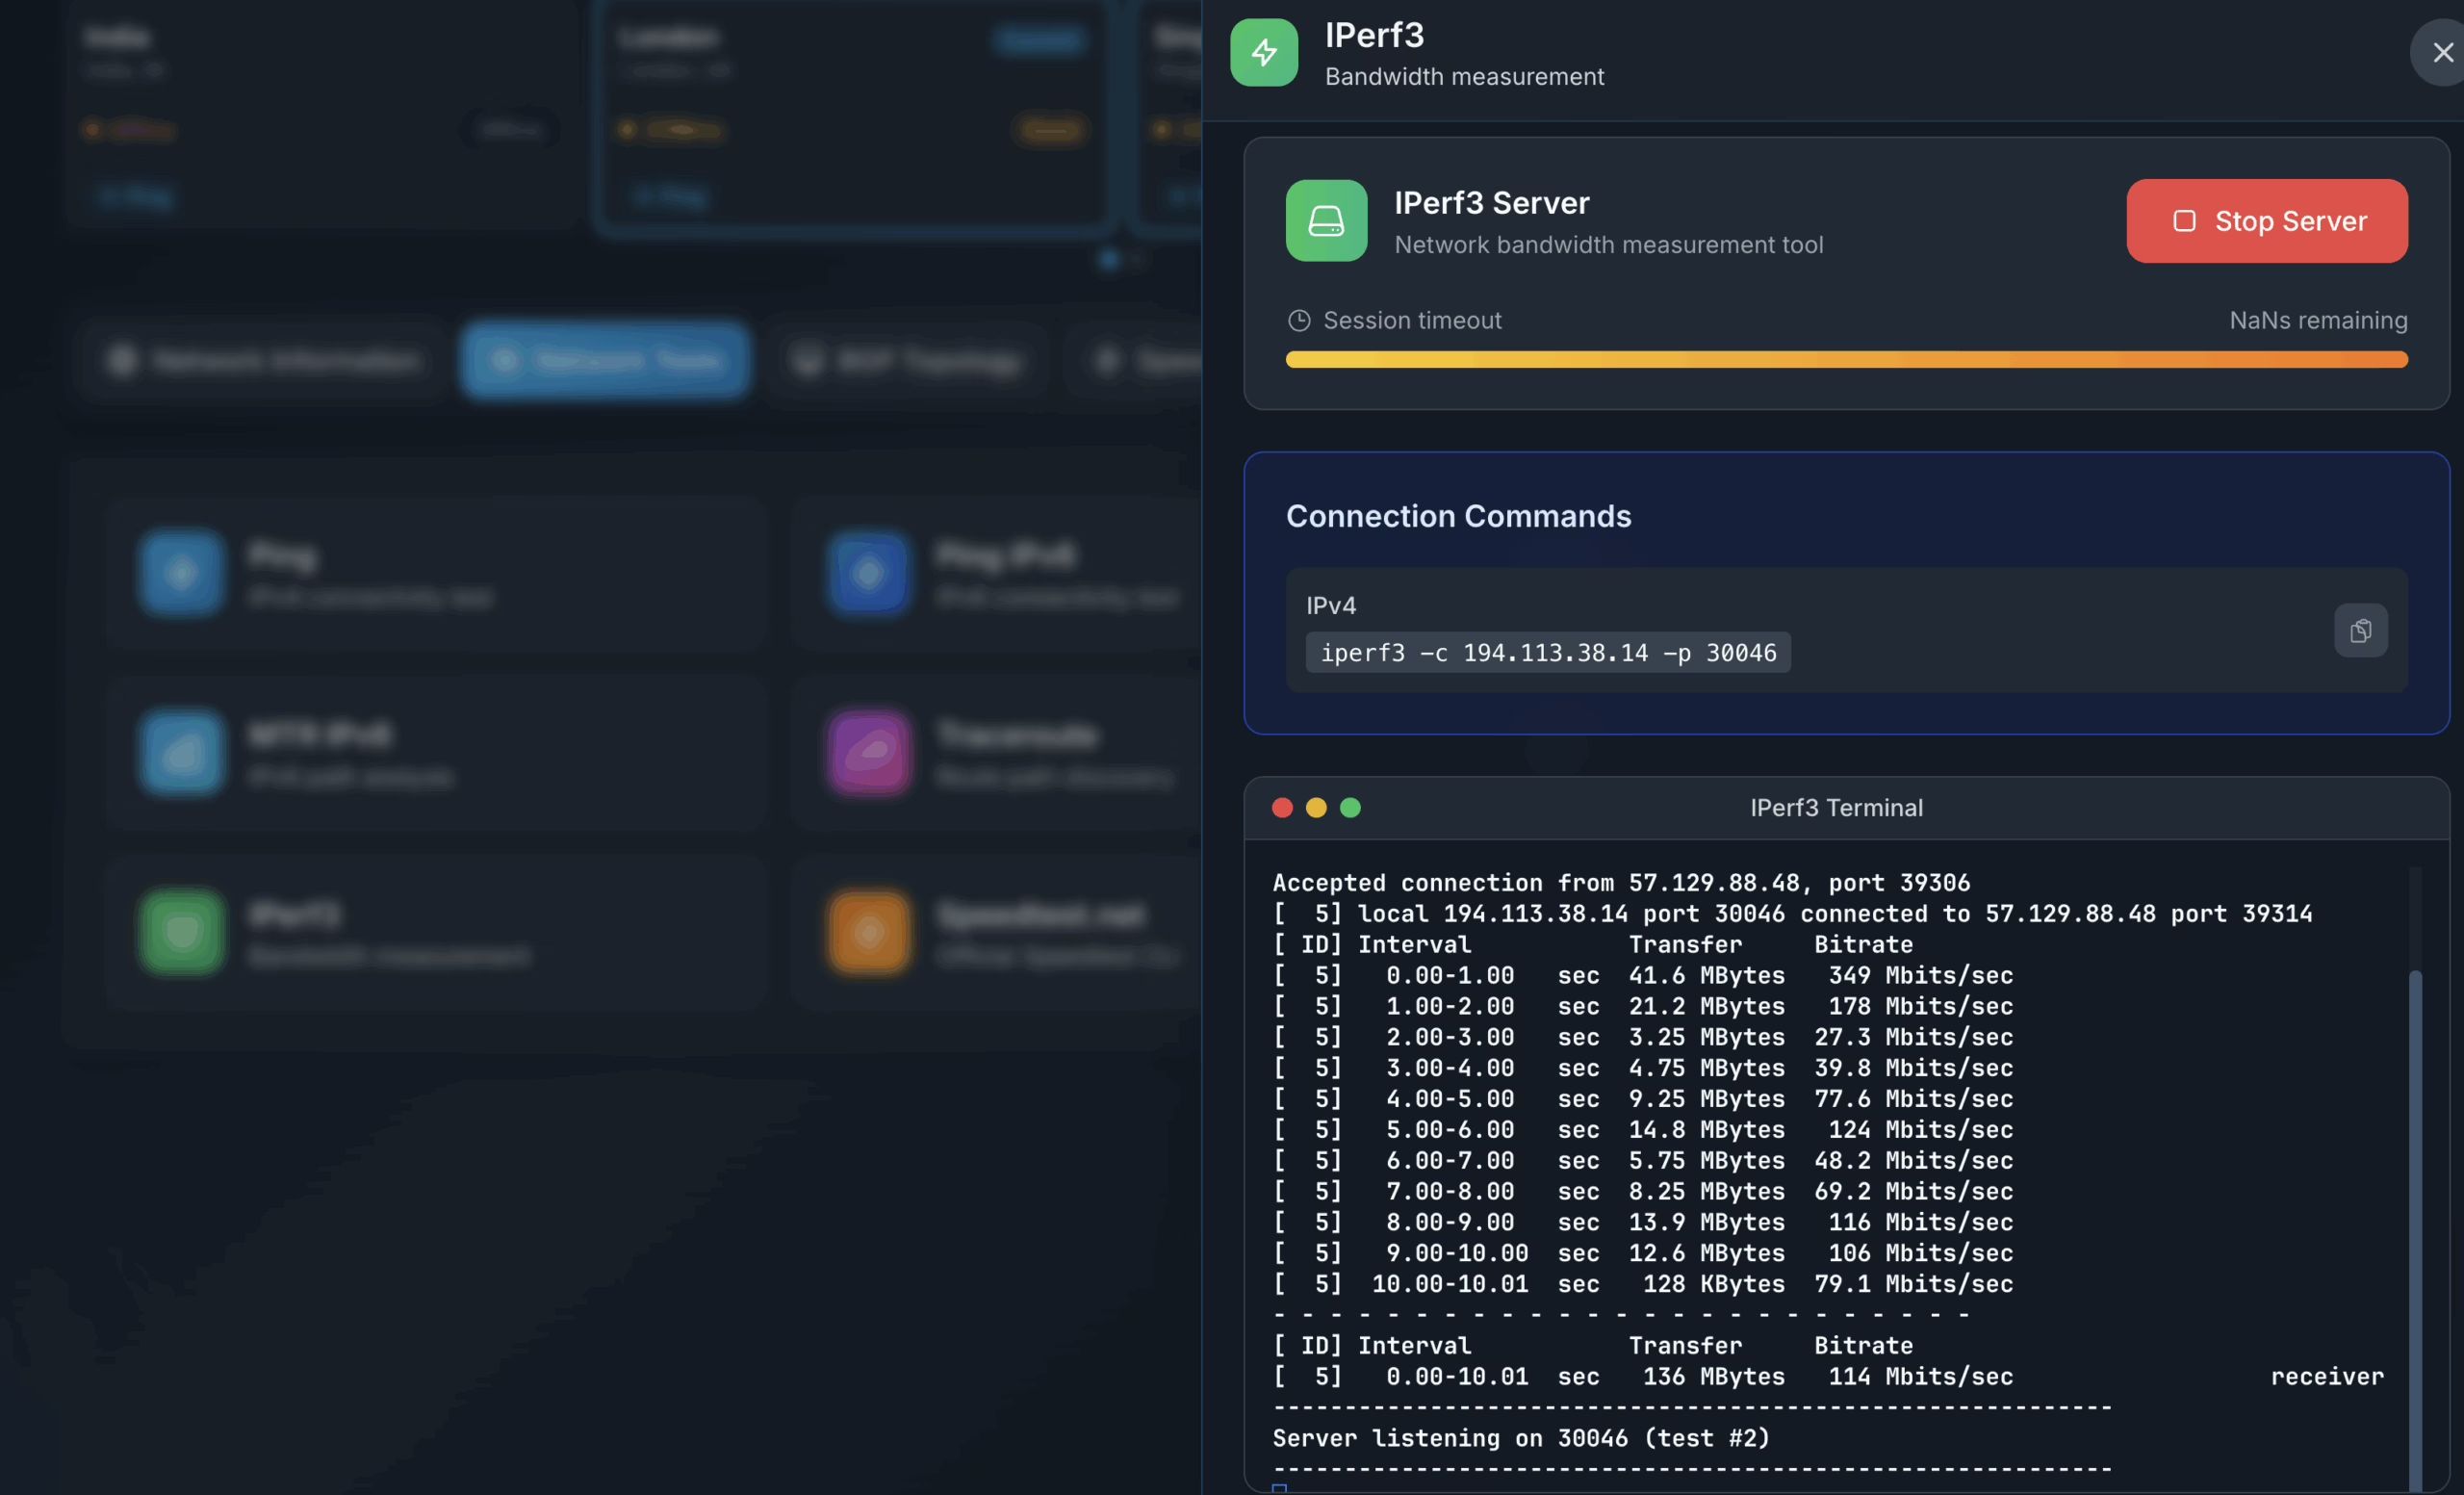
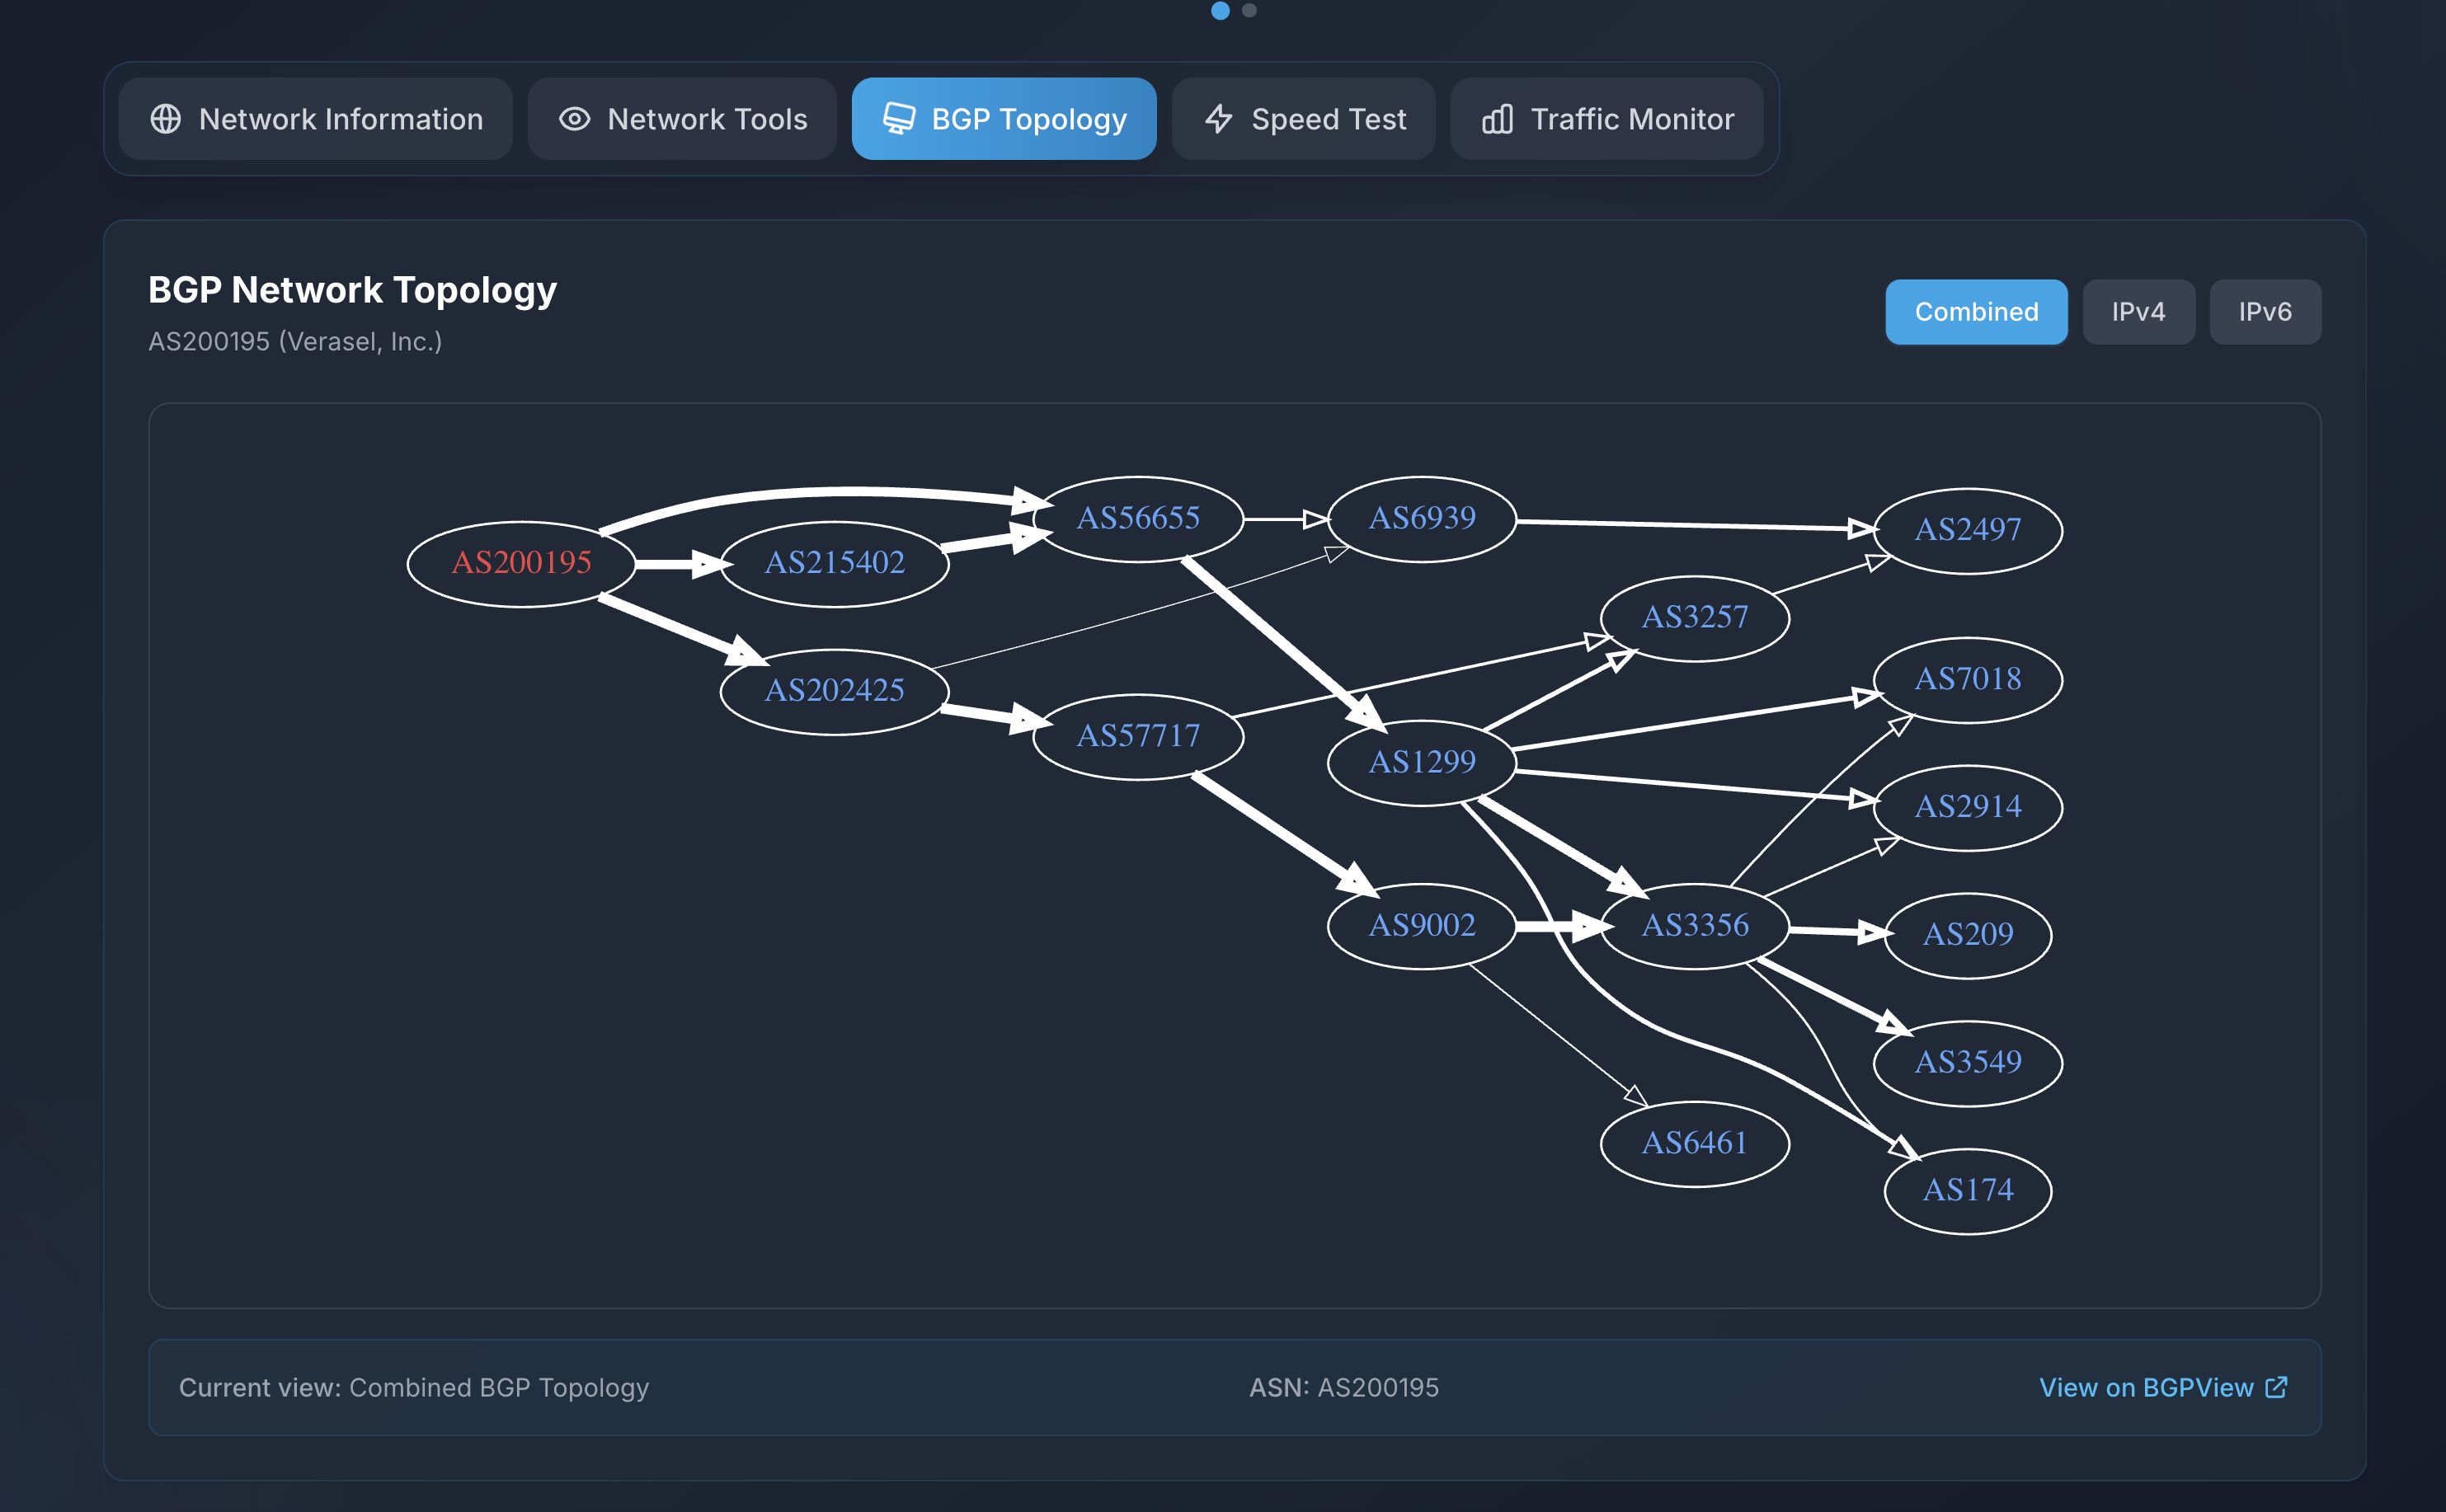
Network tools: Integrated suite including Ping, iPerf3, Speedtest, BGP endpoints, and more.
-
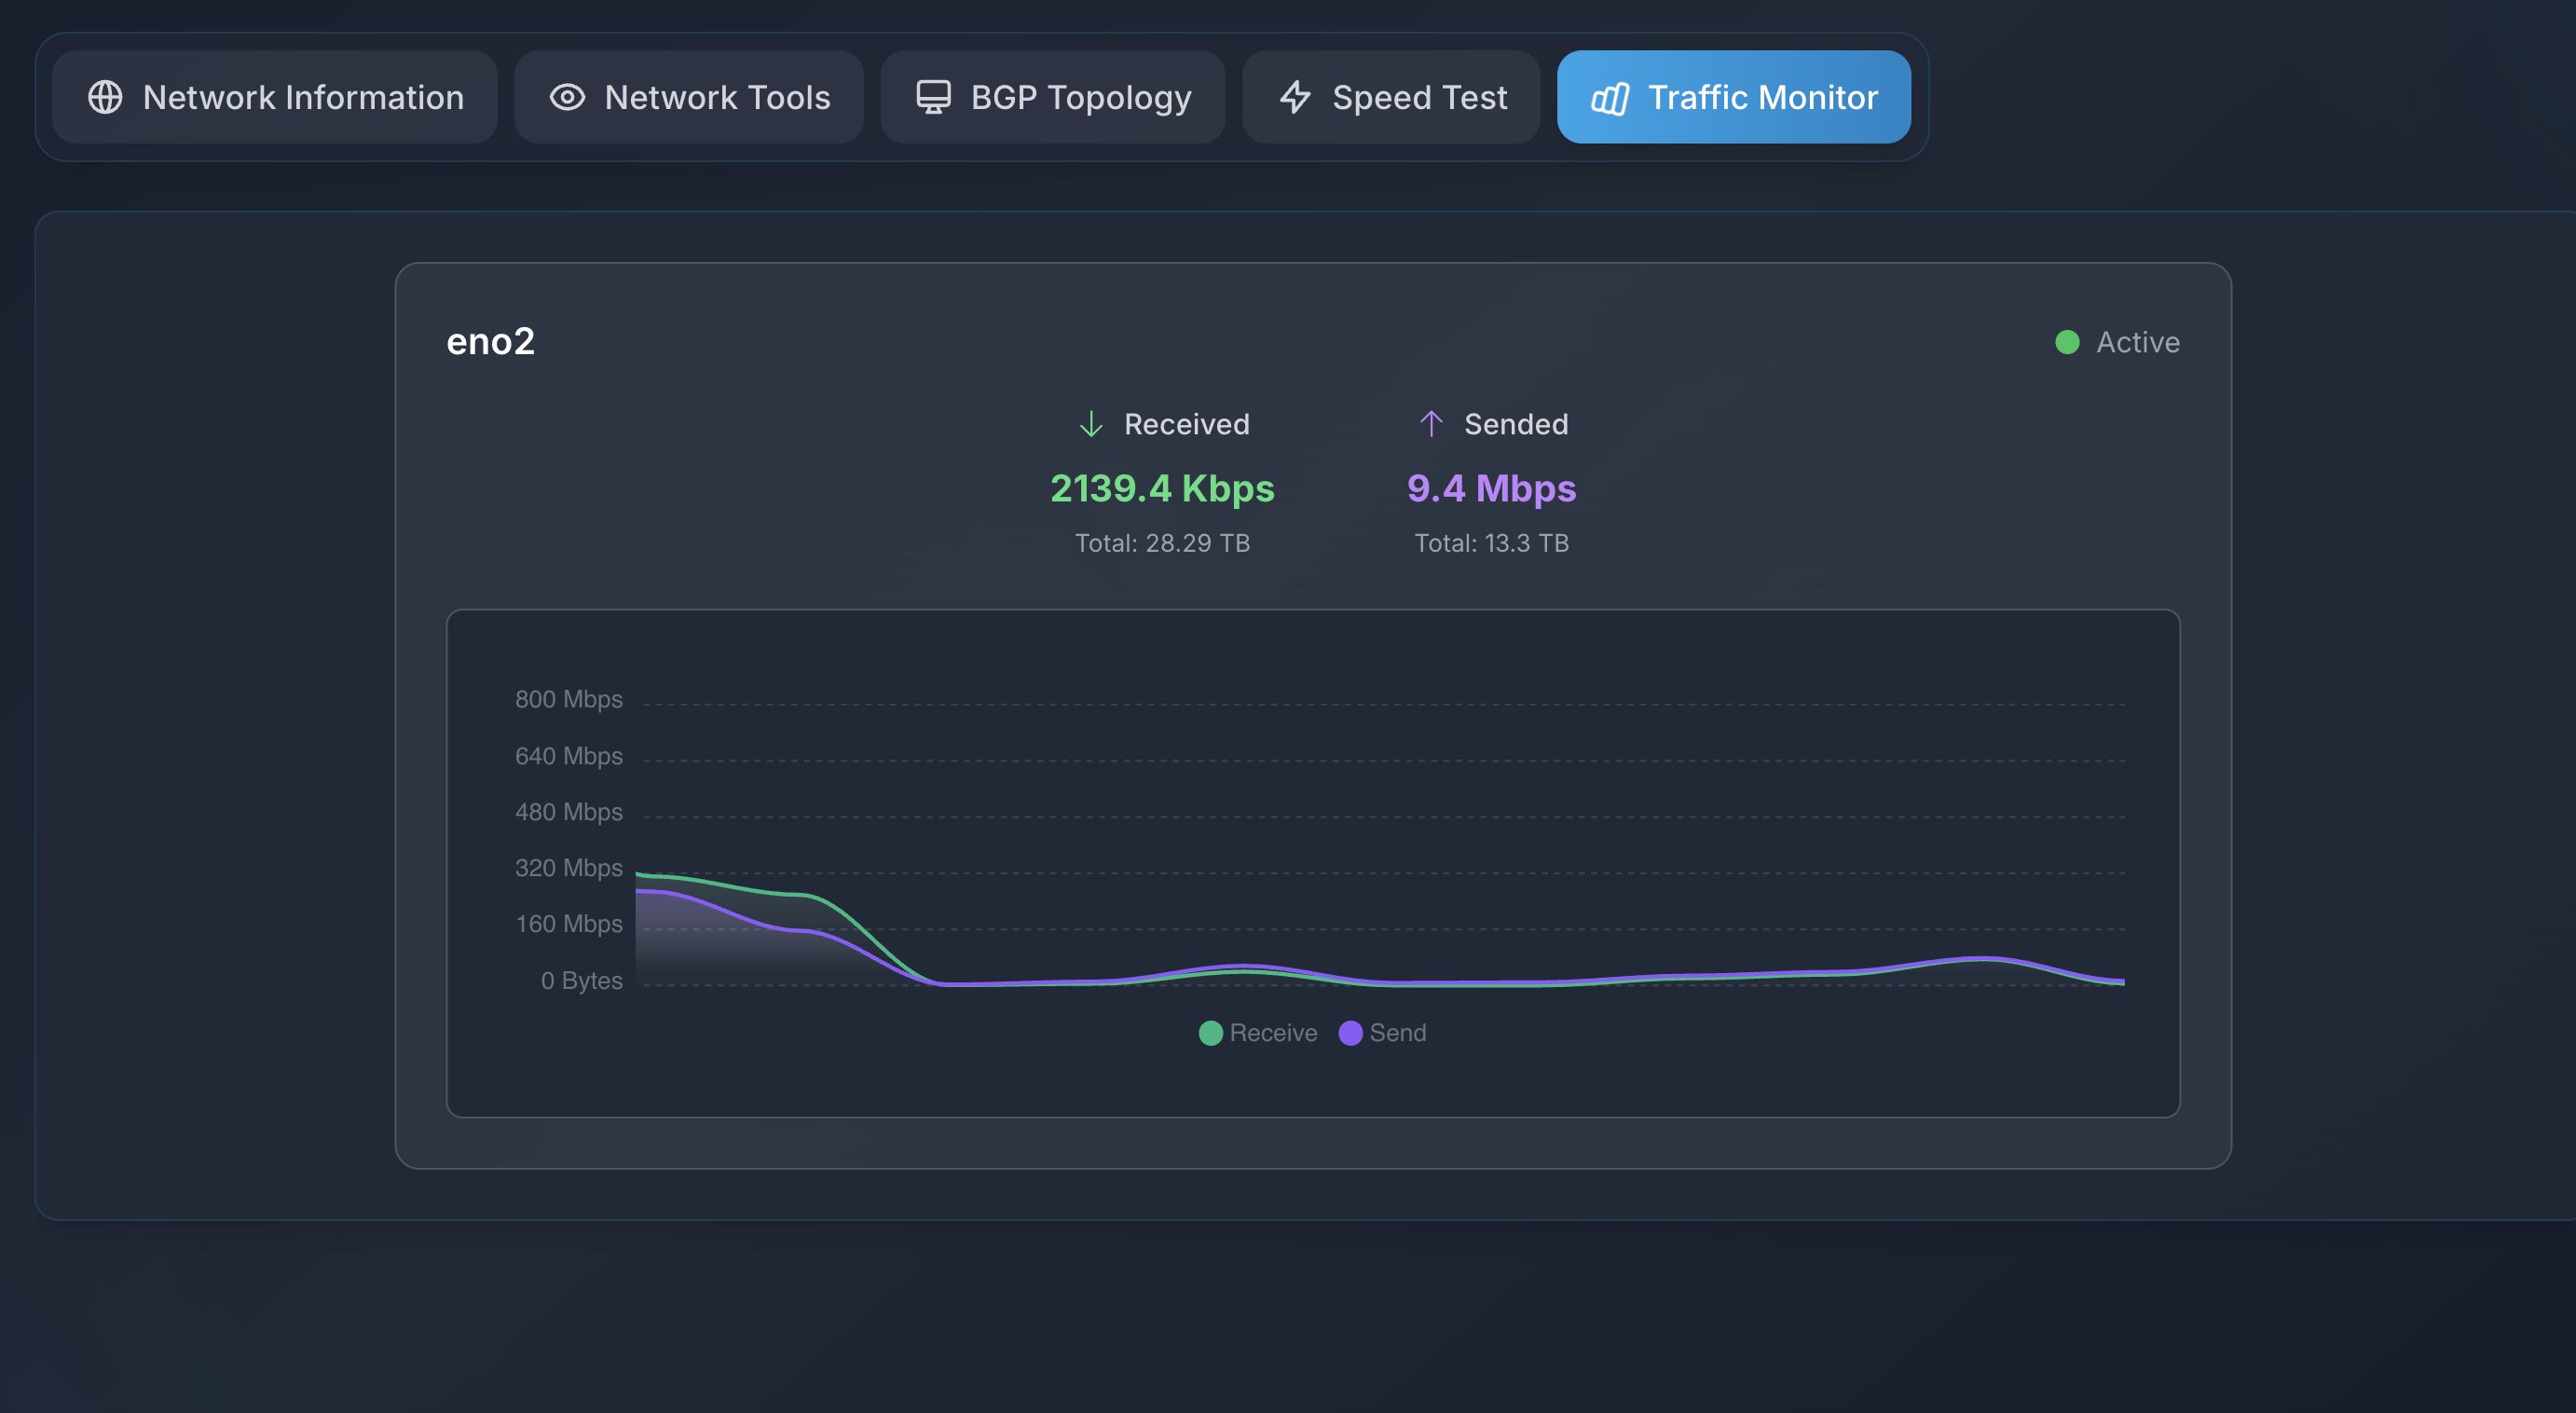
Real-time traffic: Live monitoring of network interface traffic.
-
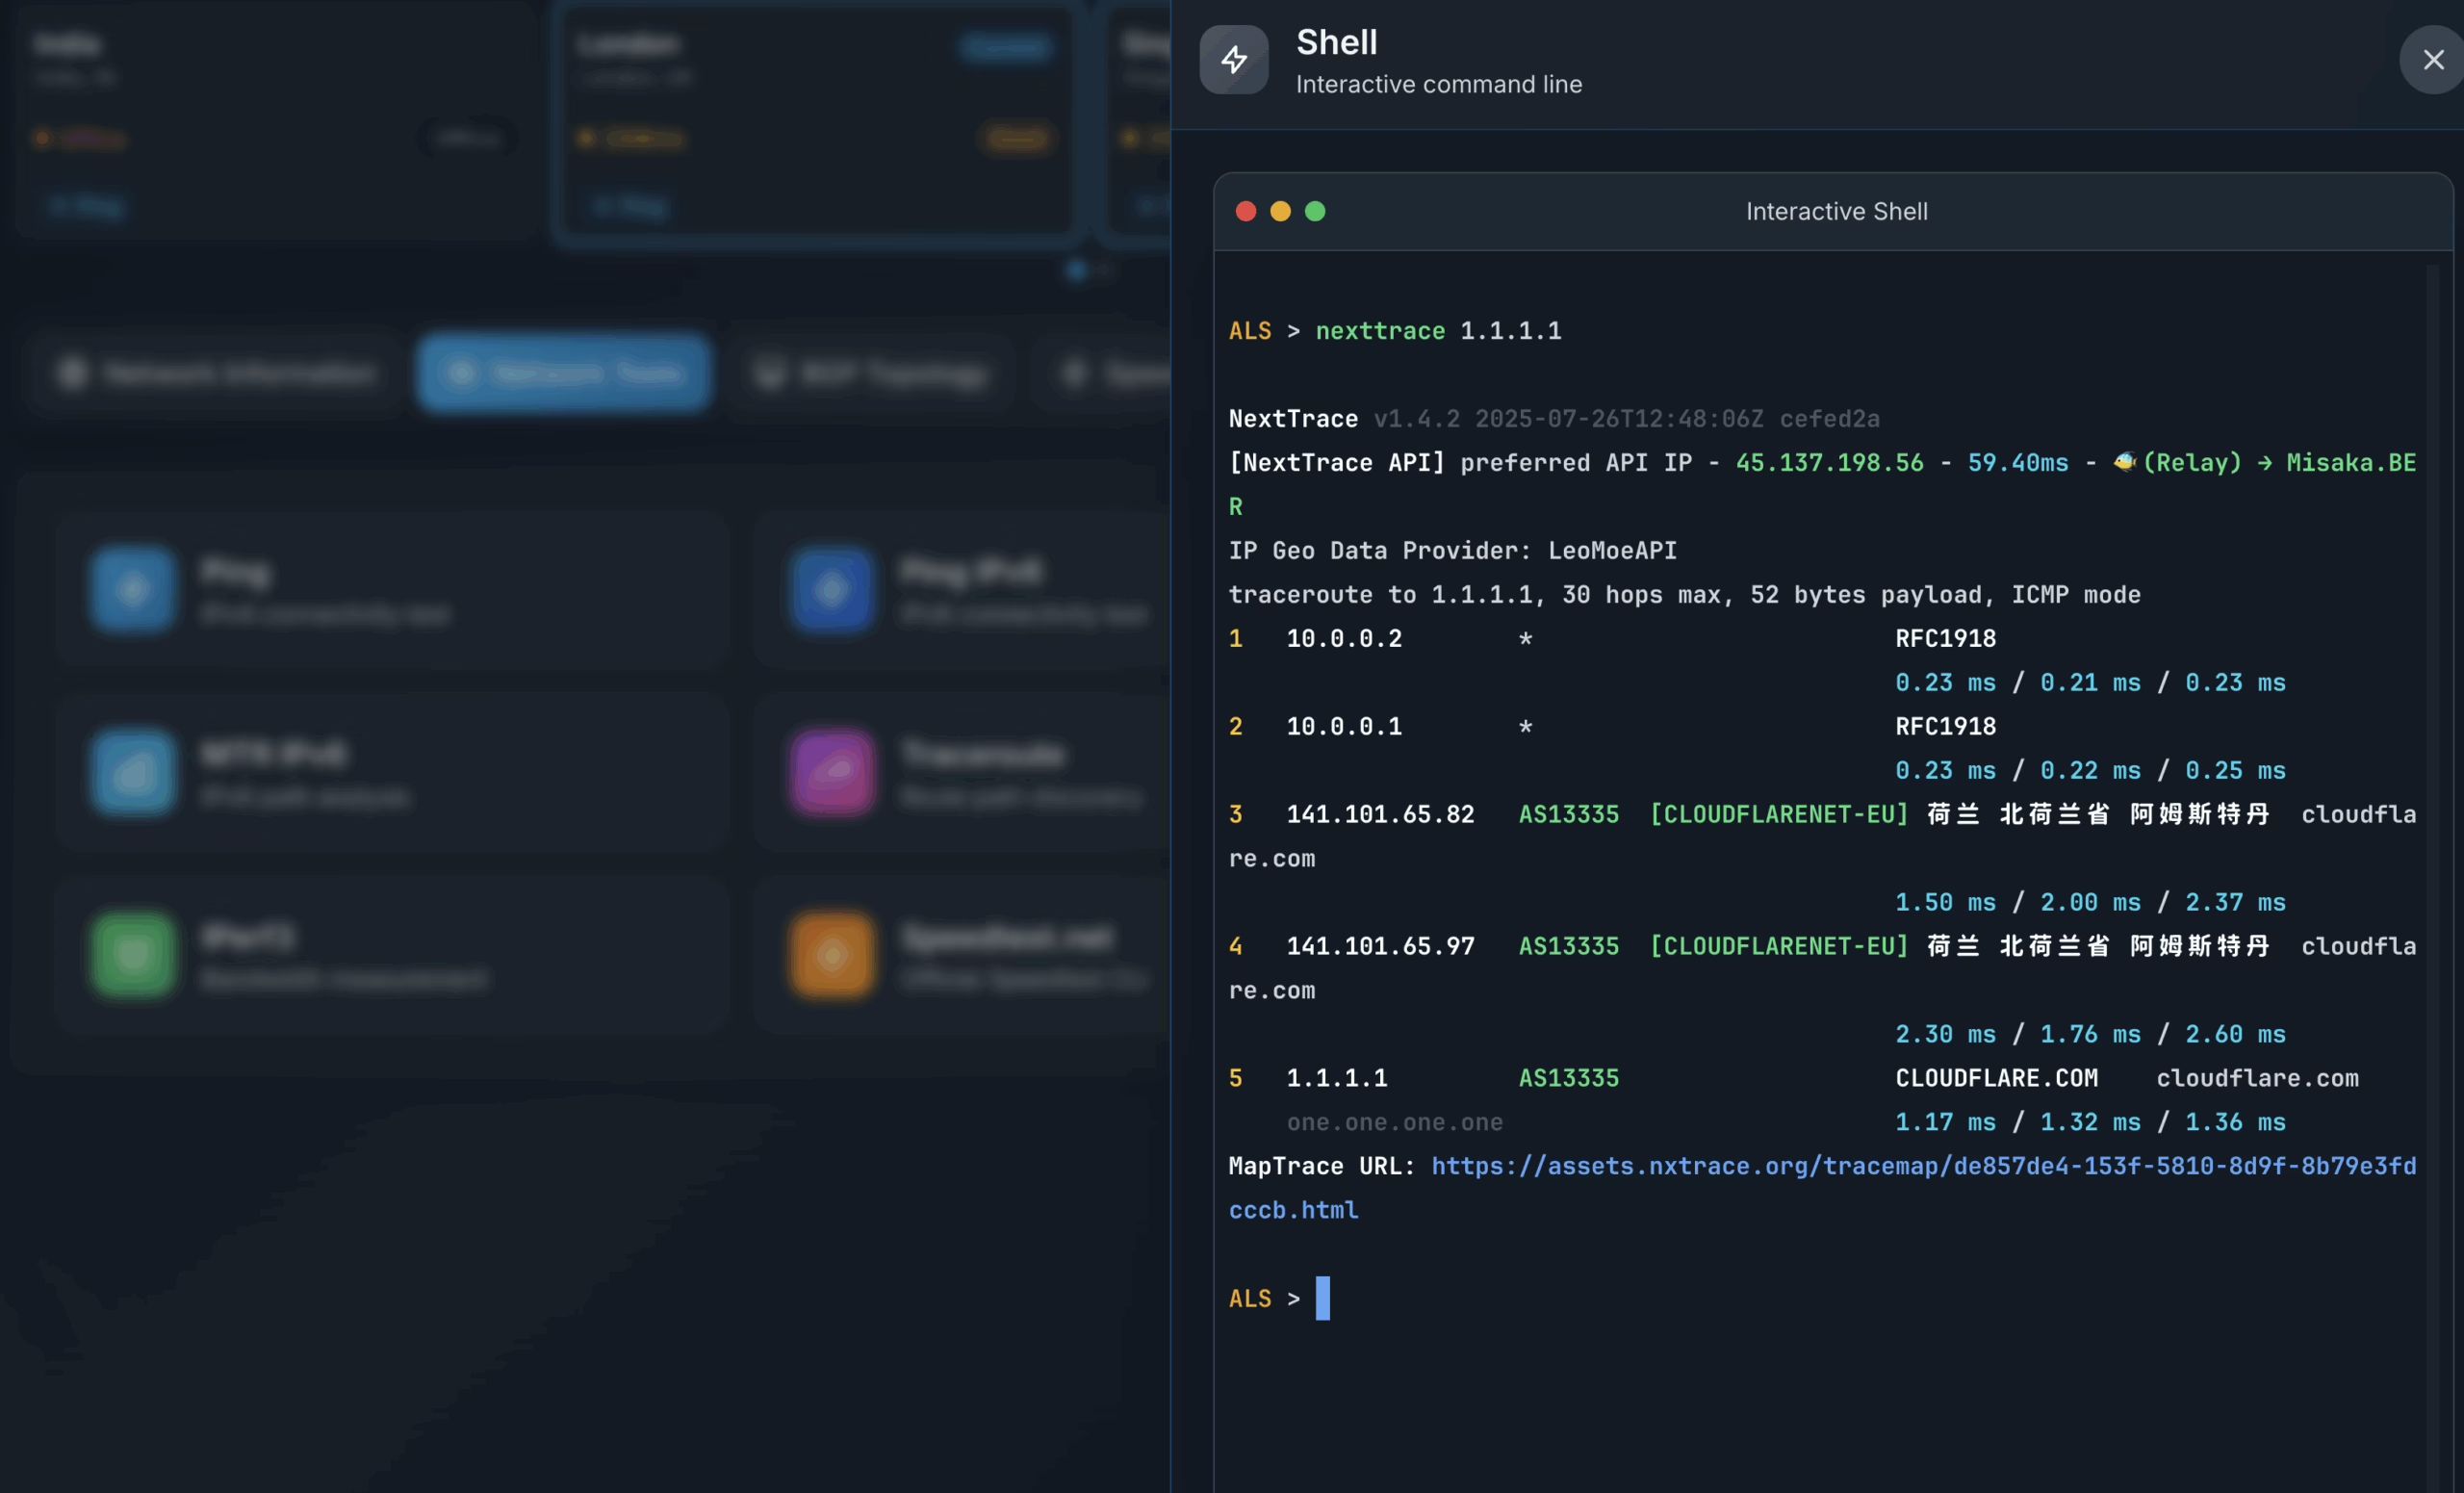
Interactive shell: Simulated shell environment for basic diagnostics.
-
Easy deployment: Distributed as a single Docker container.
-
Customizable: Configure features and server details via environment variables.
-
Multi-node support: For providers with many regions, a module for master/secondary region switching is also included.
-
Security-focused design: Only the panel and related APIs are exposed; nodes communicate securely via gRPC.
🧪 Why NetMirror?
If you want to provide network test services for your VPS, or showcase network quality across multiple regions, NetMirror is a lightweight yet complete option. You no longer need to maintain legacy PHP projects or wrestle with front-end/back-end integration — we’ve packaged everything for you.
📸 UI Preview
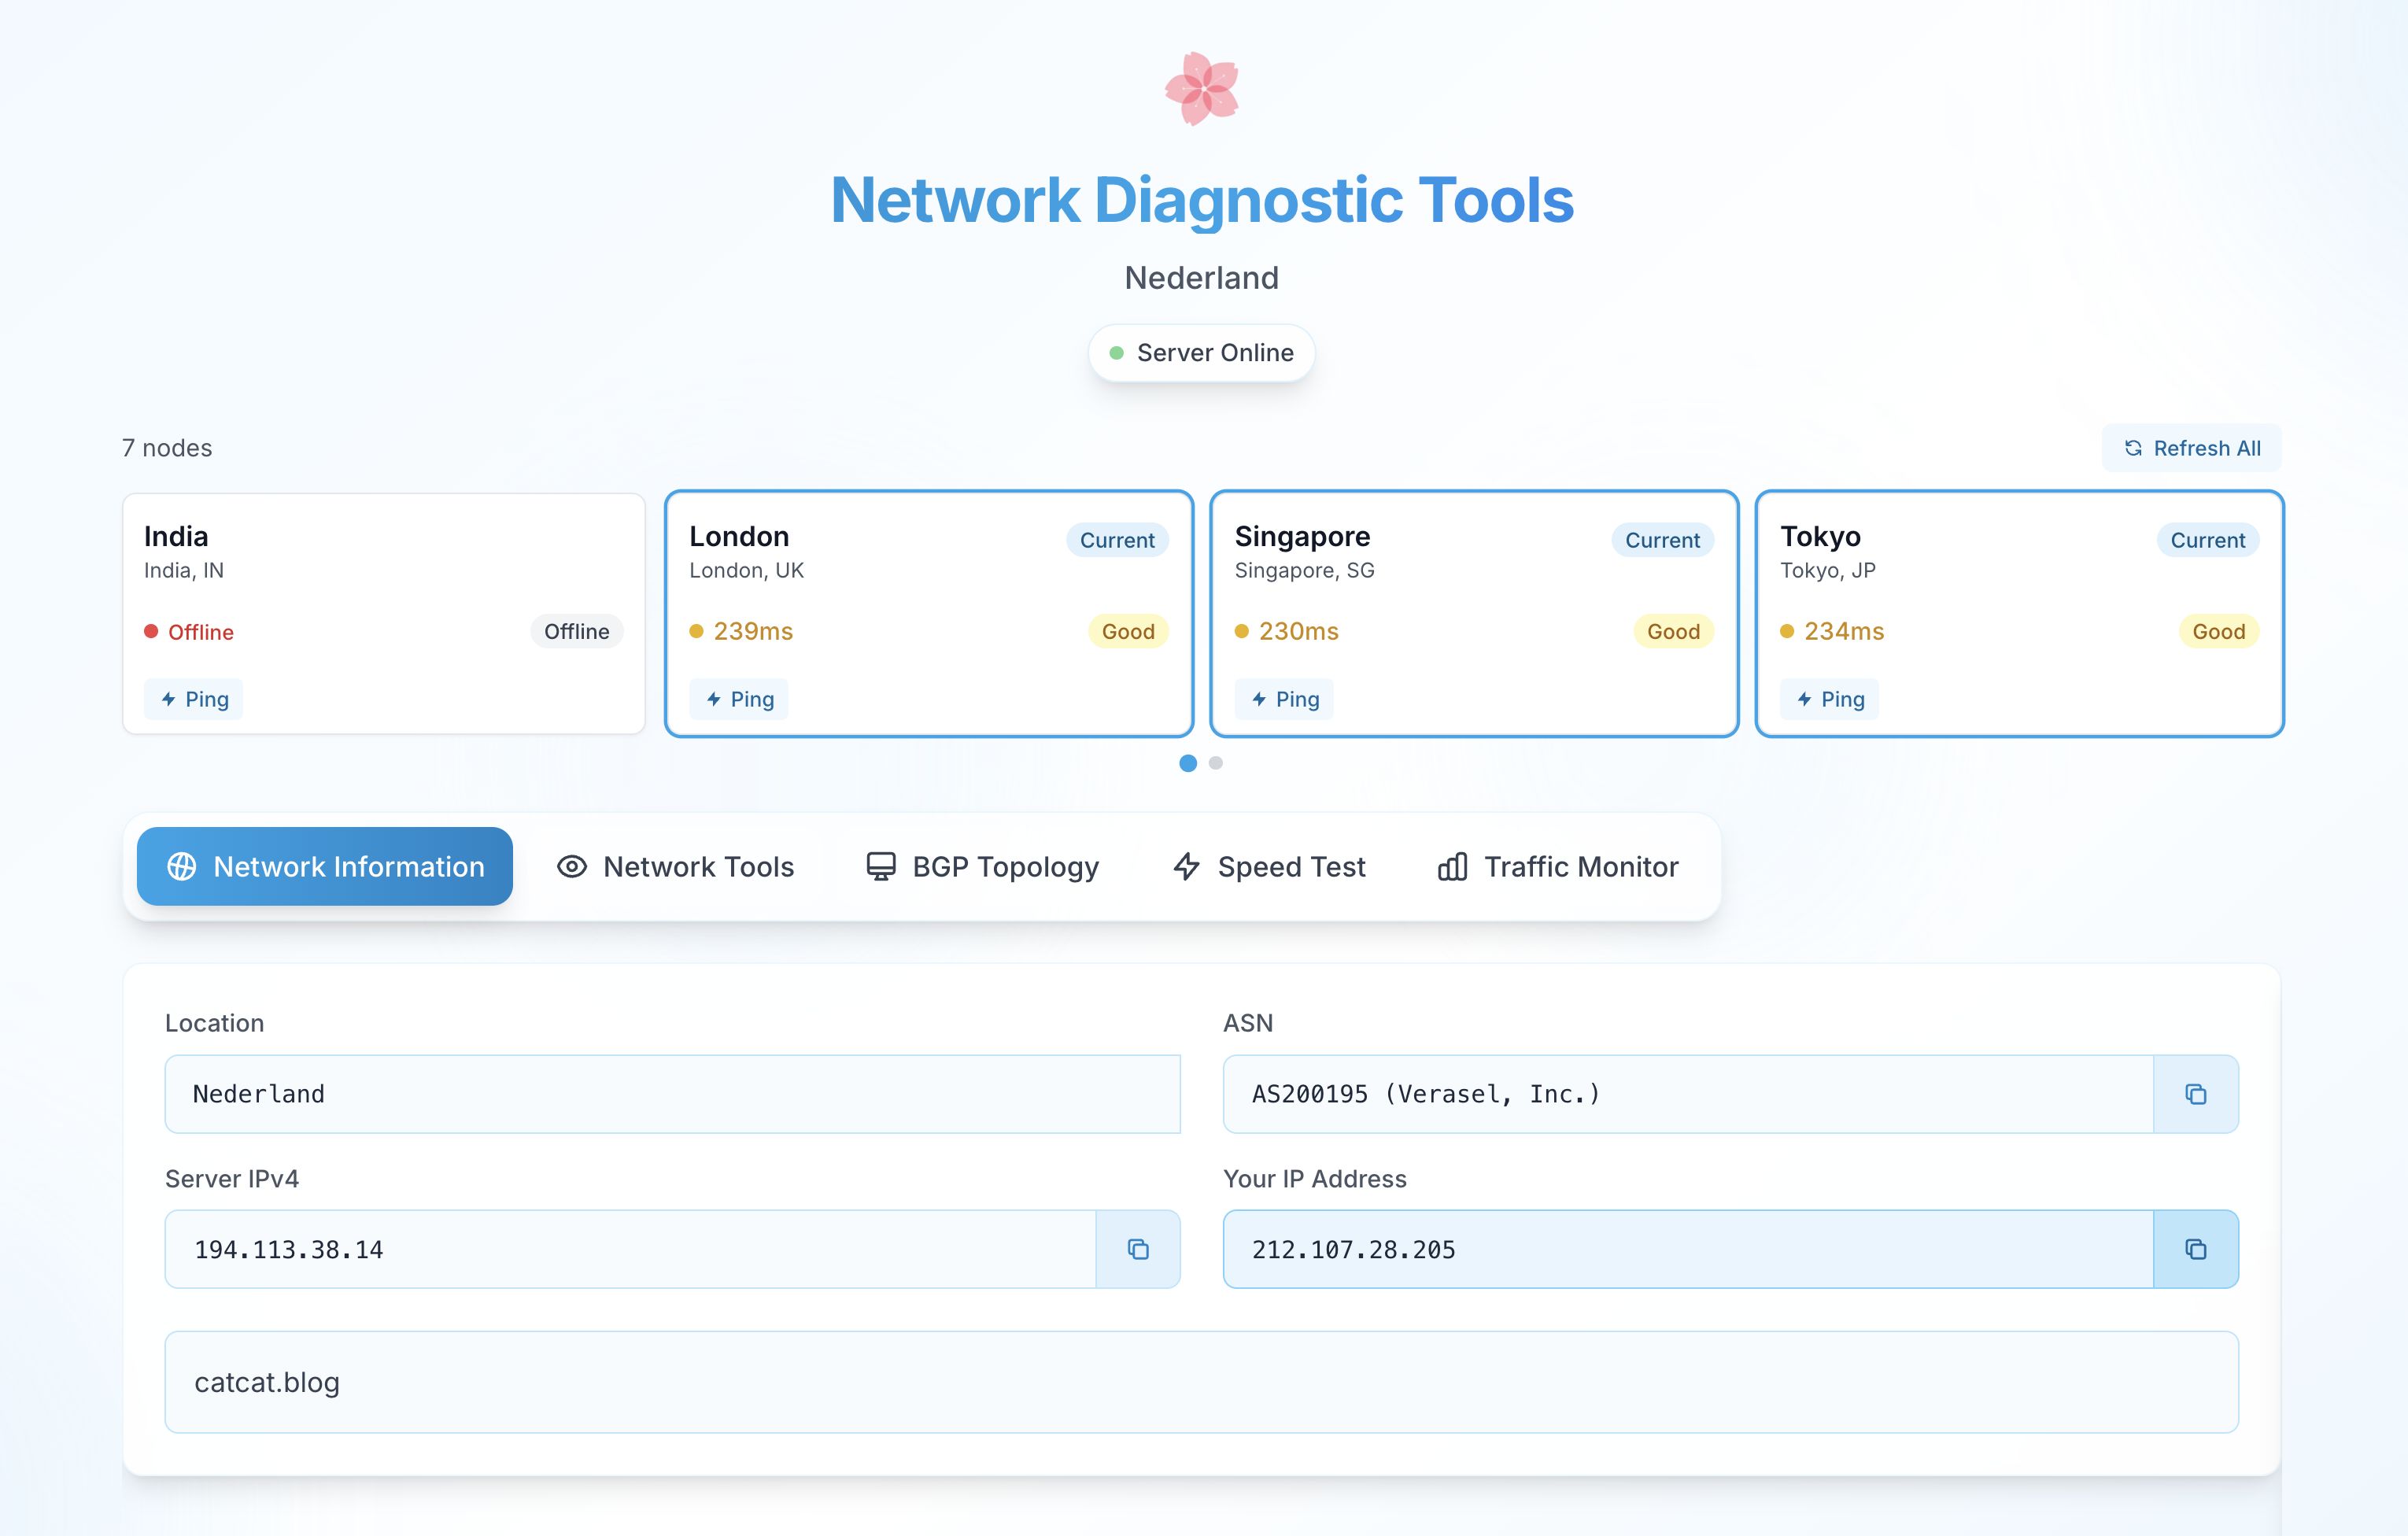


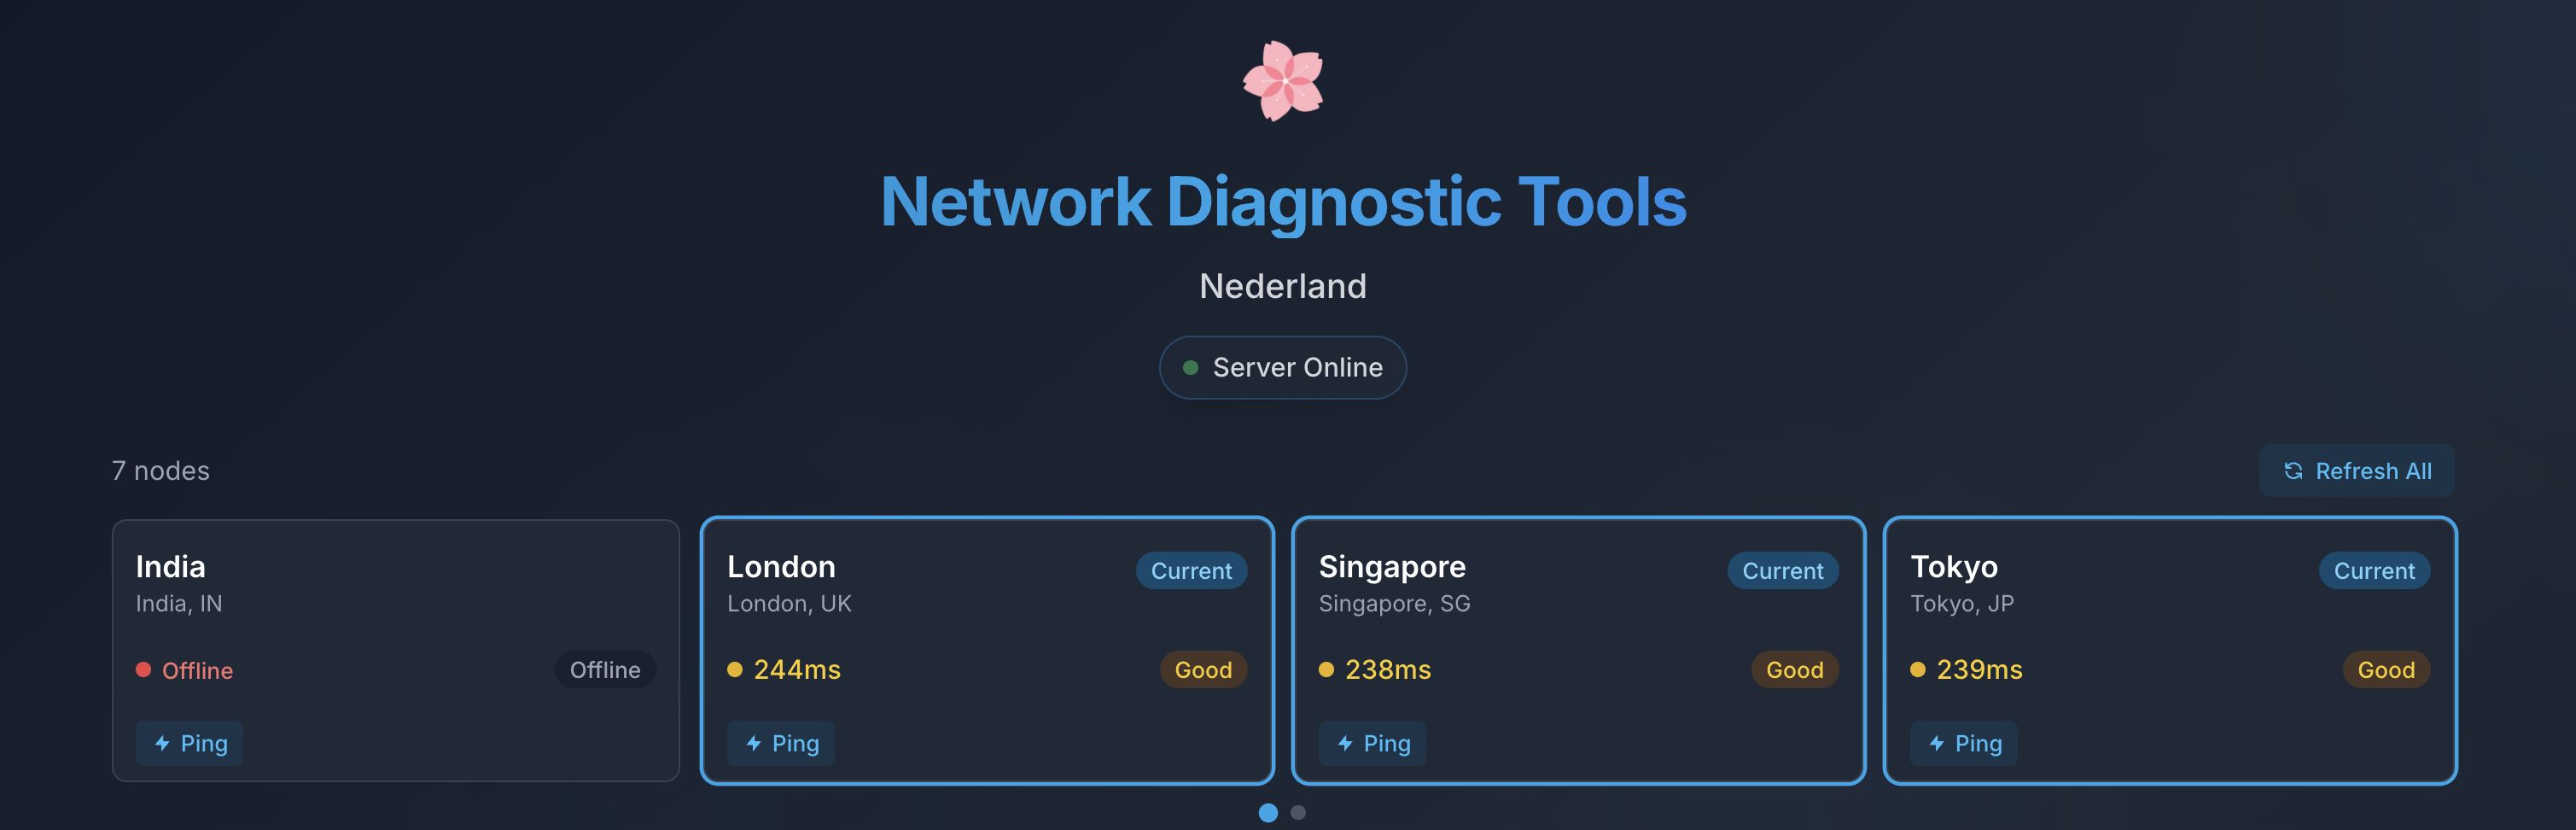
Here you can define multiple data centers and quickly jump to the LG of other regions.
Deployment
Docker Deployment
Clone the repo
git clone https://github.com/Yuri-NagaSaki/NetMirror.git cd NetMirrorCreate the environment file
Copy the example env file to create your own configuration.
cp .env.example .envNote: If the .env.example file does not exist, you can create an empty .env file and add the variables you need from the table below.
Customize your configuration (optional)
Edit the .env file to set your server location, public IP address, and other options.
Start the service:
services: als: image: soyorins/netmirror:latest container_name: looking-glass-e restart: always network_mode: host user: root env_file: - .env volumes: - ./data:/data - ./.air.toml:/app/.air.toml healthcheck: test: ["CMD", "wget", "--quiet", "--tries=1", "--spider", "http://localhost:${HTTP_PORT:-80}/"] interval: 30s timeout: 10s retries: 3 logging: driver: "json-file" options: max-size: "10m" max-file: "3"docker compose up -dThe app will be available at http://<your-server-ip>. The default port is 3000 and can be changed via the HTTP_PORT environment variable.
ENV configuration explained
# ALS - Another Looking-glass Server environment variables# Copy this file to .env and fill in the values you need.
# --- Network settings ---# IP address for the server to bind to. Leave empty to bind to all interfaces.LISTEN_IP=0.0.0.0# HTTP port to listen on.HTTP_PORT=3000
# --- Server information ---# String describing the server location.LOCATION=BGP# Public IPv4 address of the server. If empty, it will be auto-detected.PUBLIC_IPV4=# Public IPv6 address of the server. If empty, it will be auto-detected.PUBLIC_IPV6=
# --- Site branding ---# Logo settings, supports multiple formats:# 1. Image URL: LOGO=https://example.com/logo.png# 2. Base64 image: LOGO=data:image/png;base64,iVBORw0K...# 3. Emoji: LOGO=🌐# 4. Plain text: LOGO=NetMirror# 5. SVG markup: LOGO=<svg viewBox="0 0 24 24">...</svg>
# Example: use a network icon SVGLOGO=<svg viewBox="0 0 24 24" fill="none" stroke="currentColor" stroke-width="2"><circle cx="12" cy="12" r="2"/><path d="m16.24 7.76-1.41 1.41M15.76 16.24l1.41 1.41M7.76 16.24l1.41-1.41M7.76 7.76l1.41 1.41M12 3v6M12 15v6M3 12h6M15 12h6"/></svg>
# Logo type (optional, leave empty for auto-detection)# Supported values: auto, url, base64, emoji, text, svgLOGO_TYPE=auto
# Other examples (uncomment to test):# Use emoji: LOGO=🌐# Use text: LOGO=NetMirror# Use a simple SVG icon: LOGO=<svg viewBox="0 0 24 24" fill="currentColor"><path d="M12 2L2 7v10c0 5.55 3.84 9.95 9 11 5.16-1.05 9-5.45 9-11V7l-10-5z"/></svg>
# --- Feature toggles ---# Set to 'true' or 'false' to enable/disable features.# Display real-time NIC traffic charts.DISPLAY_TRAFFIC=true# Enable LibreSpeed (HTML5) speed test.ENABLE_SPEEDTEST=true# Enable Ping tool.UTILITIES_PING=true# Enable MTR tool.UTILITIES_MTR=true# Enable Traceroute tool.UTILITIES_TRACEROUTE=true# Enable Speedtest.net CLI integration.UTILITIES_SPEEDTESTDOTNET=true# Enable interactive fake shell.UTILITIES_FAKESHELL=true# Enable iPerf3 server tool.UTILITIES_IPERF3=true
# --- Feature configuration ---# File size list for download speed tests, space-separated.# Example: "10MB 100MB 1GB"SPEEDTEST_FILE_LIST=100MB 1GB 10GB# iPerf3 server port range - start.UTILITIES_IPERF3_PORT_MIN=30000# iPerf3 server port range - end.UTILITIES_IPERF3_PORT_MAX=31000
# --- Custom content ---# Display sponsor information. Supports multiple formats:# 1. Local file path:# - Markdown file: SPONSOR_MESSAGE=/data/sponsor.md# - HTML file: SPONSOR_MESSAGE=/data/sponsor.html# 2. Remote URL:# - Markdown link: SPONSOR_MESSAGE=https://example.com/sponsor.md (content will be downloaded)# - HTML page: SPONSOR_MESSAGE=https://example.com/sponsor.html (embedded via iframe)# 3. Direct content:# - Plain text: SPONSOR_MESSAGE="Thanks for using our service"# - HTML code: SPONSOR_MESSAGE="<div><h2>Sponsor Us</h2><p>Content...</p></div>"# - Markdown text: SPONSOR_MESSAGE="## Title\n**Bold** content"
# Test with the sample Markdown/HTML file under the data directorySPONSOR_MESSAGE=data/sponsor-iframe-example.html
# Try other formats (uncomment to test):# Use HTML iframe page# SPONSOR_MESSAGE=/data/sponsor-iframe-example.html# Use external website iframe# SPONSOR_MESSAGE=https://example.com/sponsor# Use direct HTML content# SPONSOR_MESSAGE="<div style='text-align:center;'><h2 style='color:#0ea5e9;'>💝 Thanks for your support</h2><p>Your support keeps us going!</p><a href='https://github.com/sponsors/username' target='_blank' style='color:#0ea5e9;'>GitHub Sponsors</a></div>"
# --- Looking Glass node configuration ---# Node list format: NAME1|LOCATION1|URL1;NAME2|LOCATION2|URL2# Example: "London|London, UK|http://IP:Port;Singapore|Singapore, SG|http://IP:Port;Tokyo|Tokyo, JP|http://IP:Port"LG_NODES=London|London, UK|http://IP:Port;Singapore|Singapore, SG|http://IP:Port;Tokyo|Tokyo, JP|http://IP:Port;Frankfurt|Frankfurt, DE|http://IP:Port;New York|New York, US|http://IP:Port;Los Angeles|Los Angeles, US|http://IP:Port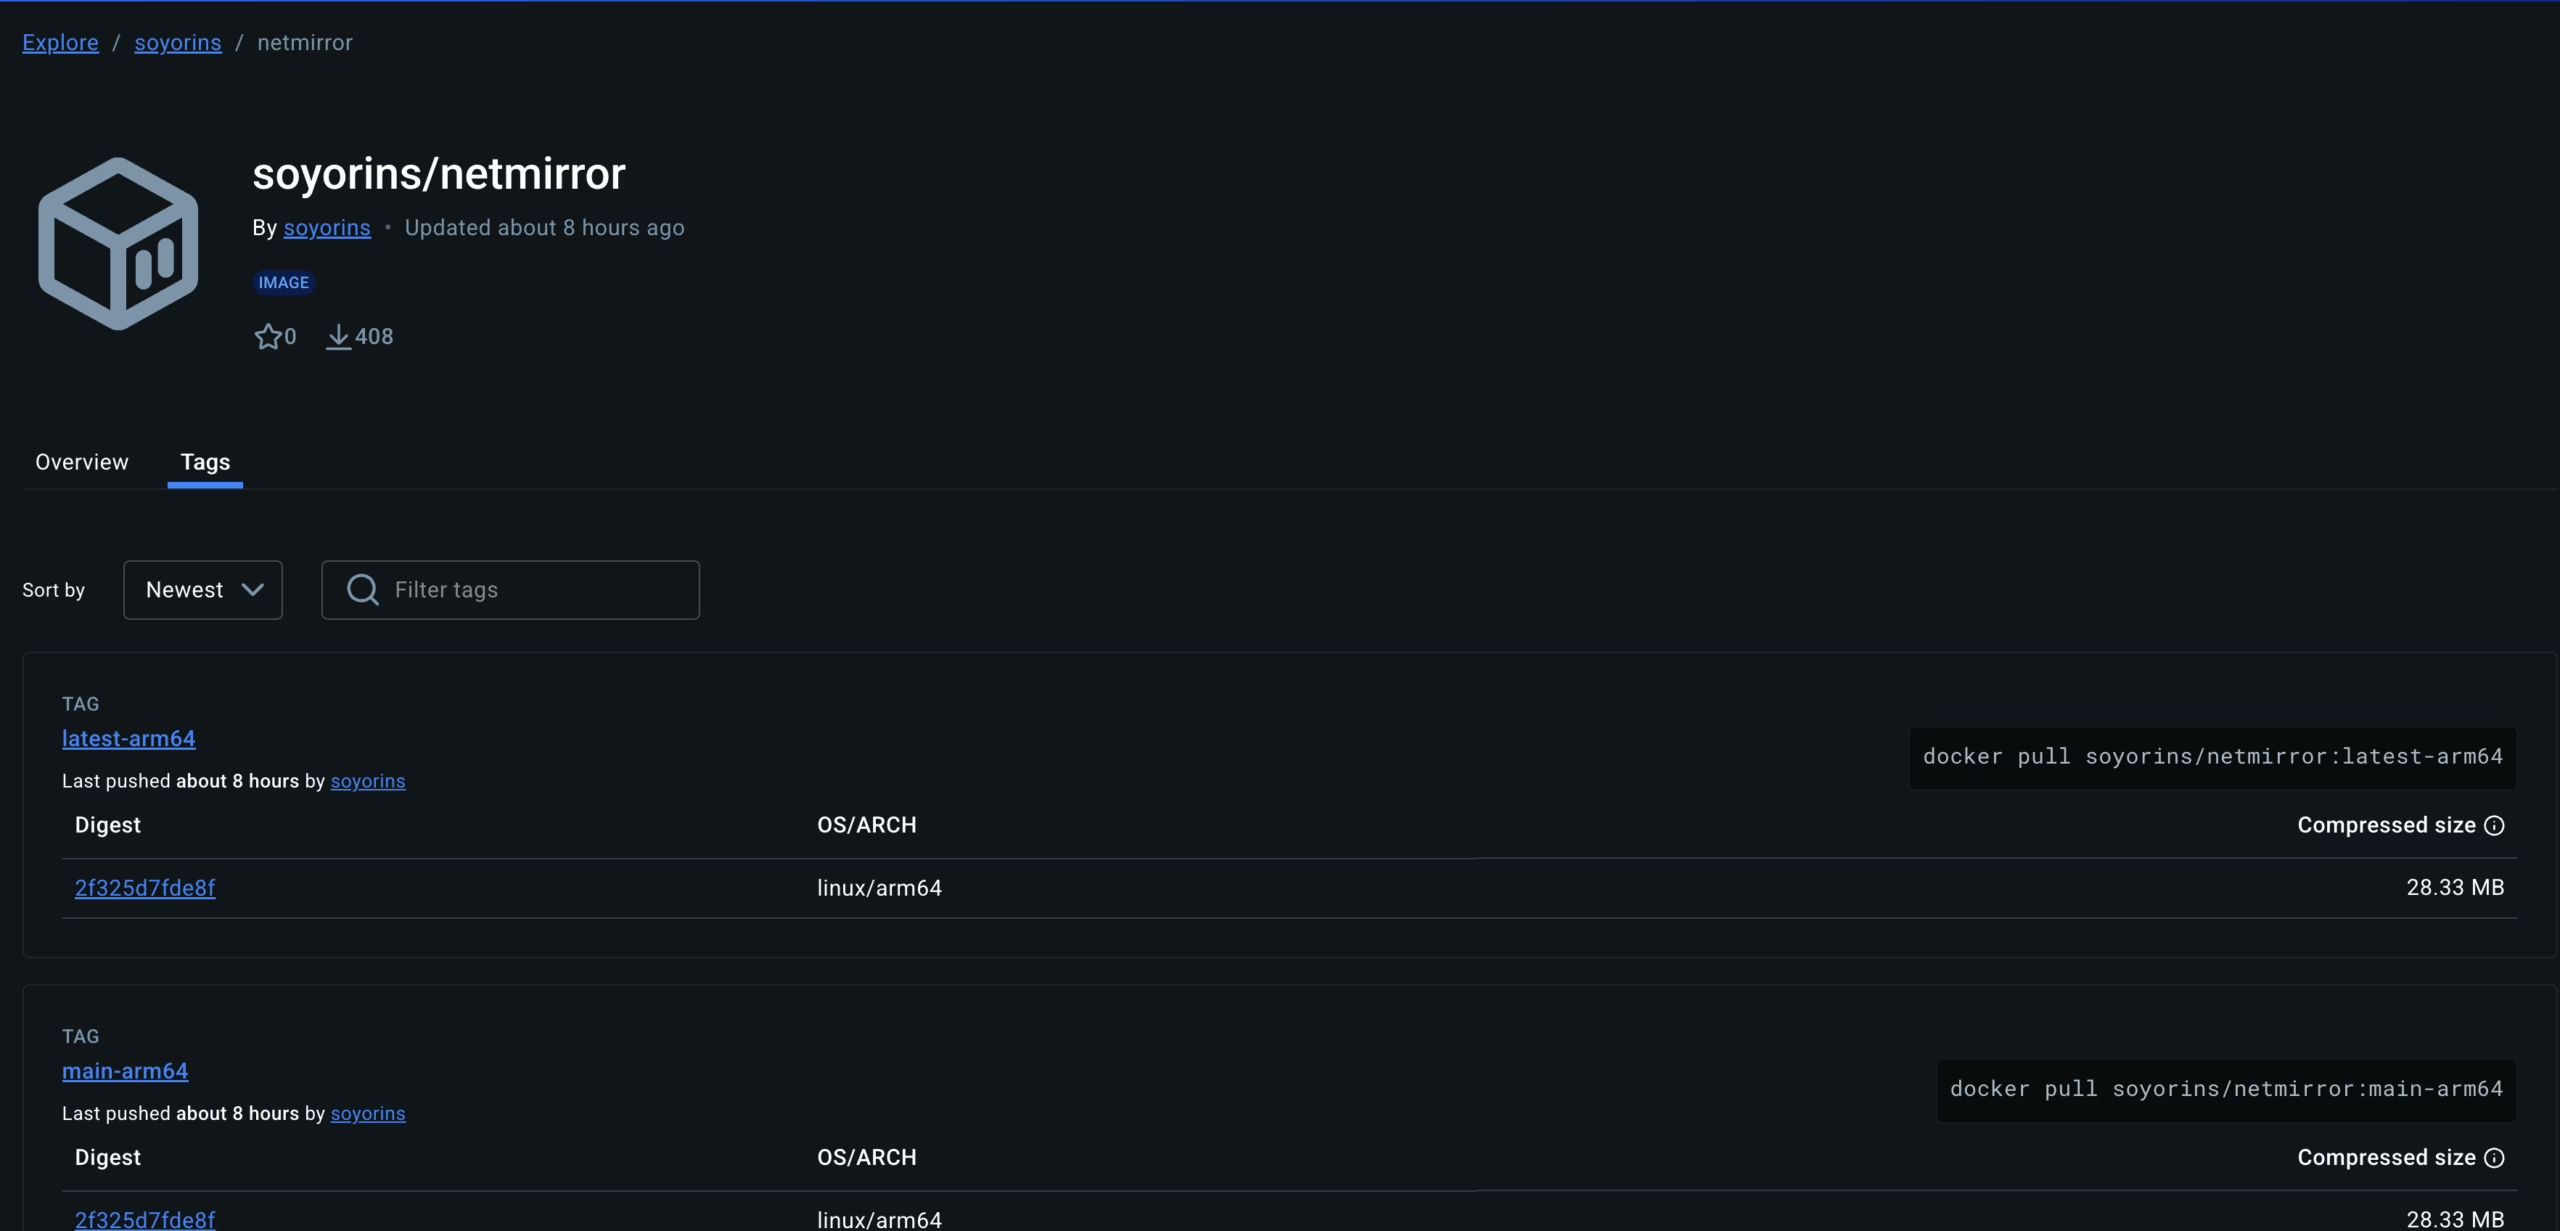
The image size is very small, only about 30 MB, so it can be deployed on virtually any machine.