Configuring Dokploy Backups with Cloudflare R2
Dokploy Backup & Restore Guide
1. Why Backups Are Critical
When self‑hosting applications on a VPS with Dokploy, having a reliable backup strategy is not just important—it’s essential.
Whether you’re running production apps, databases, or personal projects, data loss can be devastating.
Why backups are essential for self‑hosted applications
Before diving into the technical setup, it’s important to understand why backups should be your top priority when you self‑host:
- Hardware failures — VPS servers can suffer from disk failure, memory corruption, or complete hardware loss.
- Human error — accidental database deletion, misconfigured services, or destructive commands can happen to anyone.
- Security incidents — ransomware, hacking, or credential leaks can all corrupt or destroy your data.
- Provider issues — cloud providers can have outages, data center failures, or even suspend your account.
- Software bugs — app upgrades, migrations, or configuration changes can corrupt your data.
The most important lesson: never store backups in the same place as your primary data. If your VPS provider suspends your account or its data center has a catastrophic failure, you’ll need your backups safely stored elsewhere.
2. Why Choose Cloudflare R2?
Even after yesterday’s epic outage, it’s still our only choice—everything else is simply too expensive.
Cloudflare R2 is a high‑performance, low‑cost object storage solution, especially suitable for reliable backup scenarios. Key features include:
- High availability: R2 uses multiple data centers worldwide to ensure no single failure can destroy your data.
- Low cost: compared to traditional cloud storage, R2 offers more competitive pricing.
- Flexibility: R2 supports multiple access methods, including HTTP/HTTPS, API, and CDN acceleration.
- 10GB storage – free forever, ideal for small to medium deployments
- Zero egress fees – unlike AWS S3, you don’t pay to download data.
- S3‑compatible – works with any S3‑compatible tool or application
- Global distribution – data is automatically distributed across Cloudflare’s network
- No hidden fees – transparent pricing with no surprises
Cost comparison
| Provider | Storage (per GB/month) | Egress (per GB) | Free tier |
|---|---|---|---|
| Cloudflare R2 | $0.015 | $0.00 | 10GB storage |
| AWS S3 | $0.023 | $0.09 | 5GB (12 months) |
| Hetzner Storage Box | $3.81 (100GB) | $0.00 | None |
| Backblaze B2 | $0.005 | $0.01 | 10GB storage |
3. Create a Cloudflare R2 Bucket and Connect It to Dokploy
Step 1: Configure a Cloudflare R2 Bucket
1.1 Create an R2 bucket
-
Log in to the Cloudflare dashboard:
https://dash.cloudflare.com -
In the left menu, click R2
-
Click Create bucket
-
Enter a bucket name, for example:
dokploy-backupsyourapp-backups
-
Choose a region (ideally close to your VPS):
- WNAM (Western North America)
- ENAM (Eastern North America)
- WEUR (Western Europe)
- APAC (Asia‑Pacific)
-
Click Create bucket
Bucket naming rules:
- Length 3–63 characters- Lowercase letters, numbers, and hyphens only- Must start and end with a letter or number- No spaces or special characters1.2 Create an API token for Dokploy
-
Go back to the R2 page and find Manage R2 API Tokens
-
Click Create API Token
-
Set a name, for example:
Dokploy Backup Access -
Permissions:
- Object Read & Write
-
Recommended options:
- Applies to specific buckets only
- Select your bucket, e.g.
dokploy-backups
-
Click Create API Token
-
Save the following info (critical – only shown once):
Access Key ID: f3811c6d27415a9s6cv943b6743ad784Secret Access Key: aa55ee40b4049e93b7252bf698408cc22a3c2856d2530s7c1cb7670e318f15e58Store these in a password manager; you won’t be able to view the secret again after closing the window.
1.3 Get the R2 Endpoint URL
On the R2 overview page you’ll see an endpoint similar to:
https://2391372198321037123xdwewqe.r2.cloudflarestorage.comCopy the full Endpoint URL; you’ll need it when configuring Dokploy.
Step 2: Configure an S3 Destination (Cloudflare R2) in Dokploy
2.1 Add a new S3 destination
- Open your Dokploy dashboard
- In the left menu, go to Settings → Destinations
- Click New Destination
- Set the type to S3 Compatible
2.2 Fill in the Cloudflare R2 connection details
Mapping:
| Dokploy field | Cloudflare R2 value | Example |
|---|---|---|
| Destination Name | Custom | Cloudflare R2 Backups |
| Access Key ID | API Key | f3811c6d27415a9s6cv943b6743ad784 |
| Secret Access Key | API Secret | The long secret key |
| Region | R2 Region | WNAM / ENAM / WEUR / APAC |
| Endpoint | R2 Endpoint URL | https://12321309239213dbhwwqe.r2.cloudflarestorage.com |
| Bucket | Your bucket name | dokploy-backups |
| Force Path Style | Must be enabled | ✓ |
Important notes:
Region
Must match the region you selected when creating the bucket:
WNAM – Western North AmericaENAM – Eastern North AmericaWEUR – Western EuropeAPAC – Asia‑PacificEndpoint URL
Must use the full format:
https://xxxxxxxxxxxxxxxxxxxx.r2.cloudflarestorage.comDo not append the bucket name.
Force Path Style
This option must be enabled for Cloudflare R2.
2.3 Test the connection
-
Click Test Connection
-
If you see “Connection successful”, you’re good to go
-
If it fails, check:
- No extra spaces around keys
- Endpoint is complete
- Region is correct
- Force Path Style is enabled
- Token has Object Read & Write permissions
2.4 Save the destination
Once the test passes:
- Click Save
- Your Cloudflare R2 destination will appear in the destinations list and can be used by all Dokploy backup jobs

4. Backing Up the Dokploy System
Dokploy provides a comprehensive backup system.
- Dokploy system backups
These backups include your entire Dokploy installation:
Contents:
-
PostgreSQL database (
dokploy-postgres) with all app configuration -
Dokploy filesystem (
/etc/dokploy) with settings, certificates, and metadata -
Application definitions, environment variables, and deployment history
-
Traefik configuration and SSL certificates
-
When to use:
-
Before major Dokploy upgrades or migrations
-
After significant configuration changes
-
Disaster recovery scenarios
-
Migrating to a new server
-
Recommended schedule: daily automatic backups with 7 days of retention.
- Database backups
Separate database backups for your applications:
Supported databases:
- PostgreSQL (via
pg_dump) - MySQL (via
mysqldump) - MariaDB (via
mariadb-dump) - MongoDB (via
mongodump)
Contents:
- Full database schema (tables, indexes, constraints)
- All data in compressed format
- User privileges and roles
- Stored procedures and functions
When to use:
- Before app upgrades or schema migrations
- For point‑in‑time recovery
- When testing major data changes
- To create dev/test environments
- Recommended frequency: production DB every 6 hours; development DB daily.
- Volume backups
Docker volume backups for applications that use file‑based storage:
Ideal for:
- SQLite databases (e.g. n8n, Memos)
- File uploads and user‑generated content
- Config files stored in volumes
- Apps without a traditional database
Contents:
- Full volume contents
- File permissions and ownership
- Directory structure
When to use:
- Apps using SQLite or embedded databases
- Services storing important files in volumes
- Content management systems
- Before container updates
- Suggested schedule: high‑churn content daily, static content weekly
Step 3: Back Up the Dokploy System
Dokploy system backups are the most critical ones—they include all application configuration, environment variables, deployment records, and system metadata.
3.1 What’s included in a system backup?
When you create a Dokploy system backup, the following are fully saved:
1. PostgreSQL database (dokploy-postgres)
Includes:
- All application definitions
- Configuration and environment variables
- Deployment history
2. Filesystem /etc/dokploy
Includes:
- SSL certificates
- Traefik configuration
- System metadata
3. User accounts and authentication data
4. Git provider connections and deploy keys
5. All destination configurations
Including:
- S3 storage (e.g. Cloudflare R2)
- Git providers
and other system‑level settings
3.2 Create an automated backup
Step ①: Open the backups page
In the Dokploy dashboard, go to:
Web Servers → BackupsStep ②: Create a new backup
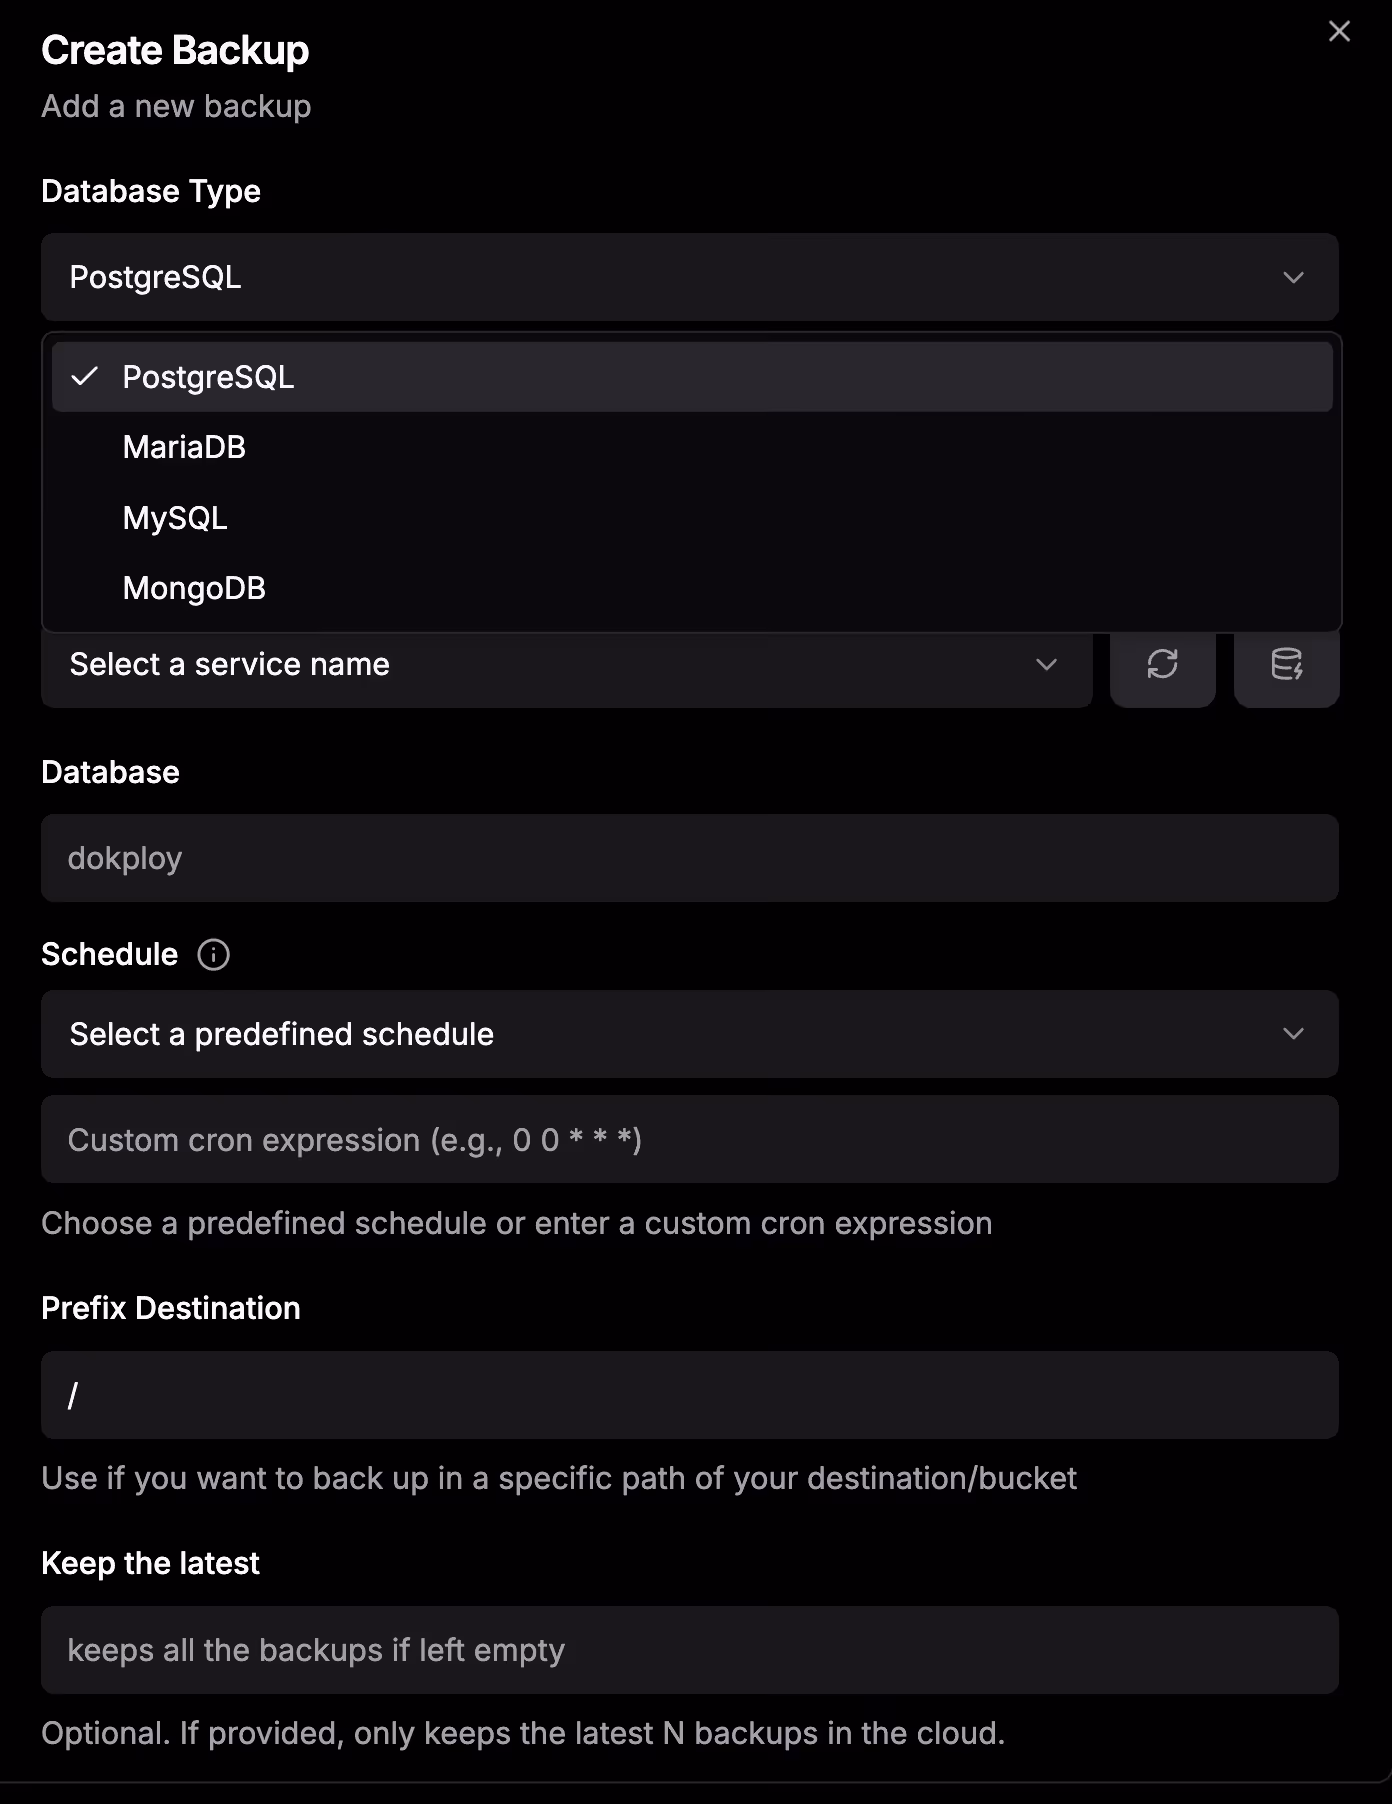
Click Create Backup.
Step ③: Configure backup parameters
| Setting | Recommended value | Description |
|---|---|---|
| Destination | Cloudflare R2 Backups | The S3 destination created earlier |
| Cron schedule | 0 2 * * * | Run daily at 2<00> AM |
| Enabled | ✓ | Enable scheduled backups |
| Retention policy | 7 days | Keep only the latest 7 backups (optional) |


3.3 Cron syntax
Dokploy uses the standard Linux Cron format:
minute hour day month weekdayCommon examples:
0 2 * * * # Every day at 2 AM0 */6 * * * # Every 6 hours0 2 * * 0 # Every Sunday at 2 AM0 3 1 * * # First day of every month at 3 AM*/30 * * * * # Every 30 minutesRecommended: 2<00> AM — typically a low‑traffic time to minimize impact.
3.4 Run a manual backup test (strongly recommended)
Before relying on scheduled backups, you should validate them once:
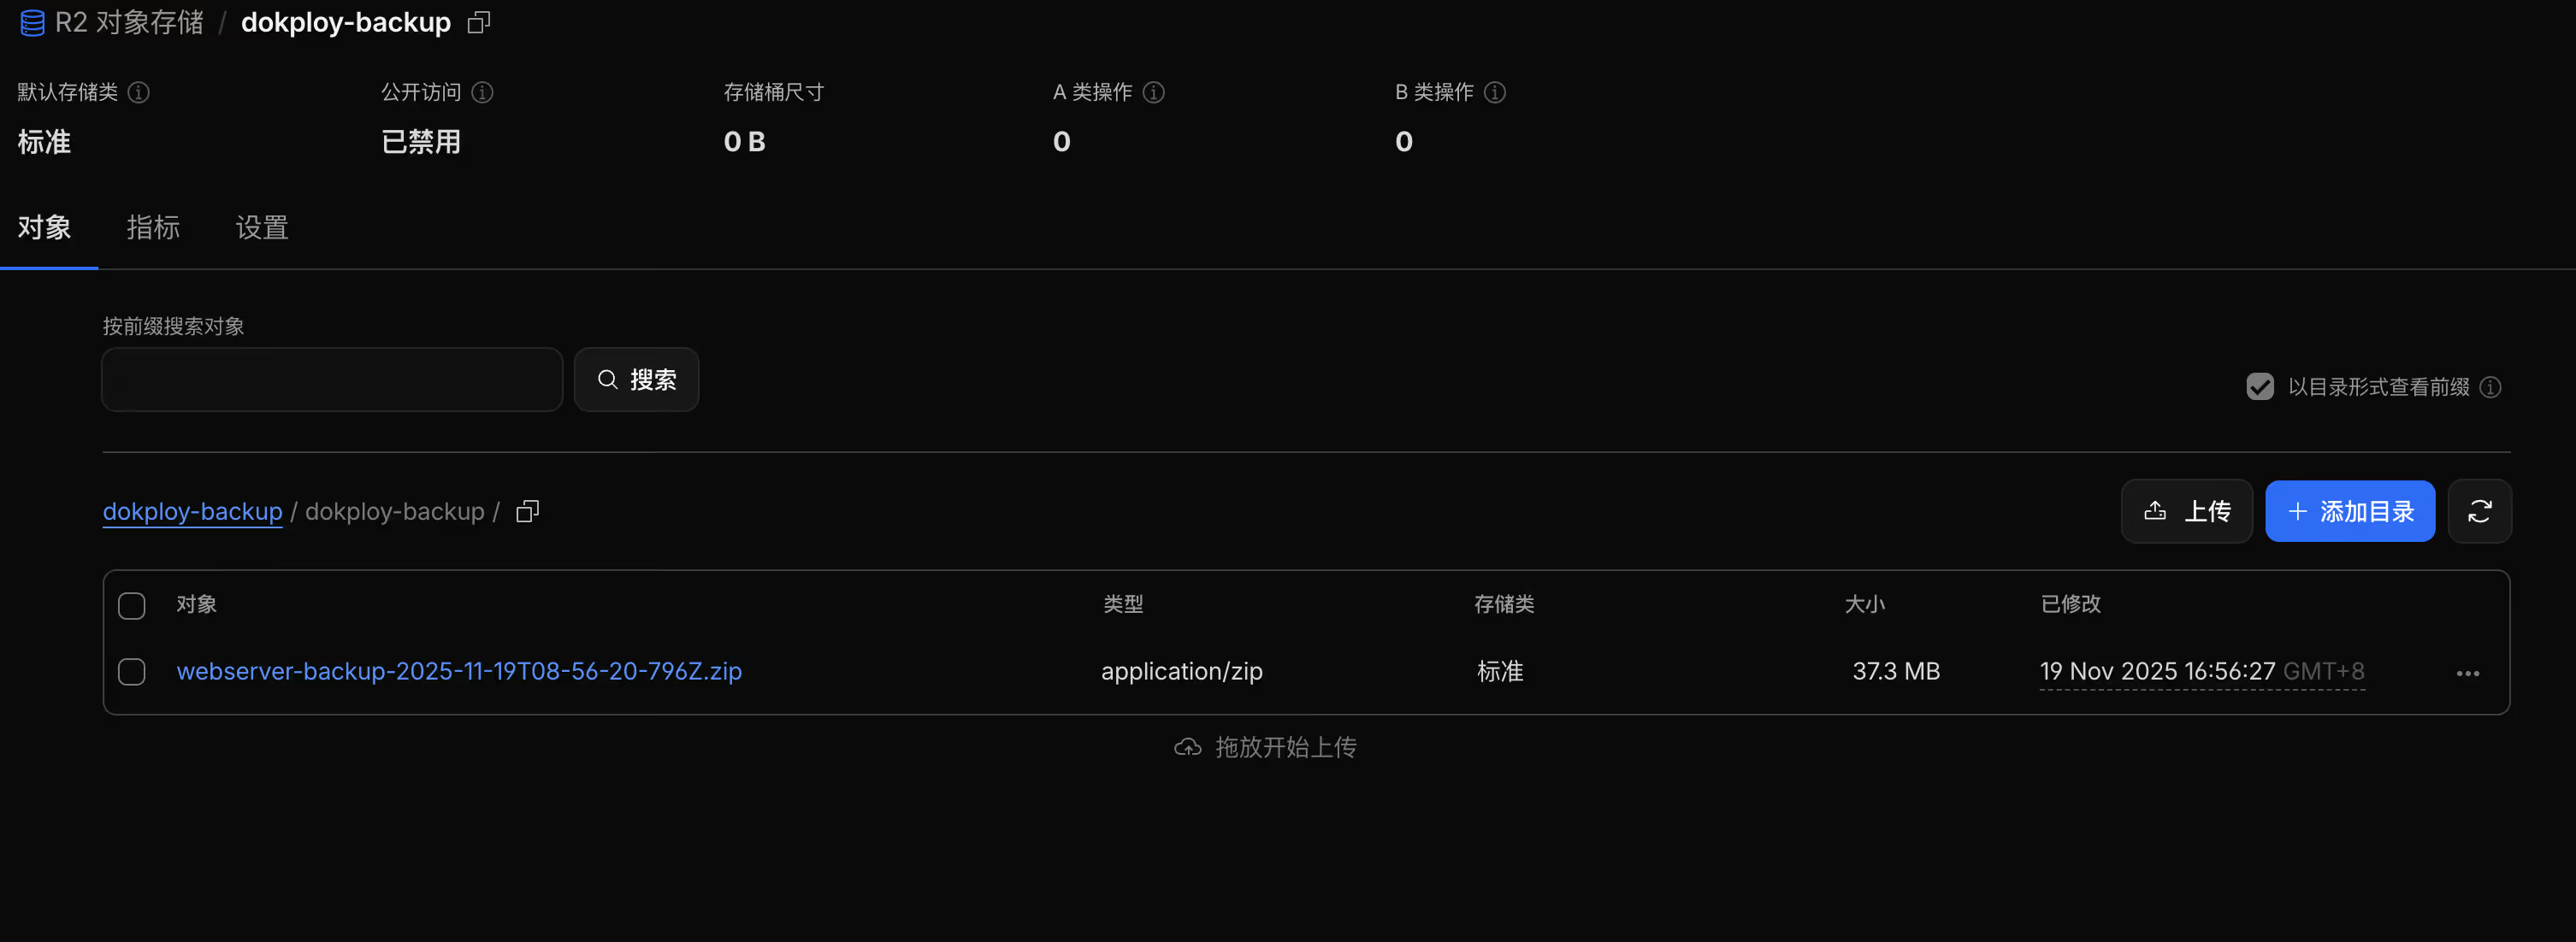
- Click Run backup now or Test backup
- Wait about 1–3 minutes
- Open the Cloudflare R2 bucket and verify that files have been uploaded
- Download a backup and confirm it can be extracted without corruption
5. Backing Up Application Databases
Step 4: Configure Database Backups
Databases are usually the most critical business data, so setting up stable, frequent, and secure automatic backups is vital. Dokploy provides native backup support for PostgreSQL, MySQL/MariaDB, and MongoDB, and can automatically upload the backups to Cloudflare R2 or other S3 storage.
4.1 Configure database backups
Step ①: Open the database management page
In the Dokploy dashboard, go to:
Databases → select your databaseStep ②: Open the backups tab
Click the Backups tab at the top.
Step ③: Create a backup configuration
Fill in:
| Setting | Recommended value | Description |
|---|---|---|
| Destination | Cloudflare R2 Backups | Use the S3 destination created earlier |
| Database name | Auto‑filled | Dokploy will detect the DB name |
| Cron schedule | 0 */6 * * * | Back up every 6 hours |
| Prefix | prod-db or app name | Folder name inside R2 |
| Enabled | ✓ | Turn on automatic backups |
Recommended backup frequencies by environment
# Production database (critical)0 */6 * * * # Every 6 hours
# Staging (medium importance)0 2 * * * # Daily at 2 AM
# Development (low importance)0 2 * * 0 # Every Sunday at 2 AM
# High‑traffic workloads (e‑commerce / real‑time systems)0 */3 * * * # Every 3 hours4.2 Test database backups
Before relying on automated jobs, always run at least one manual test.
Steps:
- Click Test backup
- Watch the live logs to ensure the job completes successfully
- Open the Cloudflare R2 bucket and confirm the backup file is there
- Download the backup file and verify it extracts correctly and is not corrupted
Example backup file structure
dokploy-backups/ └── prod-db/ ├── postgres-backup-2025-11-12-00-00.sql.gz ├── postgres-backup-2025-11-12-06-00.sql.gz ├── postgres-backup-2025-11-12-12-00.sql.gz └── postgres-backup-2025-11-12-18-00.sql.gz4.3 Commands Dokploy uses for database backups
Dokploy runs native backup commands depending on the database type and uploads them to R2 as .gz compressed files.
PostgreSQL: pg_dump
pg_dump -Fc --no-acl --no-owner -h localhost -U ${databaseUser} \ --no-password '${database}' | gzipParameter explanations:
| Option | Description | |
|---|---|---|
-Fc | Custom format dump; faster restores | |
--no-acl | Skip ACLs to avoid restore conflicts | |
--no-owner | Skip owner information | |
| ` | gzip` | Compress output, saving 70–90% space |
MySQL / MariaDB: mysqldump
mysqldump --default-character-set=utf8mb4 -u 'root' \ --password='${databaseRootPassword}' \ --single-transaction --no-tablespaces \ --quick '${database}' | gzipKey options:
utf8mb4: supports emojis and international characters--single-transaction: consistent snapshot without table locks--no-tablespaces: avoids permission issues during restore--quick: stream rows to reduce memory usage
MariaDB: mariadb-dump
mariadb-dump --user='${databaseUser}' \ --password='${databasePassword}' \ --databases ${database} | gzipMongoDB: mongodump
mongodump -d '${database}' -u '${databaseUser}' \ -p '${databasePassword}' \ --archive --authenticationDatabase=admin --gzipWhat these options do:
--archive: outputs a single file, easier to store--authenticationDatabase=admin: authenticate against the admin DB--gzip: compress the archive
4.4 Multiple database backups (multi‑project best practices)
If you have multiple databases (microservices, multiple apps, multiple environments), create a separate backup job for each.
Use clear prefixes
prod-web-app/prod-analytics/prod-auth/dev-testing/6. Volume Backups
Step 5: Volume Backups
Volume backups are for file‑based storage such as SQLite databases, uploads, config files, and static assets. For apps that don’t use an external database (e.g. n8n, Memos, Plausible, Umami), volume backups are critical for data safety.
5.1 When should you use volume backups?
Volume backups are suitable for the following data types:
| Use case | Examples |
|---|---|
| SQLite databases | n8n, Memos, Plausible, Umami |
| File‑based content | Uploaded images, user documents, media |
| Persistent config | App configuration, user settings |
| Embedded databases | LevelDB, RocksDB, LMDB |
| Static site output | HTML, CSS, static assets |
If your app stores data inside Docker volumes, you need volume backups.
5.2 Understanding Docker volume naming
Before configuring volume backups, you must know the volume name. Volume names are usually tied to the app name and the Docker Compose structure.
Single‑app Dokploy scenario
Path in the UI:
App → Advanced → MountsExample volume names:
app-datauploadsconfigDokploy (Docker Compose app) naming convention
Volume name format:
{appName}_{volumeName}Examples:
-
App:
n8n-kqlble
Volume:n8n_data
Full volume name:n8n-kqlble_n8n_data -
App:
memos-prod
Volume:memos_data
Full volume name:memos-prod_memos_data -
App:
plausible-analytics
Volume:db-data
Full volume name:plausible-analytics_db-data
5.3 Example: Backing up n8n (SQLite)
n8n uses SQLite and stores data in a Docker volume, so you must use a volume backup instead of a database backup.
Example docker-compose.yml:
version: "3.8"services: n8n: image: docker.n8n.io/n8nio/n8n:1.83.2 restart: always environment: - N8N_HOST=${N8N_HOST} - N8N_PORT=${N8N_PORT} volumes: - n8n_data:/home/node/.n8n
volumes: n8n_data:All critical data (workflows, users, history, SQLite DB) lives in the n8n_data volume.
5.4 Configure volume backups
Step ①: Navigate to Volume Backups
App → Volume BackupsStep ②: Create a volume backup job
Fill in:
| Field | Value | Description |
|---|---|---|
| Name | n8n-daily-backup | Descriptive name |
| Destination | Cloudflare R2 Backups | S3 destination |
| Cron schedule | 0 3 * * * | Daily at 3 AM |
| Service name | n8n | Auto‑filled |
| Volume name | n8n_data | Auto‑detected |
| Backup prefix | n8n-volumes | Optional folder prefix |
| Stop container | ✓ (strongly recommended) | Ensures consistency |
| Enabled | ✓ | Enable the job |
5.5 Safety considerations: should you stop the container?
Recommended: stop the container during backups (maximum safety)
Reasons:
- 100% data consistency
- Avoid corrupted SQLite backups
- Prevent partially written files
- Ensure a clean filesystem snapshot
Process:
- Dokploy stops the container
- Performs the volume backup (no writes happening)
- Uploads to R2
- Automatically restarts the container
Downtime: typically 30 seconds–2 minutes
Schedule this during the lowest‑traffic window (e.g. 03<00>).
Best for:
- Apps using SQLite or embedded databases
- Systems with active writes
- Important production workloads
Not recommended: backing up while the container is running (zero downtime, but risky)
Pros:
- No downtime
- Slightly faster
Risks:
- Files may be mid‑write → corrupt backups
- SQLite backups are almost guaranteed to be broken
- Large files may be only partially captured
- Restore may fail
OK for:
- Test environments
- Mostly static content
- Apps with safe WAL / snapshot mechanisms
For SQLite: never back up while the app is running.
5.6 How to find the correct volume name
Method 1: Dokploy UI
App → Advanced → MountsMethod 2: Check docker-compose.yml
Example:
volumes: n8n_data:Method 3: Check Docker volumes on the server
docker volume lsFilter by app:
docker volume ls | grep n8nVerify the volume exists:
docker volume inspect xxxx7. Restoring Backups
6. Restoring Backups: Safely Restoring Dokploy, Databases, and Volumes
As the saying goes: a backup only matters if you can restore it successfully.
6.1 Restore the Dokploy system (disaster recovery / migration)
System restore will replace all core Dokploy data on the current installation, including:
- PostgreSQL database (app configuration, environment variables, deployment history)
/etc/dokployfiles (Traefik config, SSL certificates, metadata)- User accounts and authentication
- Git provider connections and webhook secrets
- All deployment destination settings (S3, Git providers, etc.)
This operation overwrites the current system, so double‑check you’re restoring the correct backup.
6.1.1 Restore steps
1. Open the restore screen
In the Dokploy dashboard:
Web Servers → Backups → Restore Backup
2. Configure restore parameters
| Parameter | Description |
|---|---|
| Source S3 bucket | Select your Cloudflare R2 destination |
| Search backups | Enter keywords to find backup files |
| Select backup | Choose the snapshot you want to restore |
| Restore summary | Review what will be replaced |
3. Run the restore
Click Restore. The process usually takes 2–5 minutes.
During restore, Dokploy will:
- Delete and replace
/etc/dokploy - Drop and recreate the PostgreSQL database
- Disconnect all DB connections
- Re‑apply Traefik configuration
- Briefly stop services
6.1.2 Post‑restore checks
- You may need to log in again
- All apps should appear in the dashboard
- Verify environment variables
- Test at least one app to ensure it runs correctly
6.2 Migrate to another server (cross‑VPS restore)
System restore is also used for migrations: backup on the old server → restore on the new one.
Full migration checklist
1. Update server IP
Web Servers → Servers → Update IP address
2. Update DNS
Point your domain A records to the new IP.
Wait 5–15 minutes for propagation.
3. Recreate Traefik.me domains (if used)
Traefik.me will automatically bind to the new server IP.
You’ll need to recreate them for each app.
4. Fix Git provider webhooks
If you previously used an IP, change it to the new IP or switch to a domain.
5. Verify SSL certificates
Traefik will automatically request new Let’s Encrypt certificates.
The first issuance may take 5–10 minutes.
6. Check database connections
Ensure all apps can connect to internal/external databases.
7. Health‑check your apps
Open each app URL, test functionality, and read logs.
6.3 Restore database backups (PostgreSQL, MySQL, etc.)
Use this when you want to restore a single database without touching the entire Dokploy system.
Typical scenarios:
- Data corruption
- Failed migrations or bad updates
- Rolling back to a previous state
- Creating test/staging environments
- Accidental table data deletion
6.3.1 Restore steps
1. Open the database restore screen
Databases → select database → Backups → Restore
2. Configure restore parameters
| Parameter | Description |
|---|---|
| Source S3 bucket | Cloudflare R2 |
| Search backups | Optional prefix (e.g. prod-db/) |
| Select backup | Choose the .sql.gz or .sql file |
Example path:
prod-db/postgres-backup-2025-11-12-06-00.sql.gz3. Run the restore
The restore will:
- Drop the entire database
- Download and import the backup
- Restore permissions
- Automatically restart DB connections
6.3.2 Verify the restore
- Check DB logs for errors
- Confirm your app can use the database normally
- Verify critical records
- Ensure no connection errors appear in app logs
6.4 Restore volume backups (SQLite, uploads, config files, etc.)
Volume restore is for:
- SQLite databases
- Uploaded files (images/documents)
- App configuration files
- Embedded DBs (LevelDB, RocksDB, LMDB)
- Static site assets
6.4.1 Restore steps
1. Open the volume restore screen
Go to the app → Volume Backups → Restore Volume
2. Configure restore parameters
| Parameter | Value | Description |
|---|---|---|
| Source S3 bucket | R2 | Your backup destination |
| Search backups | Enter search keywords | Locate the volume backup |
| Target volume | e.g. n8n-kqlble_n8n_data | Must be the full volume name |
6.4.2 Understanding volume names correctly
Incorrect (will fail):
n8n_dataCorrect:
n8n-kqlble_n8n_dataRule:
Full volume name = {appName}_{volumeName}
Verification:
docker volume ls | grep n8n6.4.3 Key constraints for volume restores
Before restoring a volume, you must ensure:
| Condition | Requirement |
|---|---|
| Container stopped | Volume must not be in use |
| Volume removed | Existing volume can’t be overwritten |
| Enough disk space | Volume restore can be large |
| Backup of current volume | Avoid accidental data loss |
6.4.4 Recommended full restore procedure
# 1. Stop the appdocker compose -f /opt/stacks/n8n-kqlble/docker-compose.yml down
# 2. Remove the old volumedocker volume rm n8n-kqlble_n8n_data
# 3. Restore the volume backup in the Dokploy UI
# 4. Start the appdocker compose -f /opt/stacks/n8n-kqlble/docker-compose.yml up -d6.4.5 Post‑restore checks
- Container logs show no errors
- App starts successfully
- Restored data looks correct
- Full functionality works as expected
6.5 Compatibility notes
Dokploy only guarantees successful restores for backups created by Dokploy’s own backup system.
Backups from other sources (manual .sql, cp -r, custom scripts, etc.) may not be compatible and can fail during restore.