Deploying Pocket ID on Dokploy: Complete Tutorial
As self-hosted services continue to grow, managing numerous account passwords has become a major pain point. Pocket ID offers an elegant solution: a Passkey-based passwordless authentication system that supports the standard OIDC protocol, providing unified single sign-on (SSO) capabilities for all your self-hosted applications.
This article provides a detailed guide on how to deploy Pocket ID on Dokploy, with Linkding as an example to demonstrate application integration.
What is Pocket ID?
Pocket ID is a modern OpenID Connect (OIDC) identity provider focused on passwordless authentication using Passkeys.
Core Features
- Completely Passwordless: Uses Passkey technology (WebAuthn), eliminating traditional password security vulnerabilities
- OIDC Standard Support: Compatible with all OIDC-supporting applications like Immich, Nextcloud, Grafana, etc.
- Self-Hosting Friendly: Lightweight design, uses SQLite or PostgreSQL for data storage
- Hardware Key Support: Supports FIDO2 hardware security keys like YubiKey
- Simple and Efficient: More lightweight and easier to configure than enterprise solutions like Keycloak or Authelia
Technology Stack
- Backend: Go (high performance, low resource usage)
- Frontend: Svelte + TypeScript
- Database: SQLite (default) or PostgreSQL
Deploying on Dokploy
Prerequisites
- A server with Dokploy installed
- A domain name (for HTTPS access, Passkey must be used in HTTPS environments)
- At least 512MB available memory
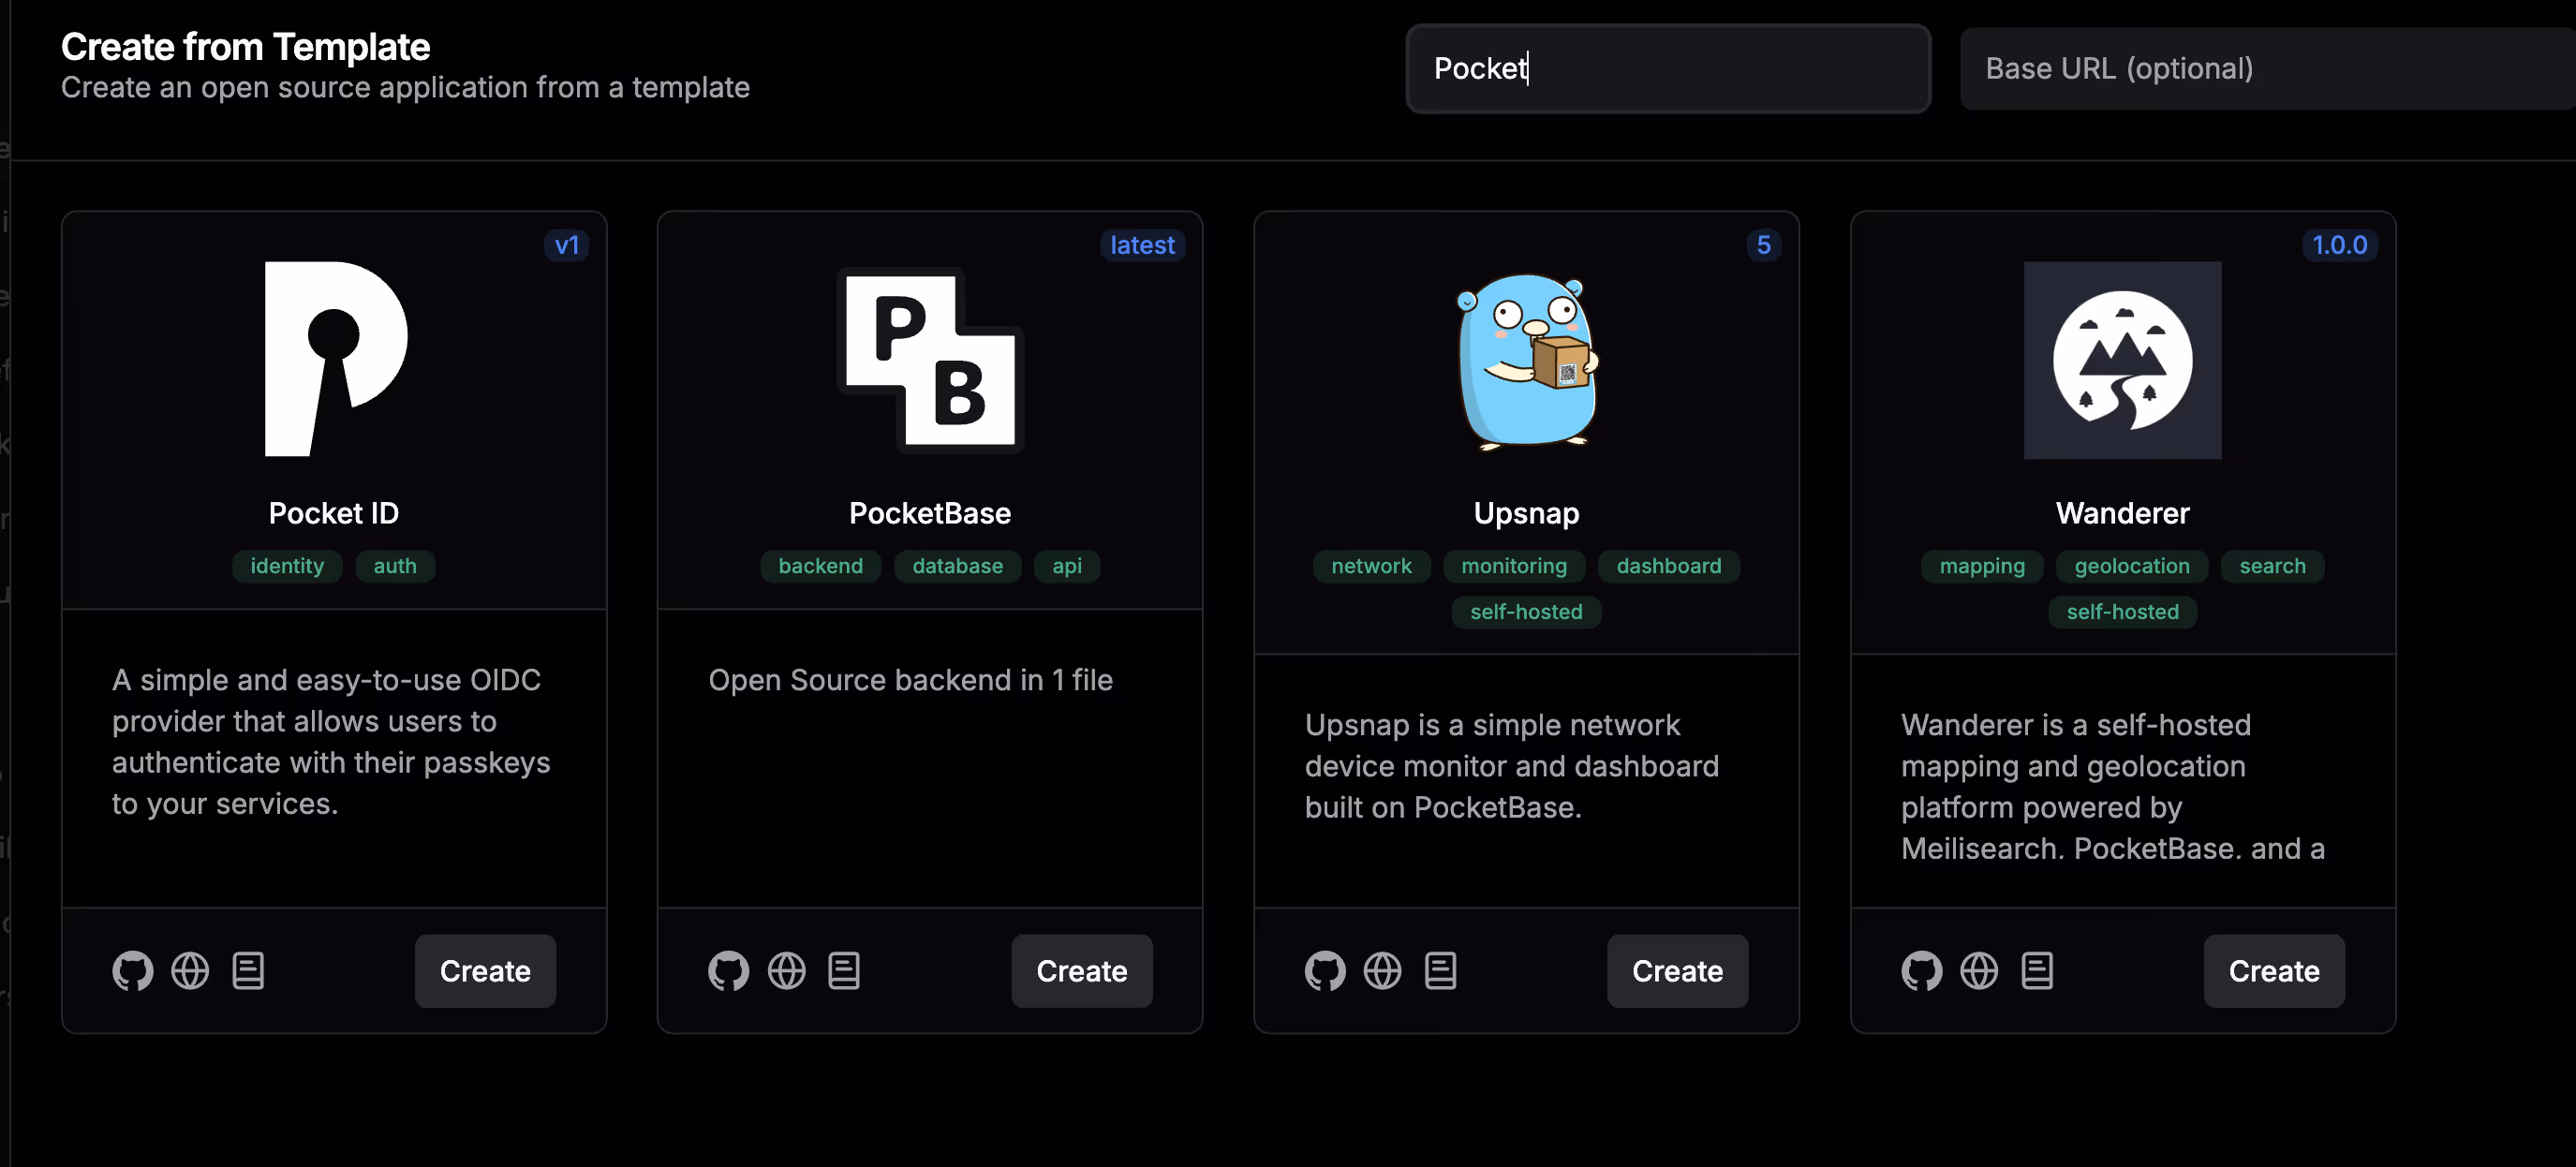
Creating a Compose Service
- Log in to the Dokploy management panel
- Select the corresponding project (or create a new one)
- Click “Create Service” → Select “Template”
- Search for and select the Pocket ID template
Docker Compose Configuration
:::caution Important: Version Issue
Dokploy’s default template may use the v1 version, which is outdated. You must modify the image to ghcr.io/pocket-id/pocket-id:v2, otherwise you may encounter compatibility issues and missing features.
:::
Paste the following content in the Compose configuration:
services: pocket-id: image: ghcr.io/pocket-id/pocket-id:v2 #also just this here to modify,because template not updated is v1 version restart: unless-stopped environment: - APP_URL - TRUST_PROXY - ENCRYPTION_KEY volumes: - pocket-id-data:/app/data healthcheck: test: [ "CMD", "/app/pocket-id", "healthcheck" ] interval: 1m30s timeout: 5s retries: 2 start_period: 10s
volumes: pocket-id-data: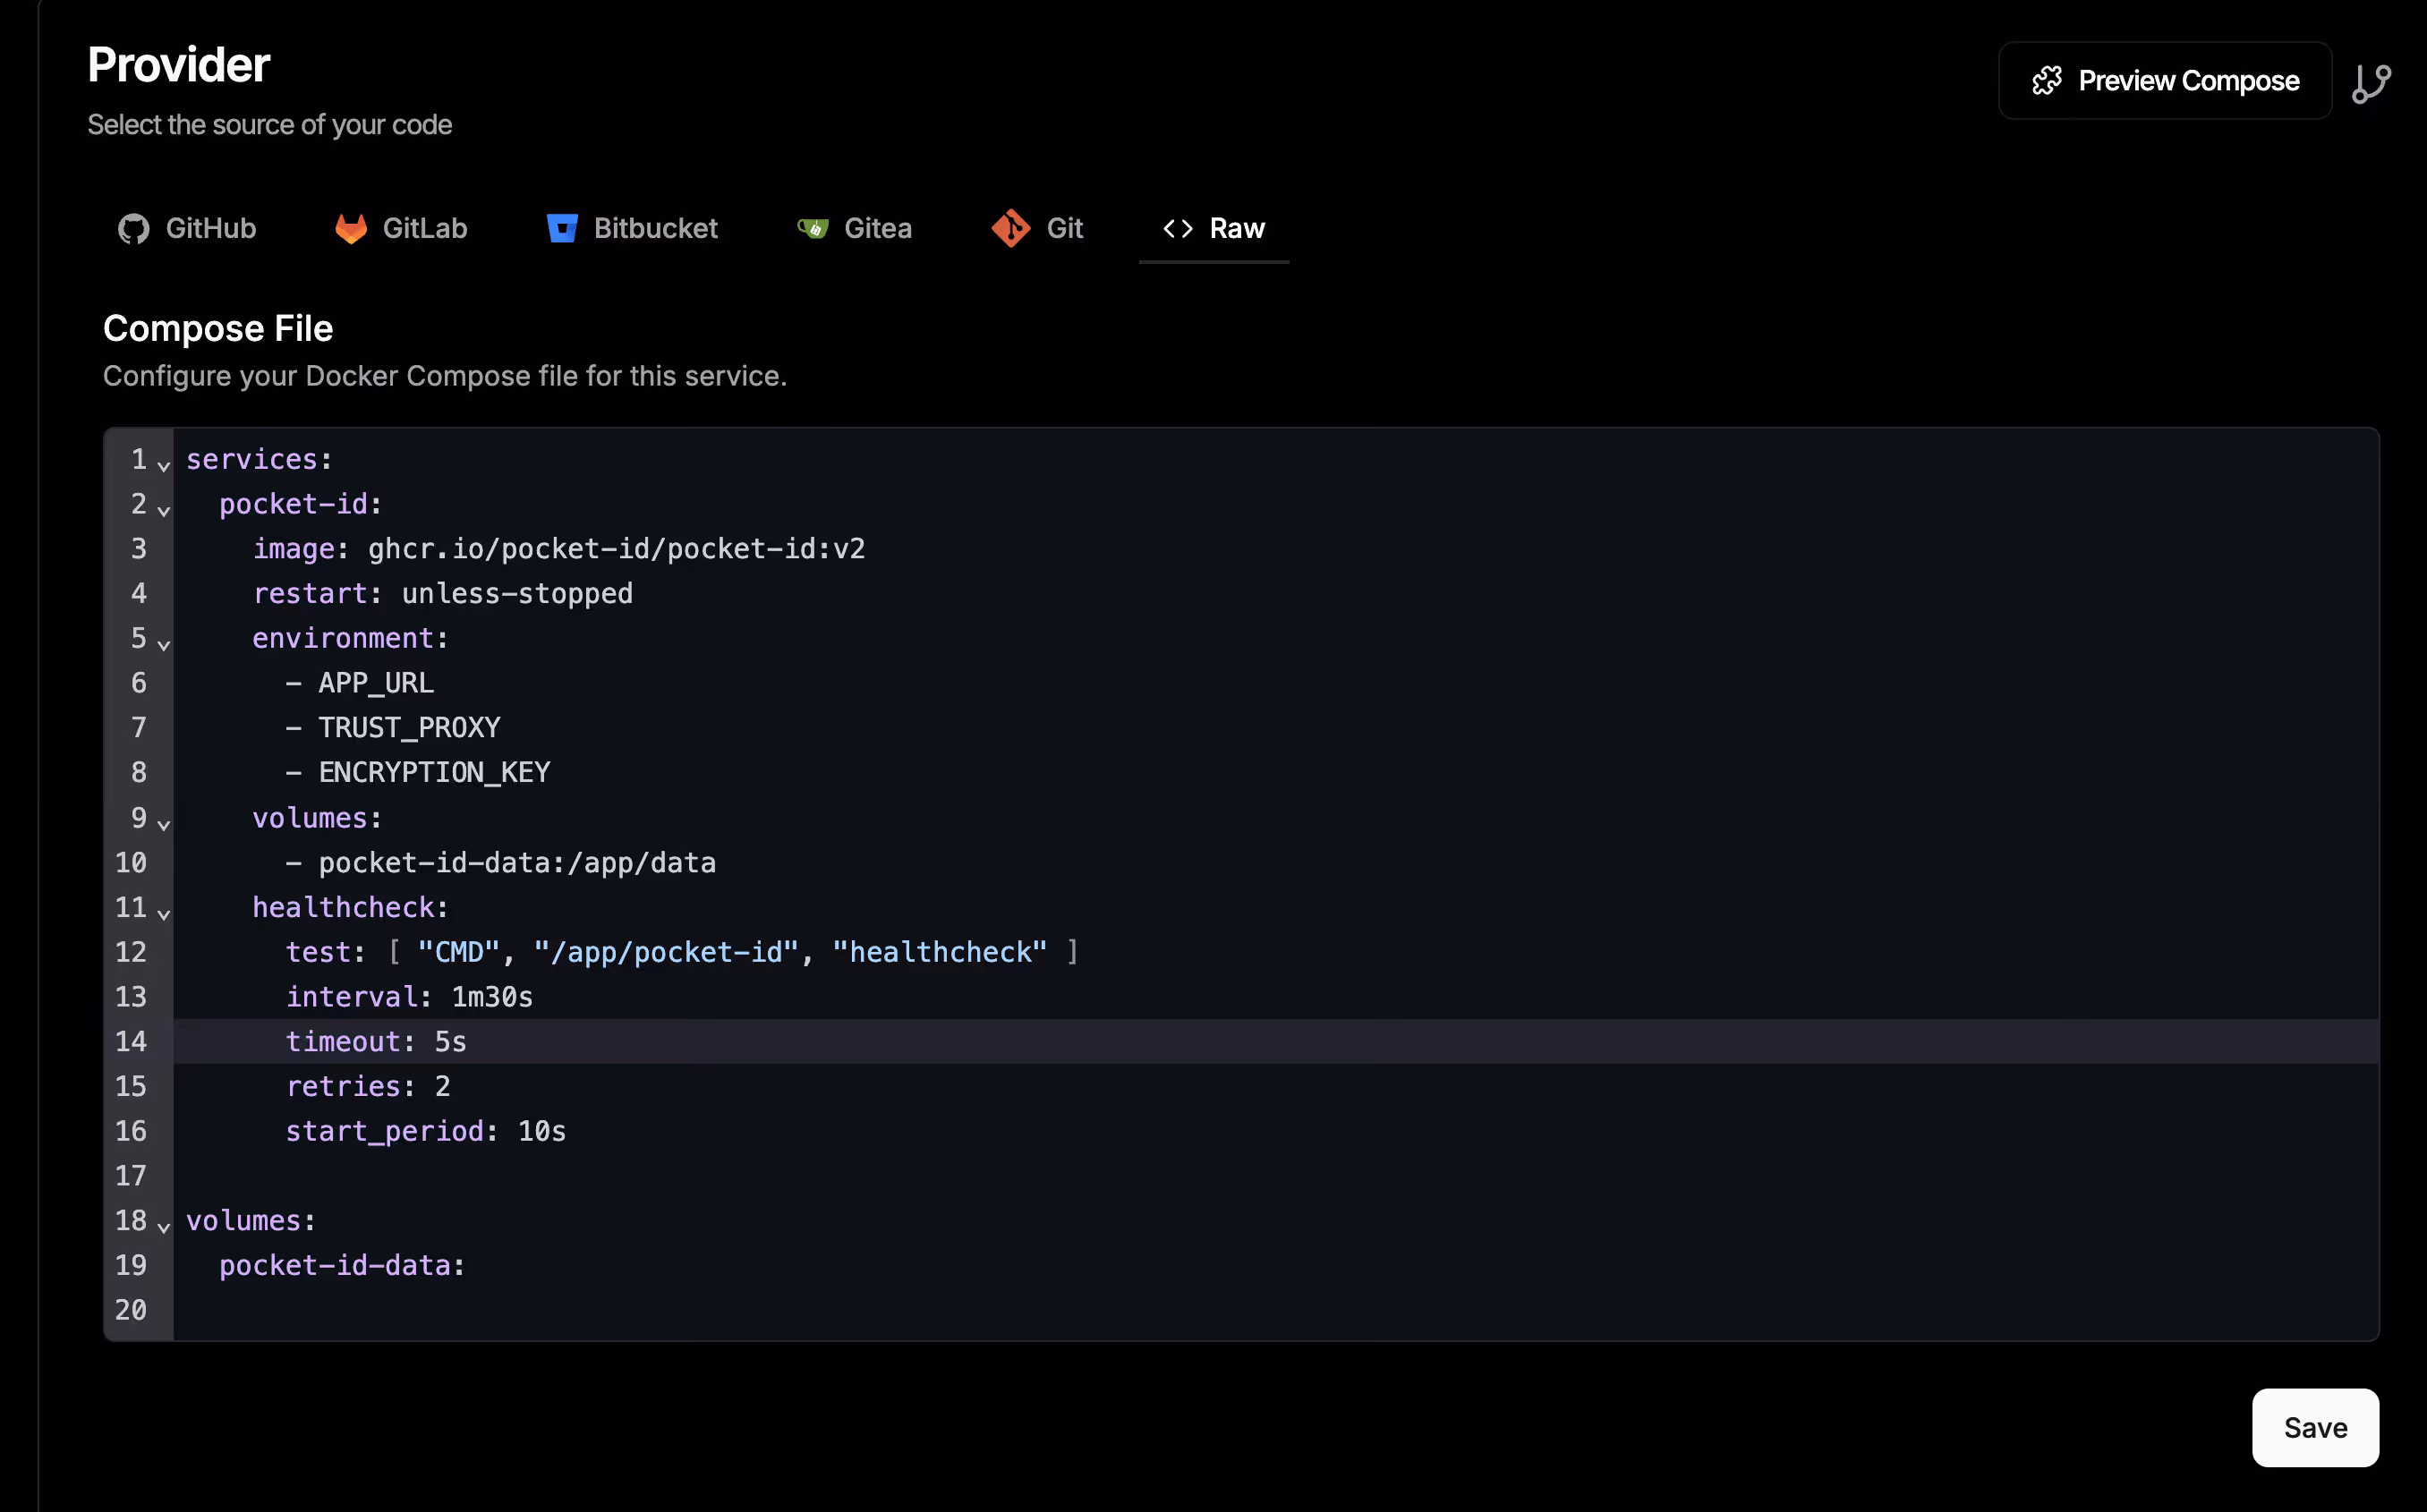
Environment Variable Configuration
In Dokploy’s “Environment” tab, add the following environment variables:
APP_URL
The full access address of the application, must use HTTPS.
APP_URL=https://pocketid.your.domainExamples:
- Using a custom domain:
https://pocketid.example.com - Using Dokploy’s auto-generated domain:
https://berohost-pocketid-0da961-5-175-220-72.traefik.me
TIPIf using Dokploy’s auto-generated domain, you can view the complete URL in the Domains tab.
ENCRYPTION_KEY
The key used to encrypt sensitive data. Set it to CHANGEME on first deployment, and the system will automatically generate it.
ENCRYPTION_KEY=CHANGEMETo manually generate a key (optional), use the following command:
openssl rand -base64 32TRUST_PROXY
Enable reverse proxy support. Dokploy uses Traefik as the reverse proxy by default, so this needs to be set to true.
TRUST_PROXY=true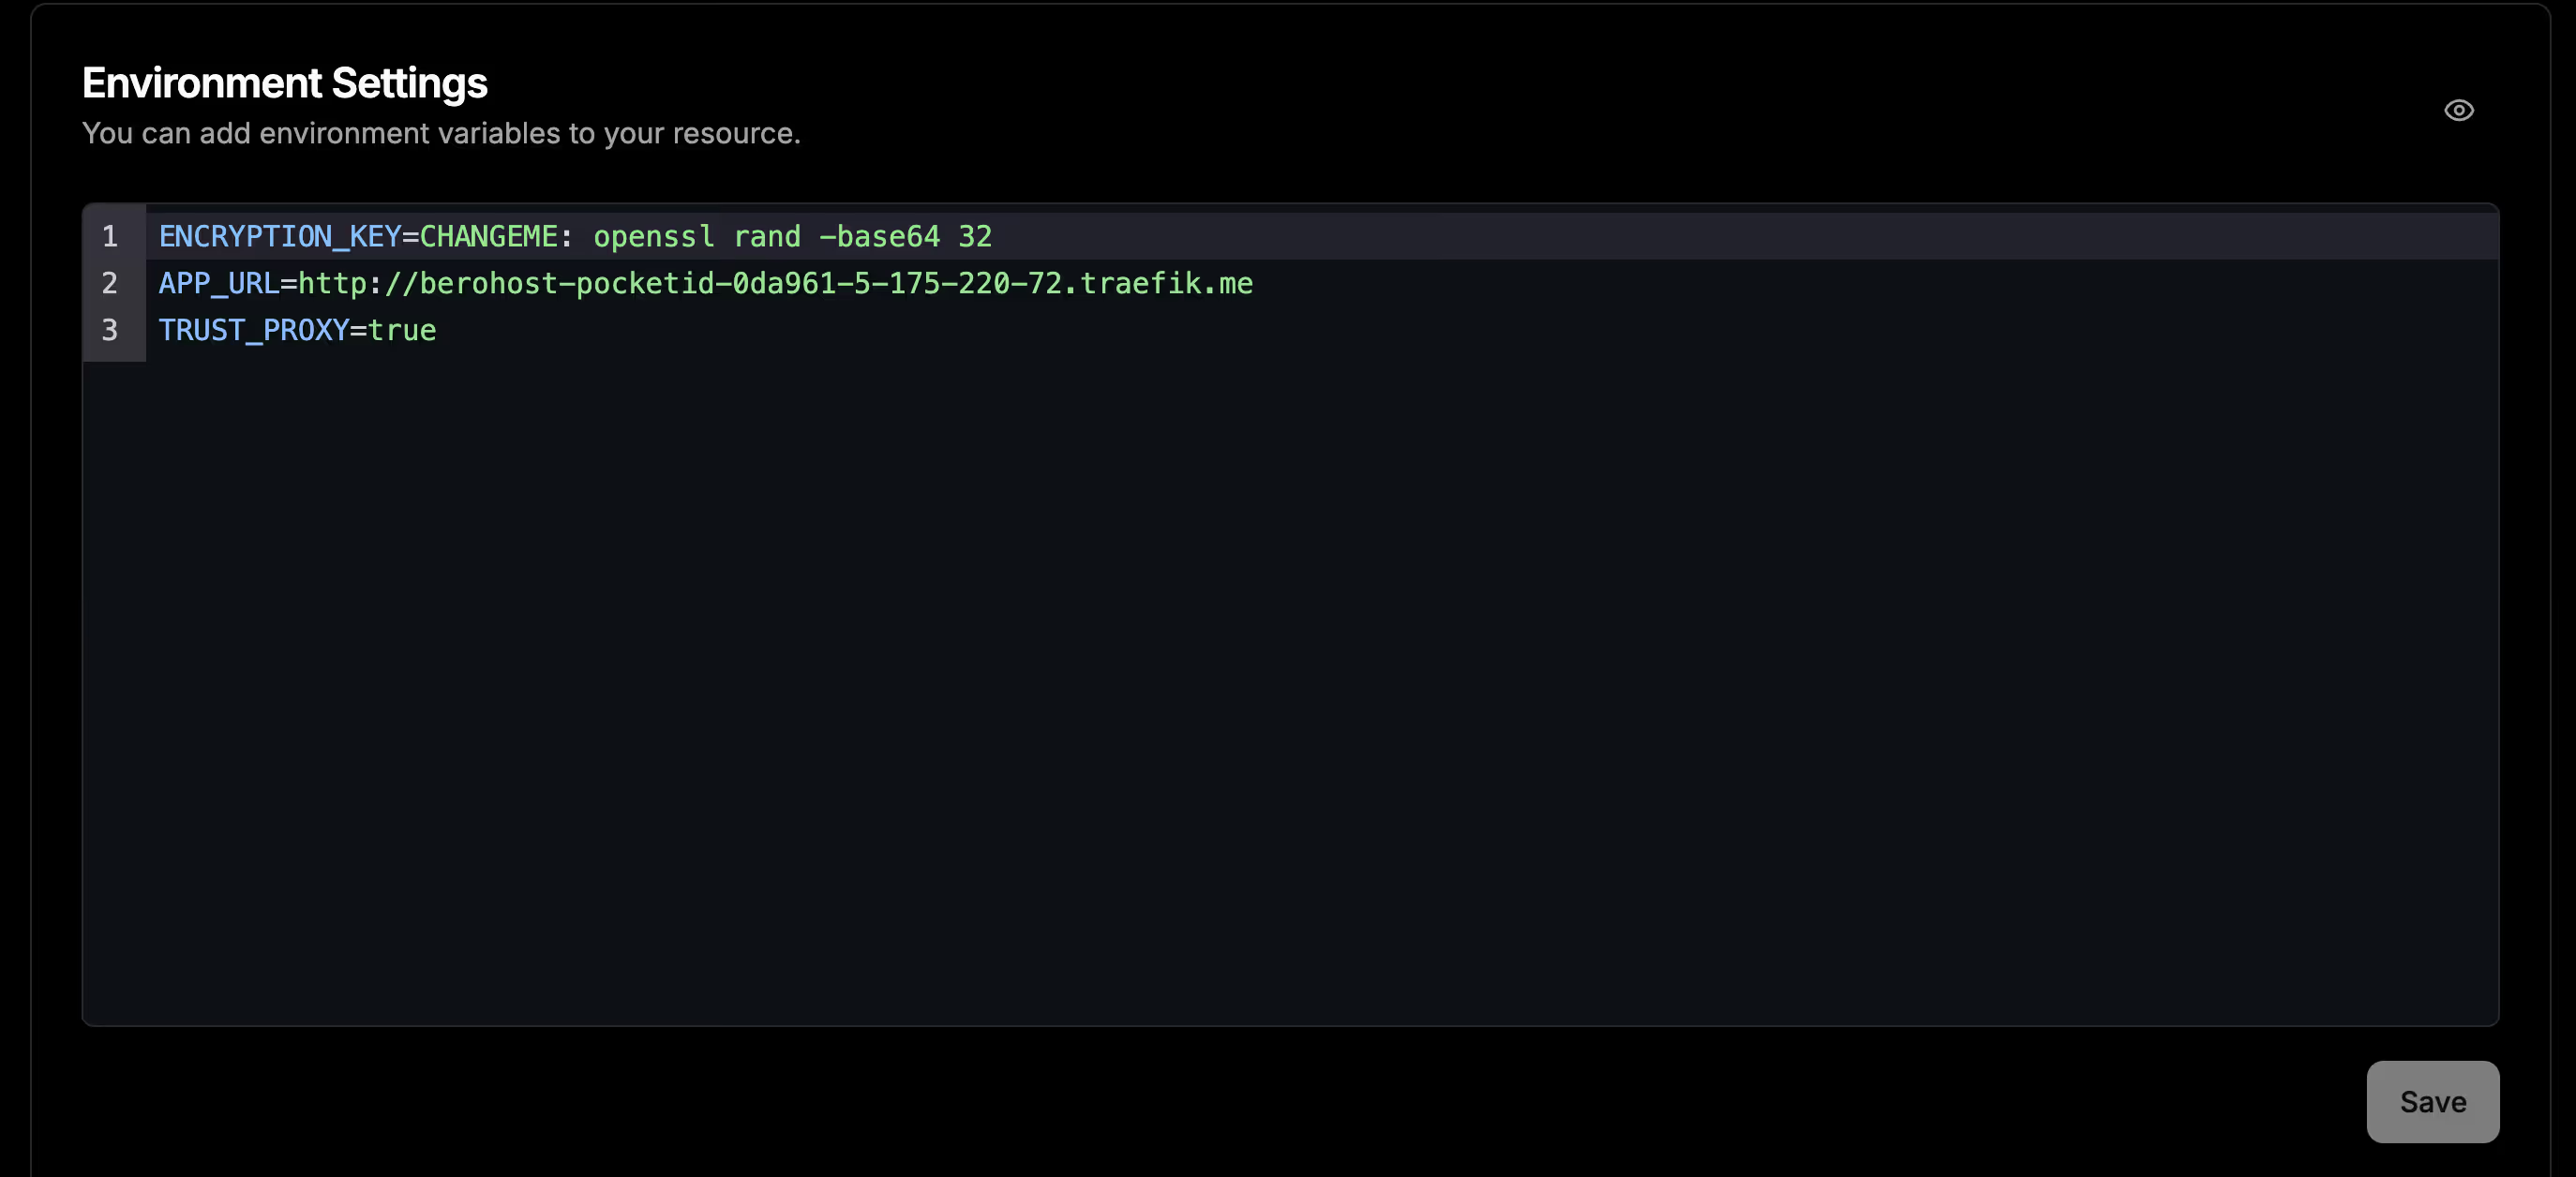
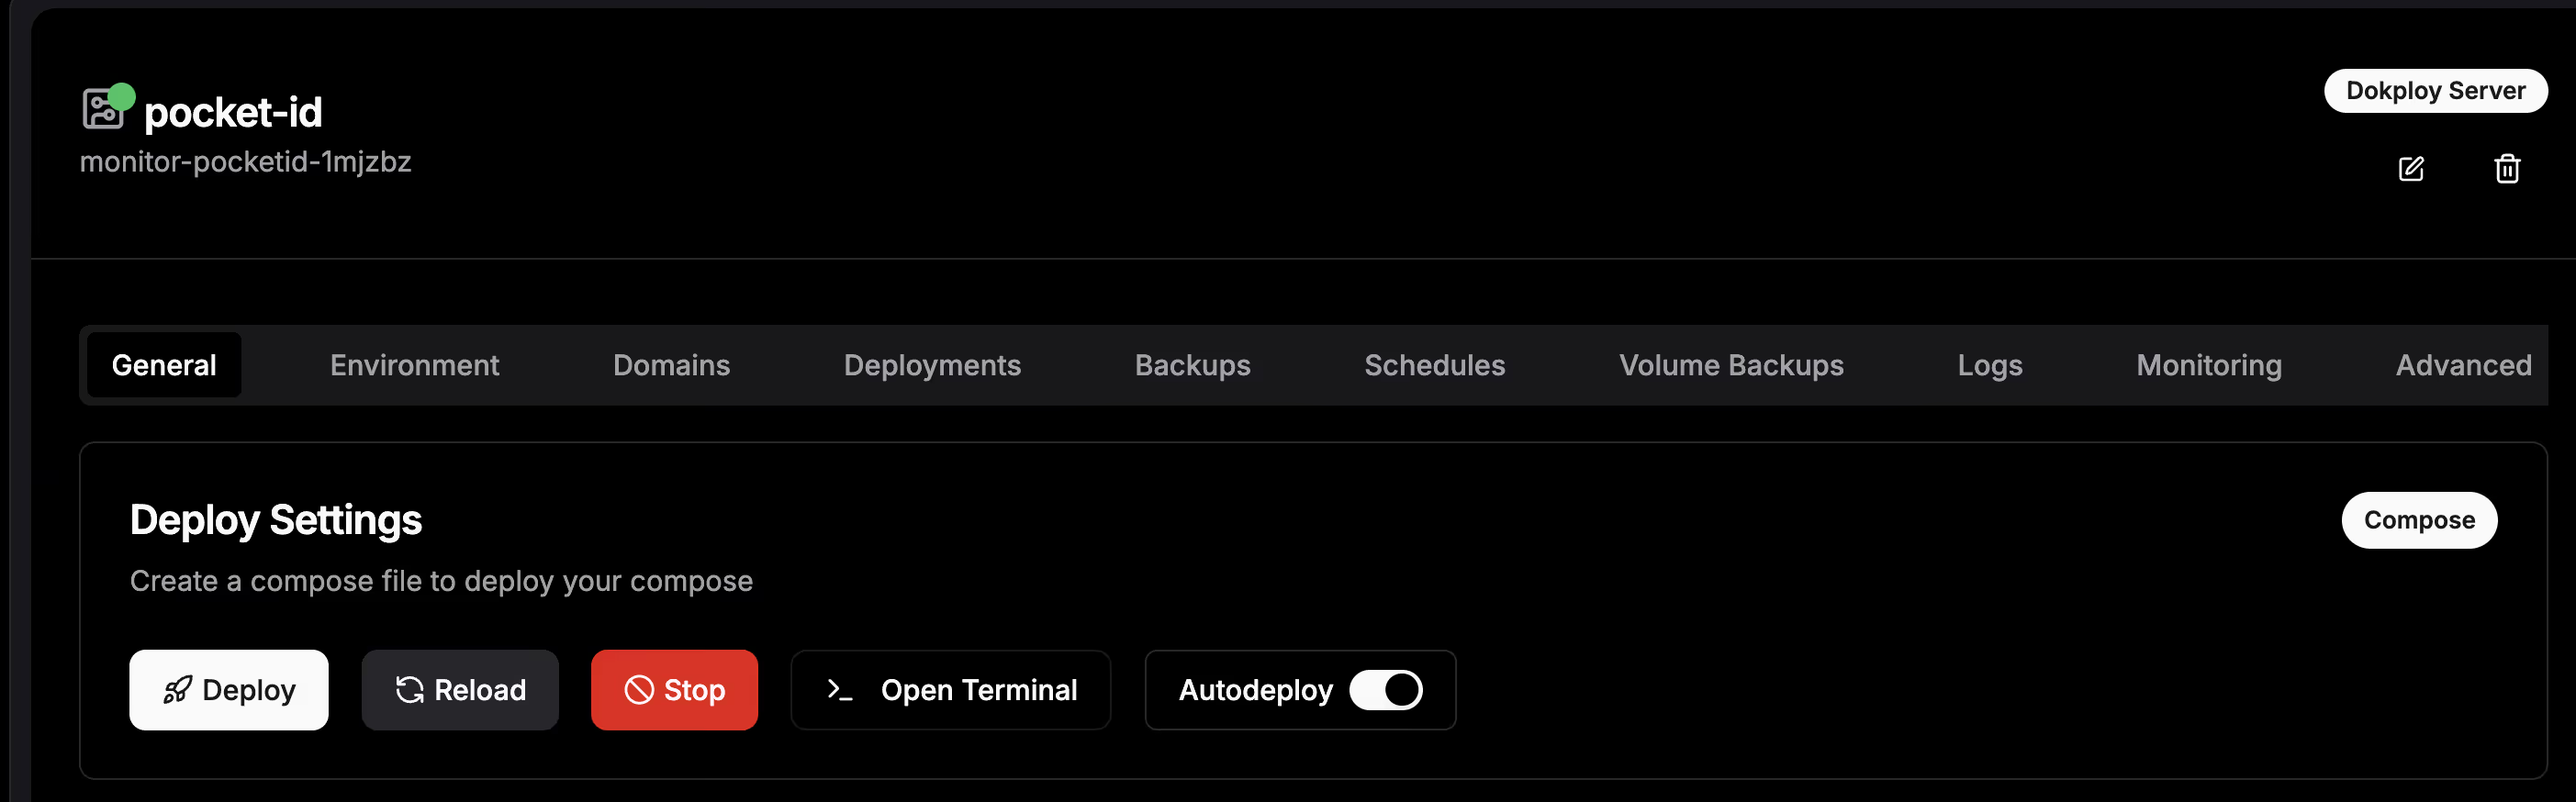
Deployment and Initialization
Starting the Service
- On the Compose service page, click the “Deploy” button
- Wait for image pulling and container startup
- Check the “Logs” tab to confirm the service has started normally
Accessing the Setup Page
After the service starts, visit:
https://pocketid.your.domain/setup
Creating an Administrator Account
- Username: Enter the administrator username (email format recommended, e.g.,
[email protected]) - Display Name: Display name
- Create Passkey: Click and follow browser prompts to create a Passkey
:::note Passkey Creation Methods
- Desktop Browser: Can choose to use system password manager (like Windows Hello, macOS Touch ID) or hardware key
- Mobile Device: Can use biometric authentication (fingerprint/face recognition)
- Cross-Device: Use 1Password, Bitwarden, and other password managers to sync Passkeys :::
After completion, you will be automatically logged into the admin panel.
Adding Additional Passkeys
Visit https://pocketid.your.domain/settings/account
Click the “Add Passkey” button below.
It’s generally recommended to add one more as a backup.

Assigning User Groups
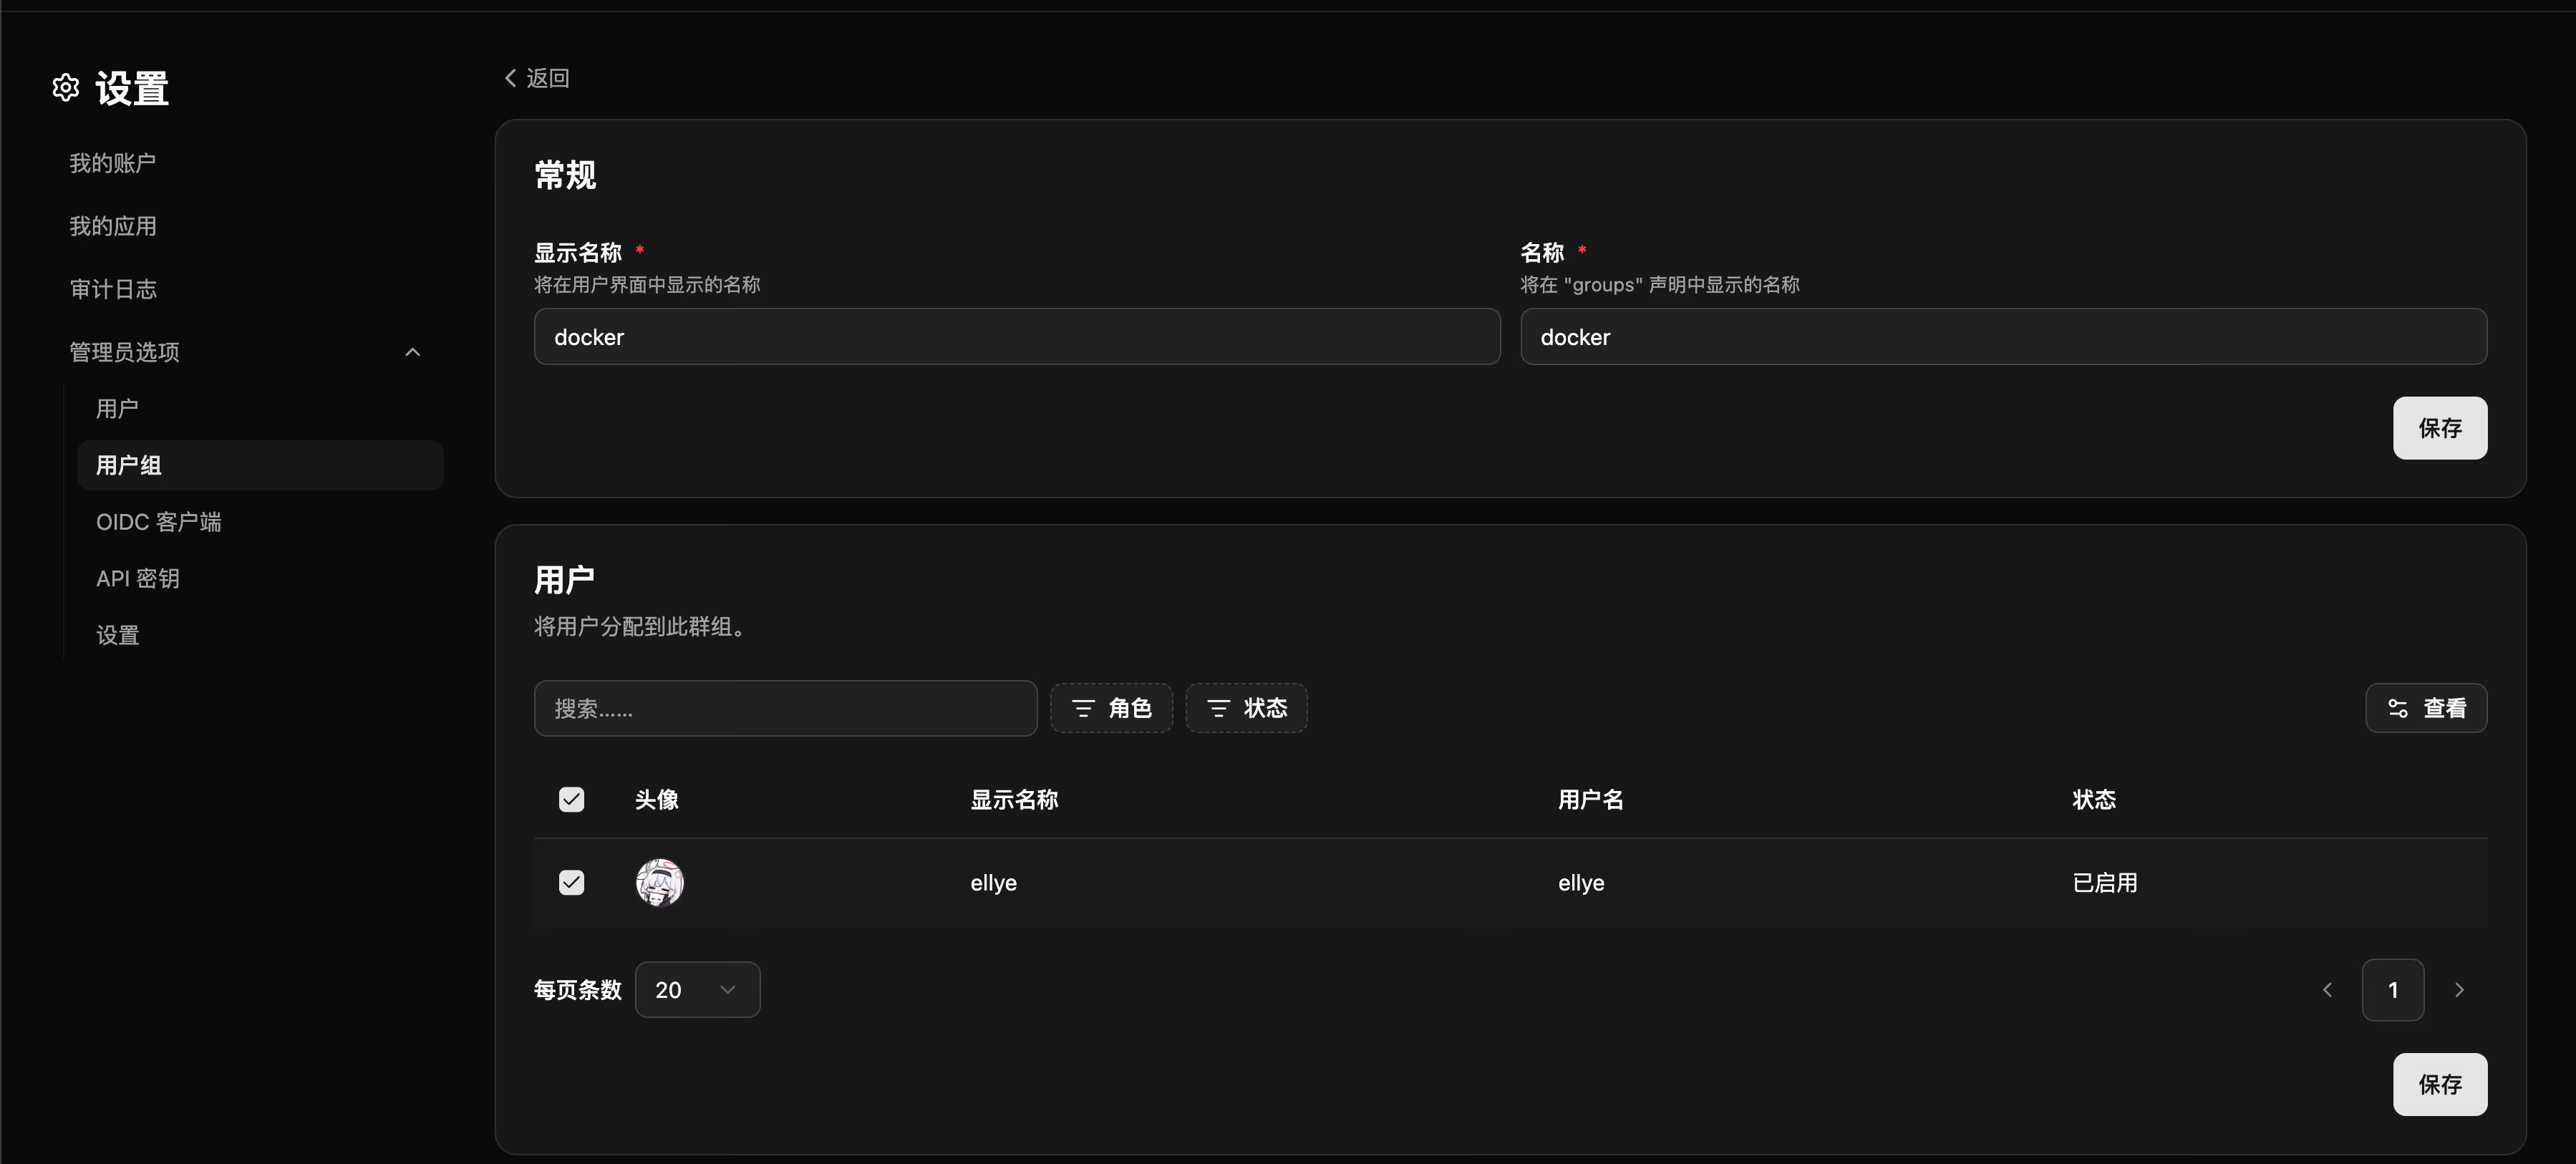
Application Integration: Linkding Example
Creating an OIDC Client in Pocket ID
- Log in to the Pocket ID admin panel
- Go to the “Clients” page
- Click “Create Client”
Fill in the following information:
Client Name: LinkdingRedirect URIs: https://linkding.your.domain/oidc/callback/:::tip Tips
- Callback URL can also be left empty; it will be auto-filled on first login
- Optionally upload a Logo icon for display on the login page :::
After creation, copy and save the following credential information:
- Client ID: e.g.,
abc123def456 - Client Secret: e.g.,
secret_xyz789
Configuring OIDC in Linkding
Assuming you’re deploying Linkding with Docker Compose, add the following to the service’s environment variables (.env file or Dokploy’s Environment tab):
# Enable OIDC loginLD_ENABLE_OIDC=True
# Pocket ID client credentialsOIDC_RP_CLIENT_ID=<Client ID copied from Pocket ID>OIDC_RP_CLIENT_SECRET=<Client Secret copied from Pocket ID>
# OIDC endpoint configurationOIDC_OP_AUTHORIZATION_ENDPOINT=https://pocketid.your.domain/authorizeOIDC_OP_TOKEN_ENDPOINT=https://pocketid.your.domain/api/oidc/tokenOIDC_OP_USER_ENDPOINT=https://pocketid.your.domain/api/oidc/userinfoOIDC_OP_JWKS_ENDPOINT=https://pocketid.your.domain/.well-known/jwks.json
# PKCE support (adjust based on actual needs, default is True)OIDC_USE_PKCE=False
# SSL certificate verification (set to False for self-signed certificates)OIDC_VERIFY_SSL=True
# Optional: Custom username field (defaults to email)# OIDC_USERNAME_CLAIM=preferred_usernameComplete Parameter Description:
| Environment Variable | Description | Example Value |
|---|---|---|
LD_ENABLE_OIDC | Enable OIDC login | True |
OIDC_RP_CLIENT_ID | Pocket ID client ID | Copy from Pocket ID |
OIDC_RP_CLIENT_SECRET | Pocket ID client secret | Copy from Pocket ID |
OIDC_OP_AUTHORIZATION_ENDPOINT | Authorization endpoint | https://pocketid.your.domain/authorize |
OIDC_OP_TOKEN_ENDPOINT | Token endpoint | https://pocketid.your.domain/api/oidc/token |
OIDC_OP_USER_ENDPOINT | User info endpoint | https://pocketid.your.domain/api/oidc/userinfo |
OIDC_OP_JWKS_ENDPOINT | JWKS endpoint | https://pocketid.your.domain/.well-known/jwks.json |
OIDC_USE_PKCE | Enable PKCE verification | False (not required for Pocket ID) |
OIDC_VERIFY_SSL | Verify SSL certificate | True (recommended for production) |
OIDC_USERNAME_CLAIM | Username field (optional) | email or preferred_username |
Redeploying Linkding
After saving the environment variables, click “Redeploy” in Dokploy to redeploy the Linkding service.
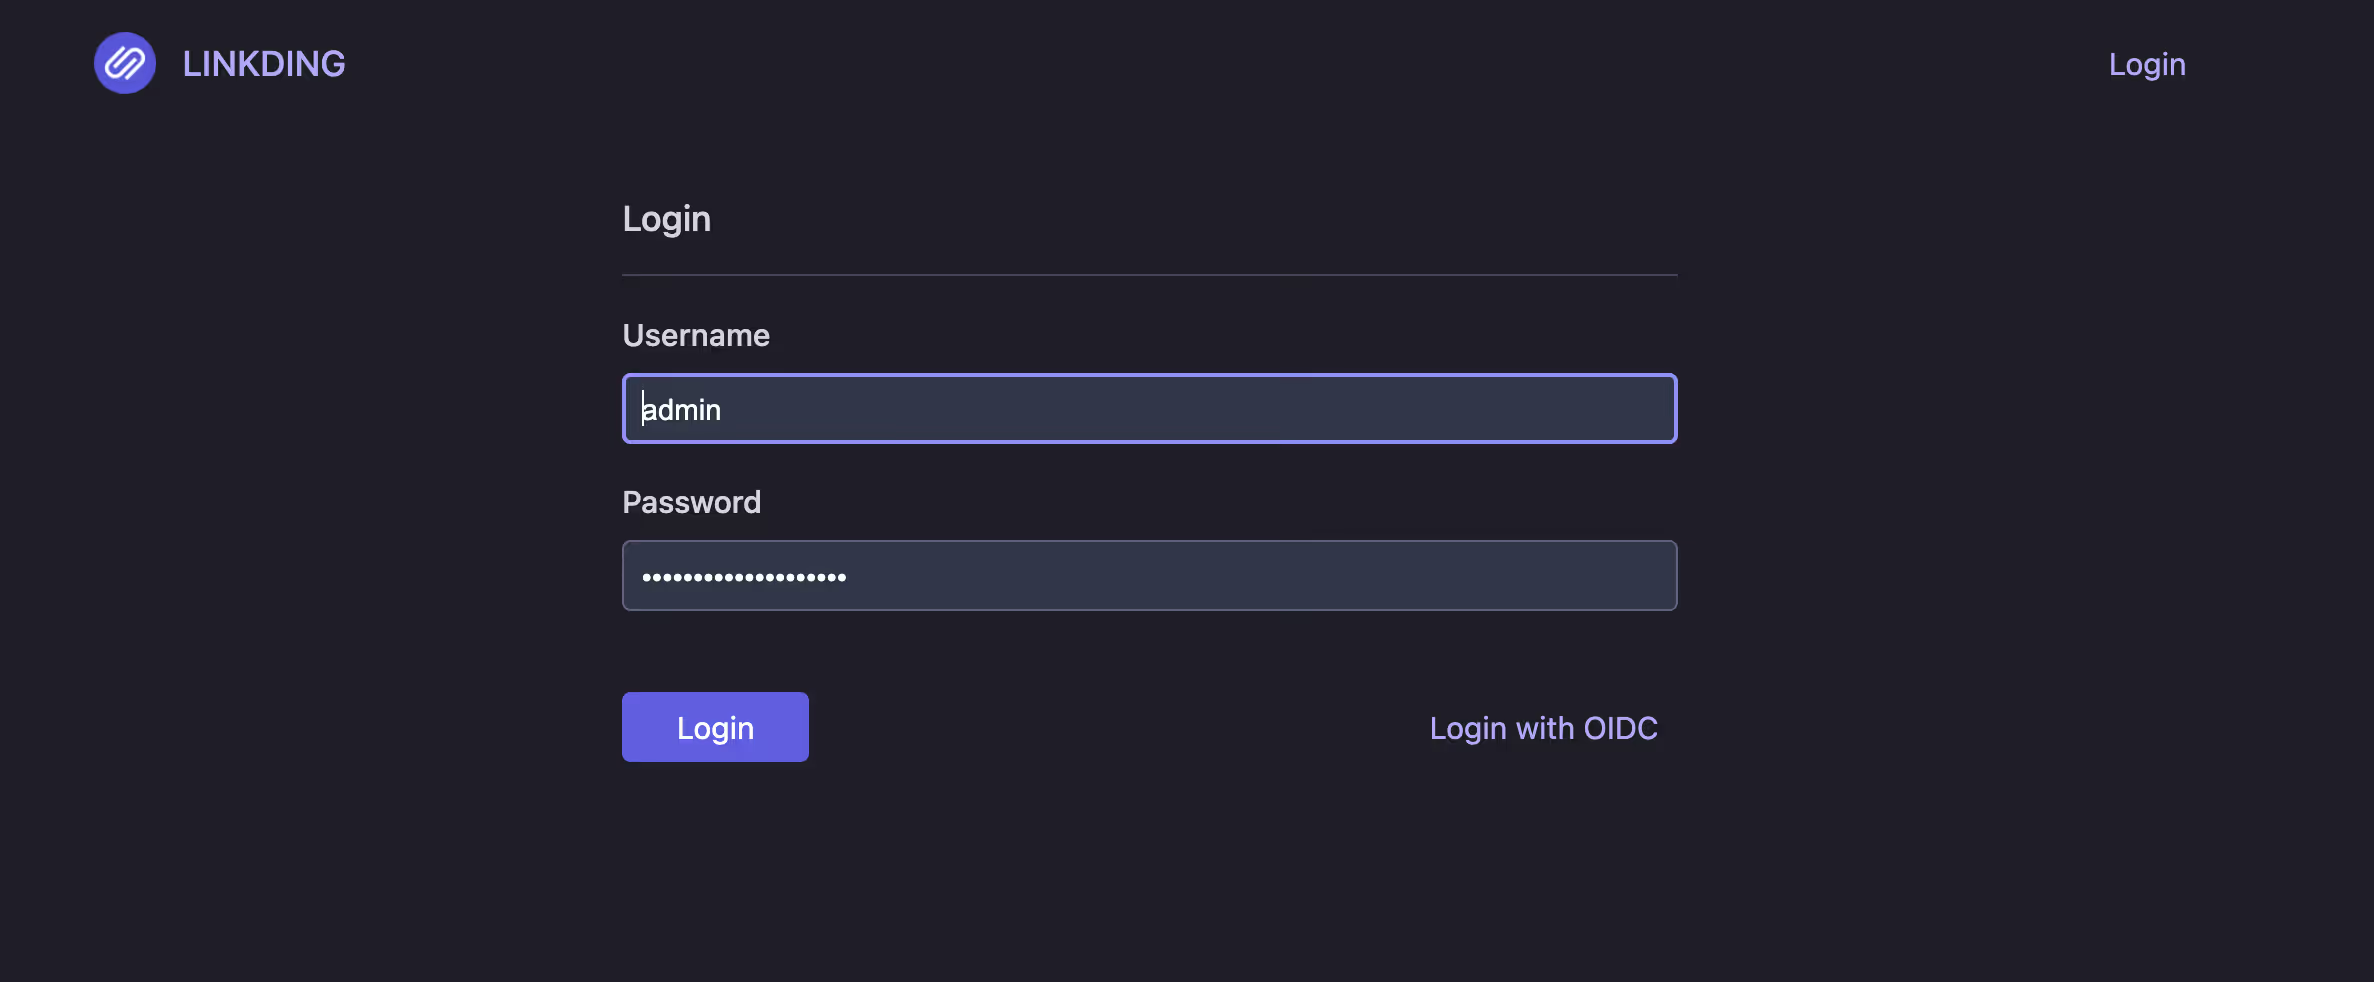
After deployment completes, visit the Linkding login page and you will see the “Sign in with OIDC” button.

General Integration Instructions
For other OIDC-supporting applications, you typically need the following information:
Issuer / Discovery URL: https://pocketid.your.domainAuthorization Endpoint: https://pocketid.your.domain/authorizeToken Endpoint: https://pocketid.your.domain/api/oidc/tokenUserInfo Endpoint: https://pocketid.your.domain/api/oidc/userinfoJWKS Endpoint: https://pocketid.your.domain/.well-known/jwks.jsonClient ID: Obtained from Pocket IDClient Secret: Obtained from Pocket IDScopes: openid profile email:::note Endpoint Information
Most OIDC applications support automatic discovery configuration, requiring only the Issuer URL (https://pocketid.your.domain). If manual configuration is needed, use the complete endpoint paths above.
:::
:::tip Common Application Integration
- Immich: Supports OIDC, configuration path at Settings → OAuth
- Grafana: In the
[auth.generic_oauth]section of the config file - Nextcloud: Install the “OpenID Connect user backend” plugin
- Portainer: Business Edition supports OIDC :::
For more integrations, see https://pocket-id.org/docs/client-examples
Backup Strategy
Data Persistence
All Pocket ID data is saved in the pocket-id-data volume, including:
- SQLite database (users, clients, Passkey information)
- Configuration files
- Session data
Backup Methods
Using Dokploy’s Built-in Backup
- Go to the service’s “Backups” tab
- Configure backup destination (e.g., S3, local path)
- Set backup schedule (daily backup recommended)
:::warning Security Tips
- Backup files contain encryption keys and user authentication information; keep them secure
- Regularly test the backup recovery process to ensure data availability
- If using PostgreSQL, backup the database separately :::
Security Hardening Recommendations
1. Enforce HTTPS
Ensure APP_URL uses HTTPS; Passkey cannot be used in non-HTTPS environments.
2. Restrict Admin Panel Access
If only specific IPs need to access the admin panel, you can configure an IP whitelist in Traefik.
Frequently Asked Questions
Q: What if Passkey creation fails?
A: Check the following:
- Confirm the access address uses HTTPS
- Does the browser support WebAuthn (Chrome 67+, Firefox 60+, Safari 14+)
- Check the browser console for error messages
Q: What if I forget the administrator account?
A: If you cannot log in, you can reset through the database:
See details at https://pocket-id.org/docs/troubleshooting/account-recovery
CAUTIONIt’s recommended to configure multiple Passkeys for the administrator account to avoid single points of failure.
Conclusion
Pocket ID provides self-hosted users with a lightweight, modern identity authentication solution.
No more need to remember passwords.
Next steps:
- Integrate more self-hosted applications with Pocket ID
- Configure multi-factor authentication (MFA) to enhance security
- Explore the Pocket ID official documentation to learn about advanced features
If you encounter problems during deployment, you can consult:
Enjoy using it!