Complete Guide to Deploying Proxmox Backup Server on Hetzner CX33 with Object Storage Integration
Introduction
In modern data center management, data backup is a critical component for ensuring business continuity and disaster recovery capabilities. Proxmox Virtual Environment (PVE), as a leading open-source virtualization platform, combined with its official Proxmox Backup Server (PBS), enables the construction of a complete, efficient, and cost-effective enterprise-grade backup solution.
This tutorial provides detailed instructions on deploying Proxmox Backup Server on a Hetzner Cloud CX33 instance, leveraging Hetzner Object Storage as a high-value backend storage solution, and seamlessly integrating with existing Proxmox VE environments to achieve automated backup and retention policies.
Why Choose Proxmox Backup Server
Proxmox Backup Server is a backup solution specifically designed for PVE environments. Compared to traditional file-level backup tools, it offers the following significant advantages:
| Feature | Description |
|---|---|
| Incremental Backups | Variable-length chunk deduplication technology transfers and stores only changed data blocks, significantly reducing storage usage and backup time |
| End-to-End Encryption | Client-side encryption support ensures backup data security during transmission and storage |
| Compression Support | Built-in Zstandard compression algorithm provides excellent balance between CPU overhead and compression ratio |
| Automatic Retention Policies | Flexible backup retention rules supporting automatic cleanup by time dimension (daily/weekly/monthly/yearly) |
| Native PVE Integration | Deep integration with Proxmox VE enables one-click backup/restore without additional configuration |
Part 1: Creating a Hetzner CX33 Server
Instance Specifications
The Hetzner CX33 is a highly cost-effective cloud server with the following specifications:
- vCPU: 4 cores (Intel Xeon or AMD EPYC)
- Memory: 8 GB
- Storage: 80 GB SSD
- Network: 1 Gbps bandwidth, 20 TB monthly traffic
- Price: Approximately €4.99/month
For small to medium-sized PVE environment backup requirements, the CX33’s performance is more than sufficient. PBS itself has modest compute resource requirements, primarily relying on memory for deduplication indexing. The 8GB memory can support multi-terabyte backup storage.
Creation Steps
- Log in to Hetzner Cloud Console
- Select your project and click “Add Server”
- Choose a Location (recommend selecting the same region as your PVE host to reduce latency)
- Select Type: CX33
- Select Image: Debian 13 (Trixie)
- Configure SSH Key or password authentication
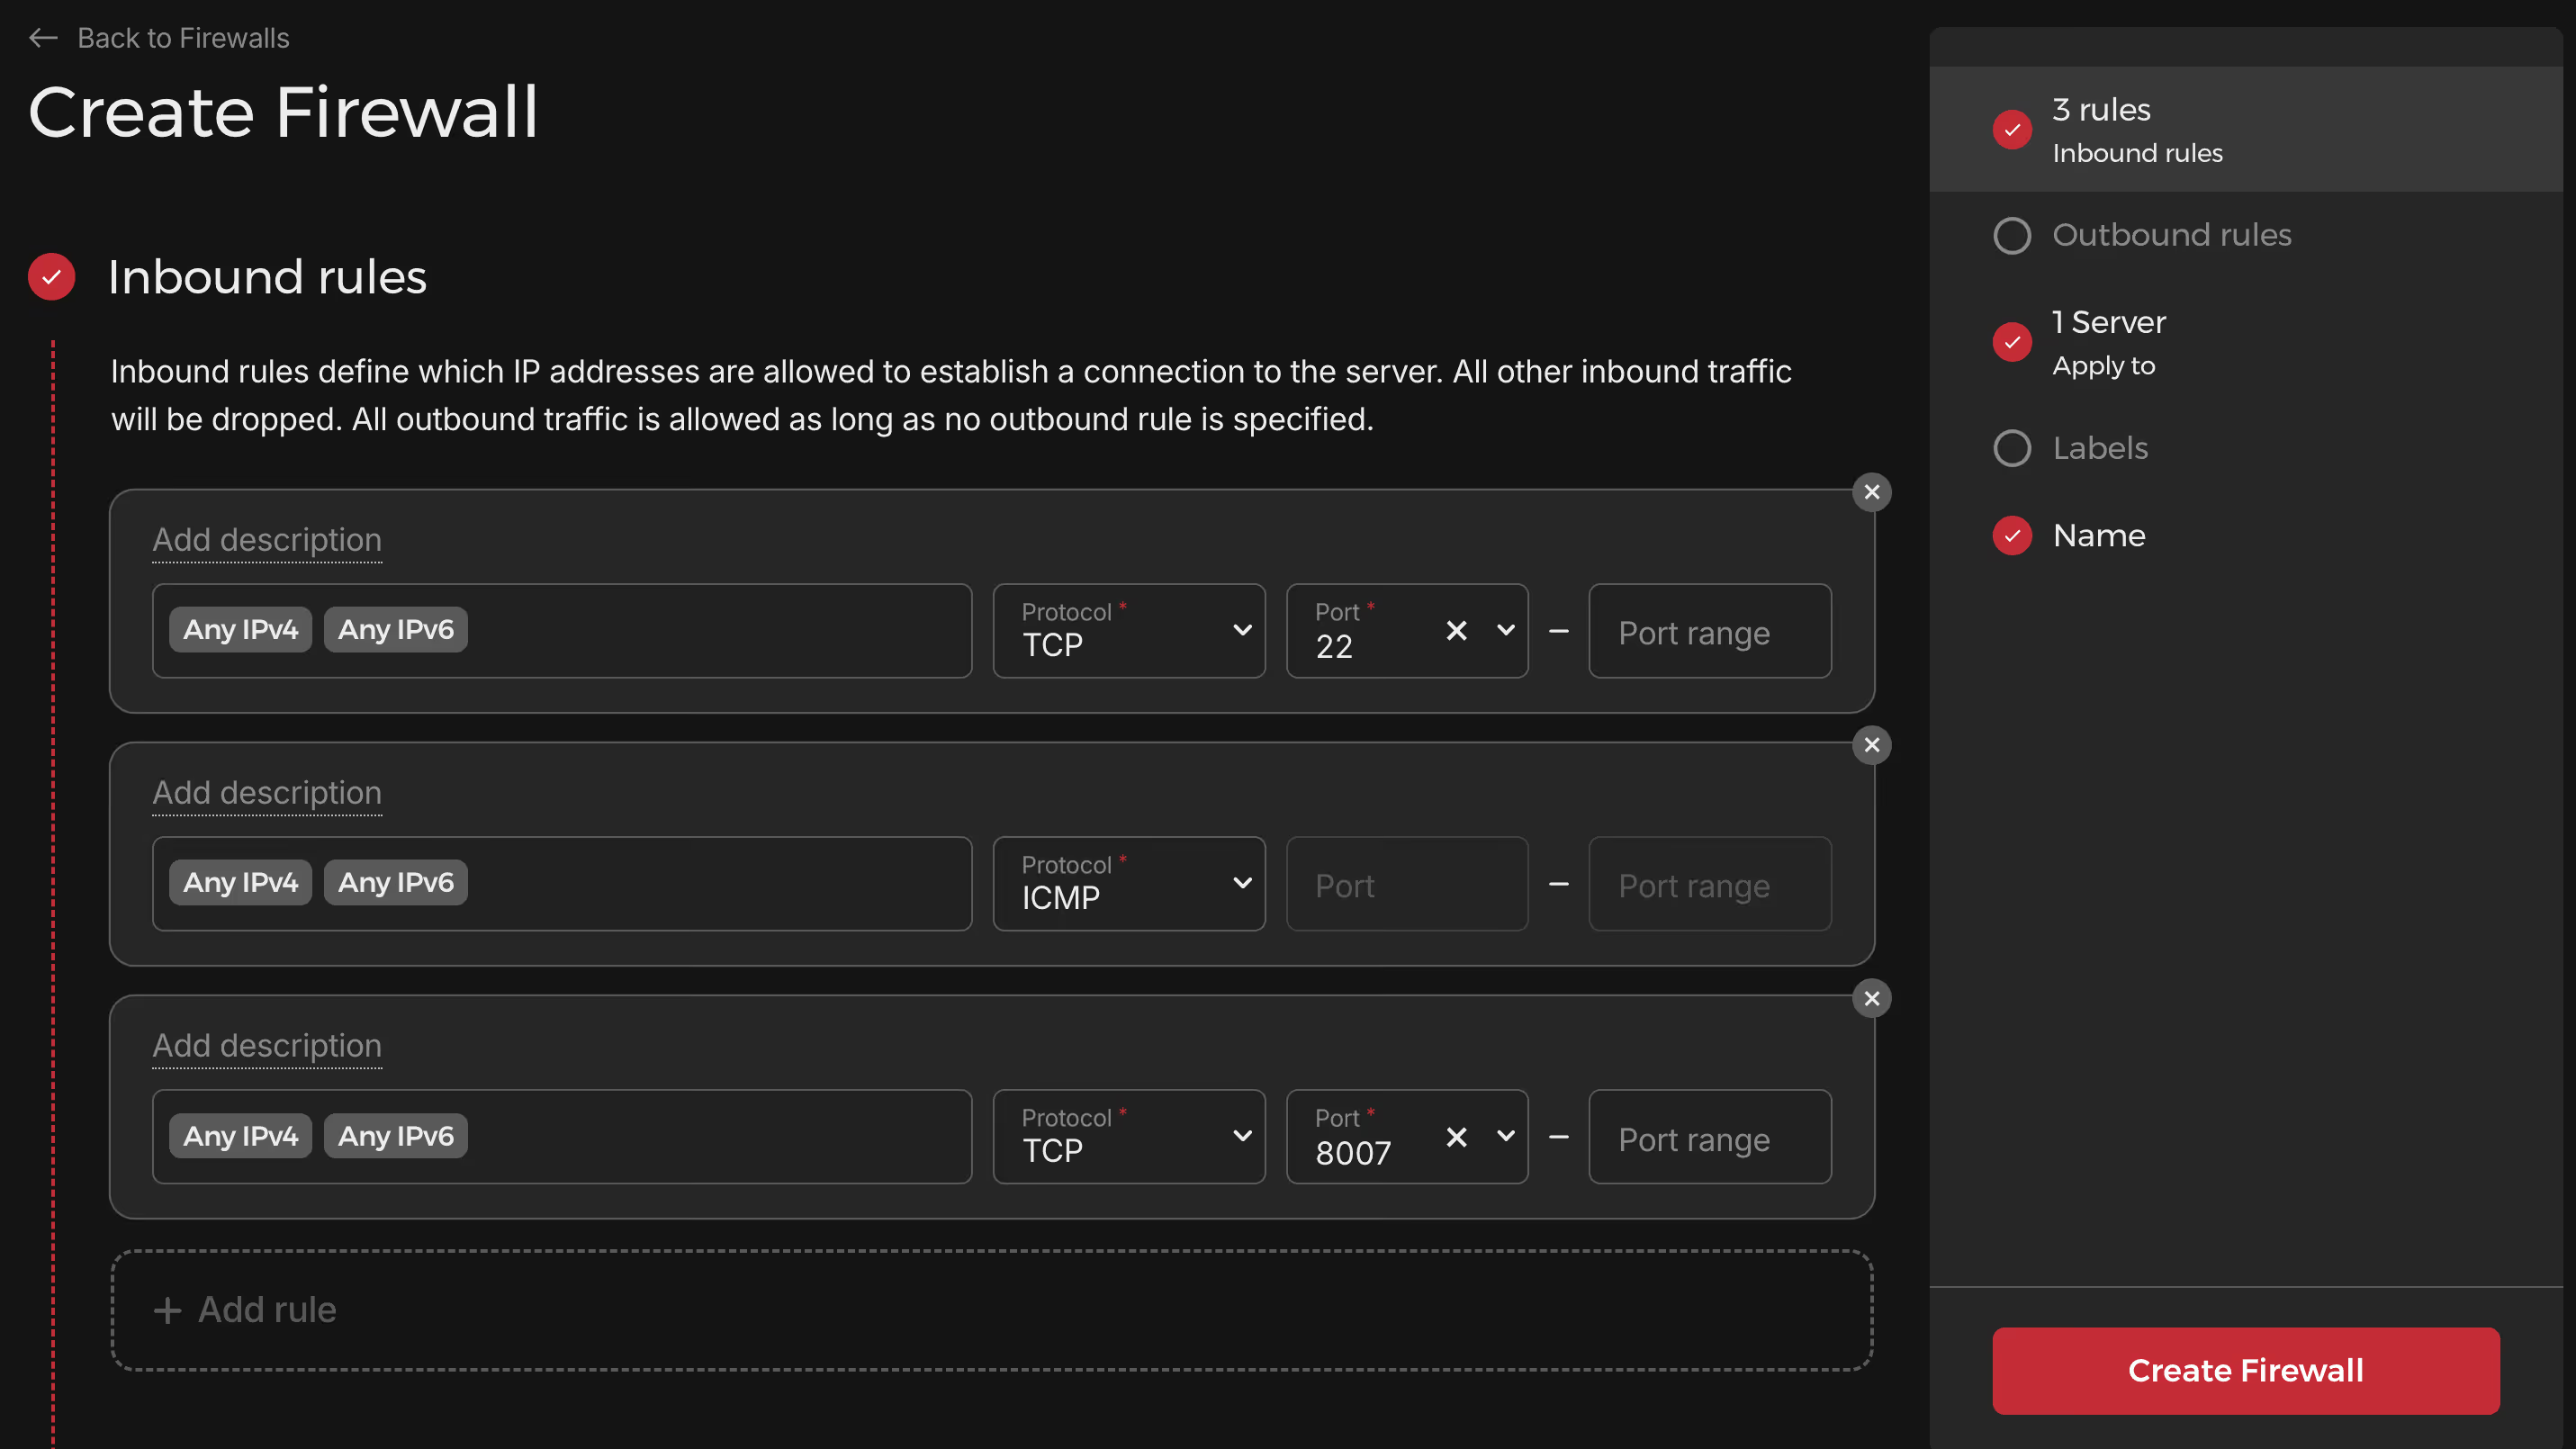
- Confirm firewall rules, ensuring port 8007 is accessible
- Create the server and record the assigned IP address
Part 2: Installing Proxmox Backup Server
Connect to the newly created CX33 server via SSH and execute the following installation steps:
Adding Proxmox Software Repositories
# Download and add Proxmox release signing keysudo wget https://enterprise.proxmox.com/debian/proxmox-release-trixie.gpg \ -O /etc/apt/trusted.gpg.d/proxmox-release-trixie.gpg
# Add PBS community edition repository (no subscription)echo "deb http://download.proxmox.com/debian/pbs trixie pbs-no-subscription" | \ sudo tee /etc/apt/sources.list.d/proxmox-backup-server.listInstalling the Package
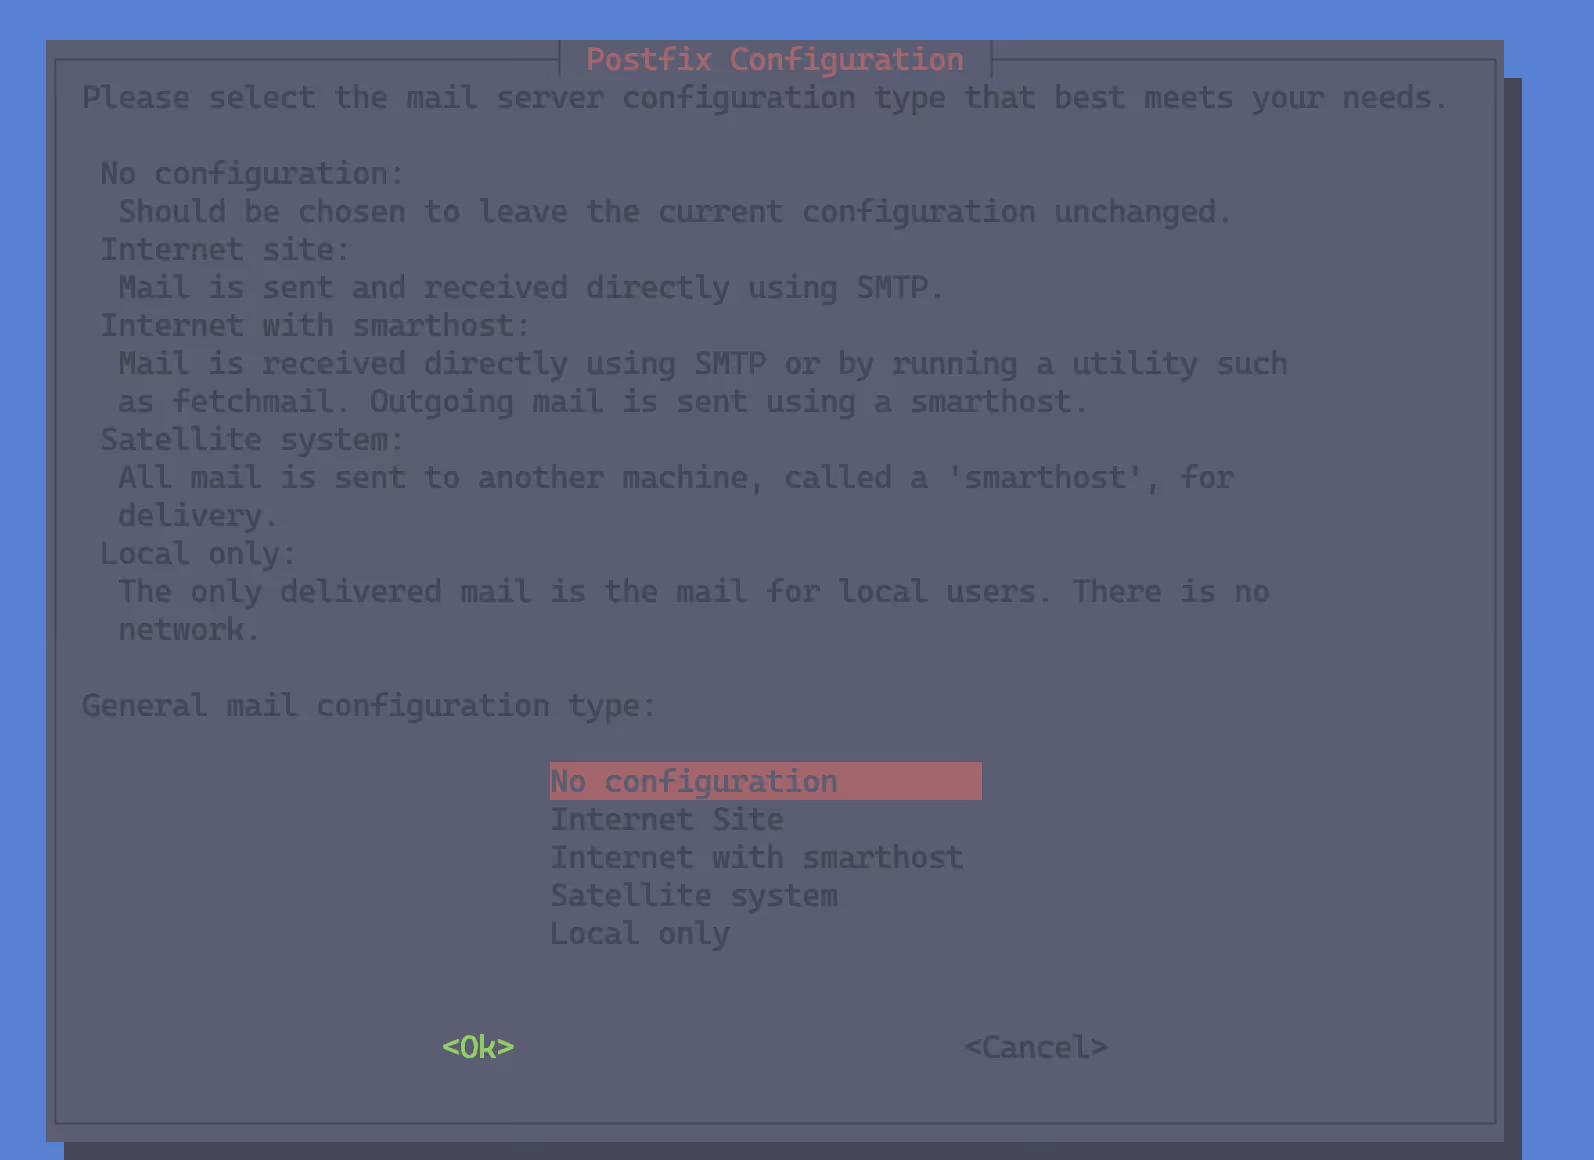
sudo apt update && sudo apt install proxmox-backup -yDuring installation, the system will prompt for Postfix mail transfer agent configuration. If you haven’t configured a mail sending policy yet, it’s recommended to temporarily select “No configuration”. You can reconfigure later using dpkg-reconfigure postfix.
Accessing the Web Management Interface
After installation completes, the PBS service will start automatically. Access it via browser:
https://<your-server-ip>:8007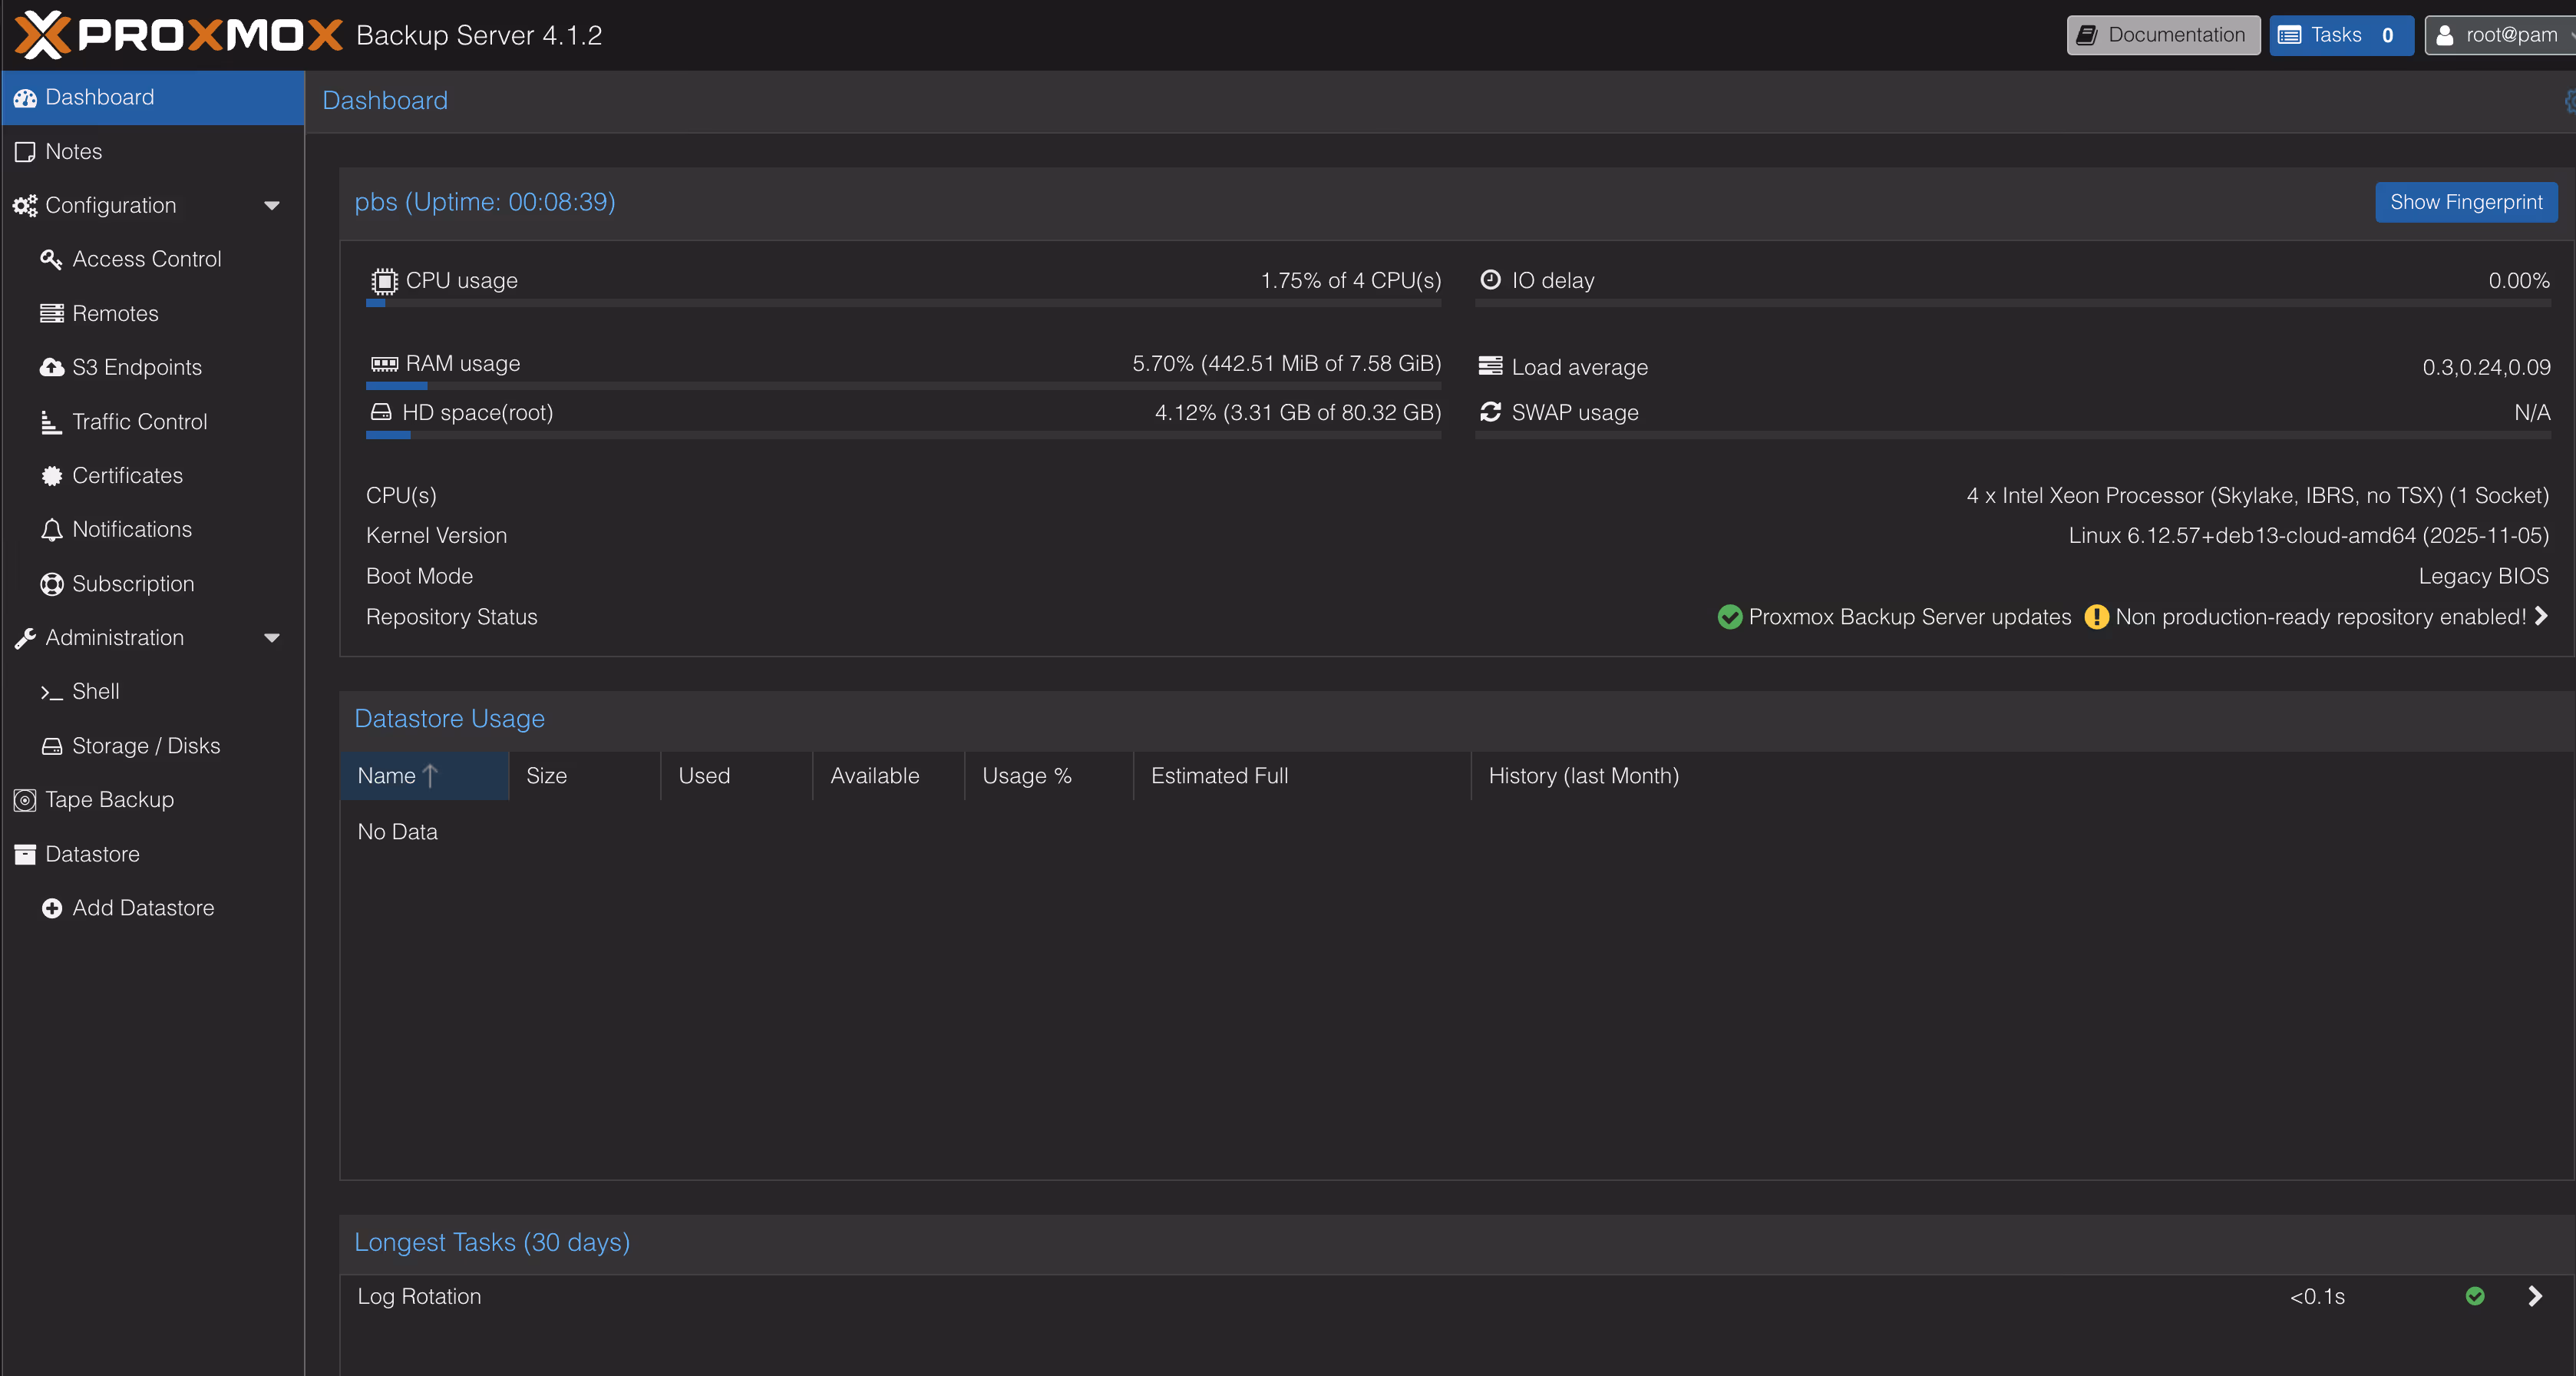
You will encounter an SSL certificate warning on first access, as PBS uses a self-signed certificate. Add a security exception to proceed to the login page. By default, use the Linux system user root and its password to log in.
Part 3: Configuring Hetzner Object Storage
Hetzner Object Storage is a cost-effective storage service based on S3-compatible API, priced at only €0.006/GB/month, making it ideal as a PBS remote storage backend.
Creating an Object Storage Bucket
- Go to Hetzner Cloud Console
- Navigate to Object Storage in the left menu
- Select the Locations tab and enable your desired region (e.g., hel1, fsn1, or nbg1)
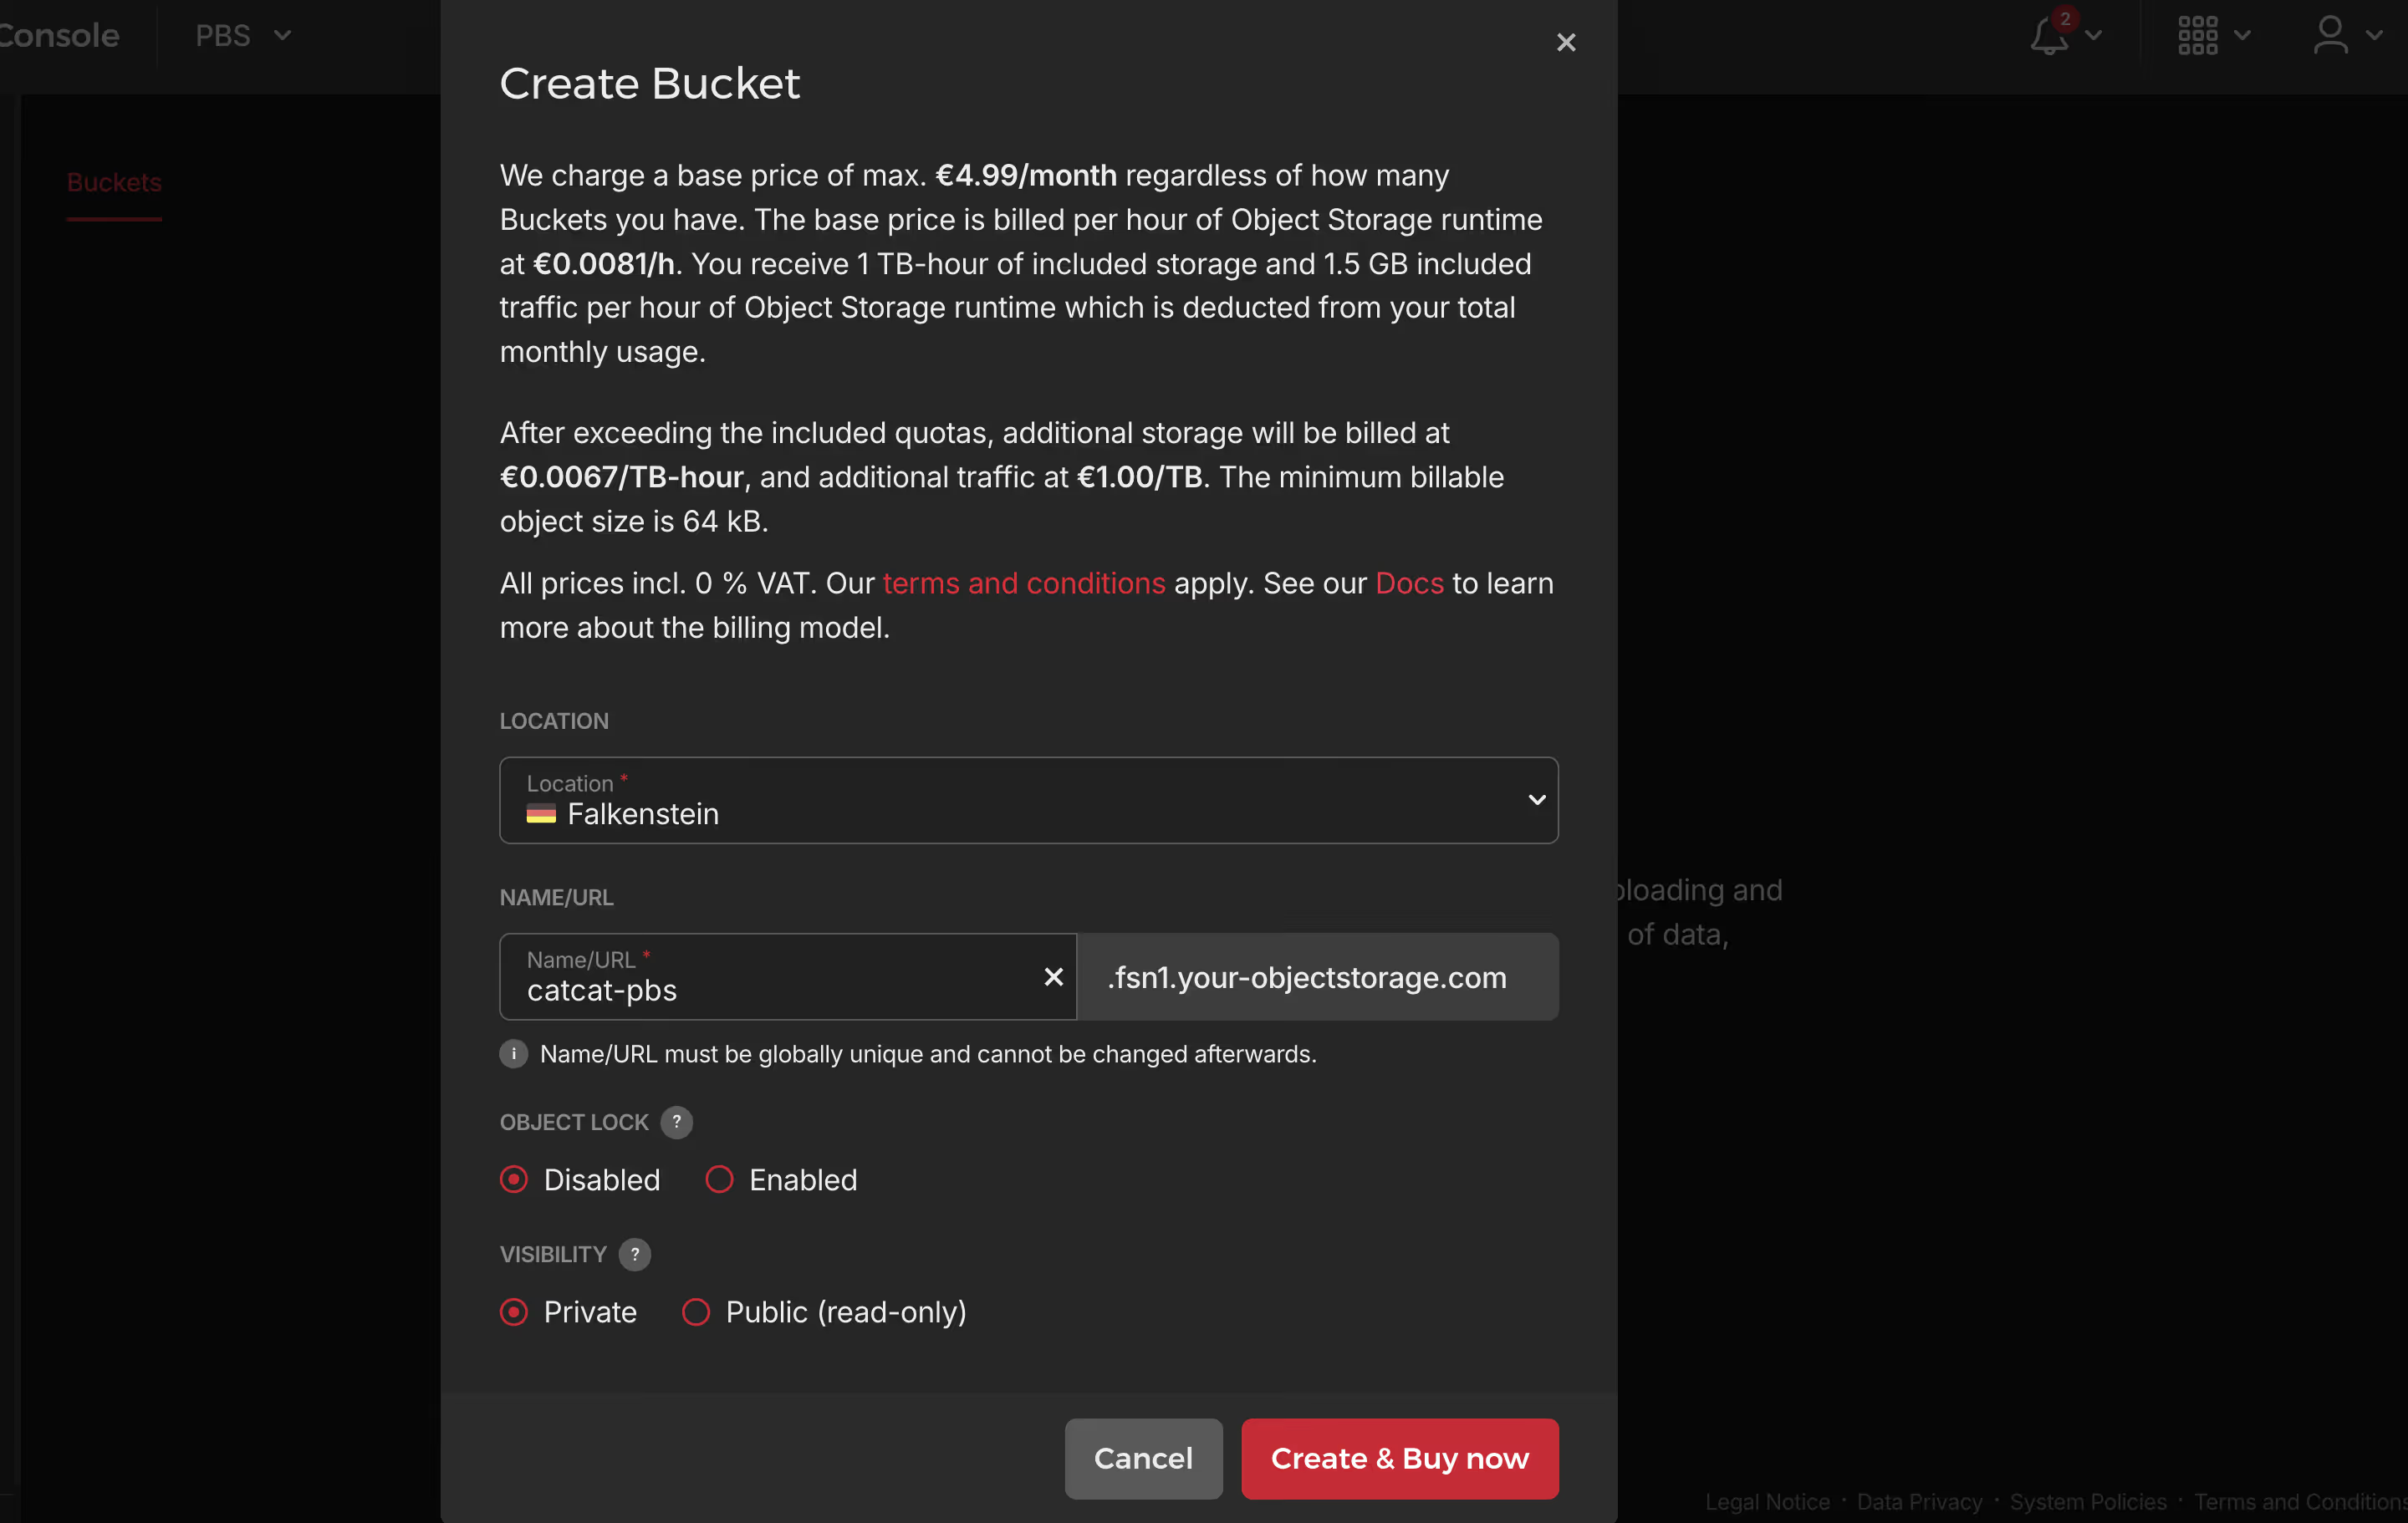
- Click Create Bucket, enter a bucket name (e.g.,
proxmox-backups) - Record the bucket’s Endpoint URL format:
https://<bucket-name>.<region>.your-objectstorage.com
Available endpoints
| Location | Endpoint |
|---|---|
| Falkenstein | fsn1.your-objectstorage.com |
| Nuremberg | nbg1.your-objectstorage.com |
| Helsinki | hel1.your-objectstorage.com |
Generating Access Credentials
- On the Object Storage page, switch to the Credentials tab
- Click S3 Credentials
- Enter a description (e.g.,
PBS-Access) - Copy the generated Access Key and Secret Key
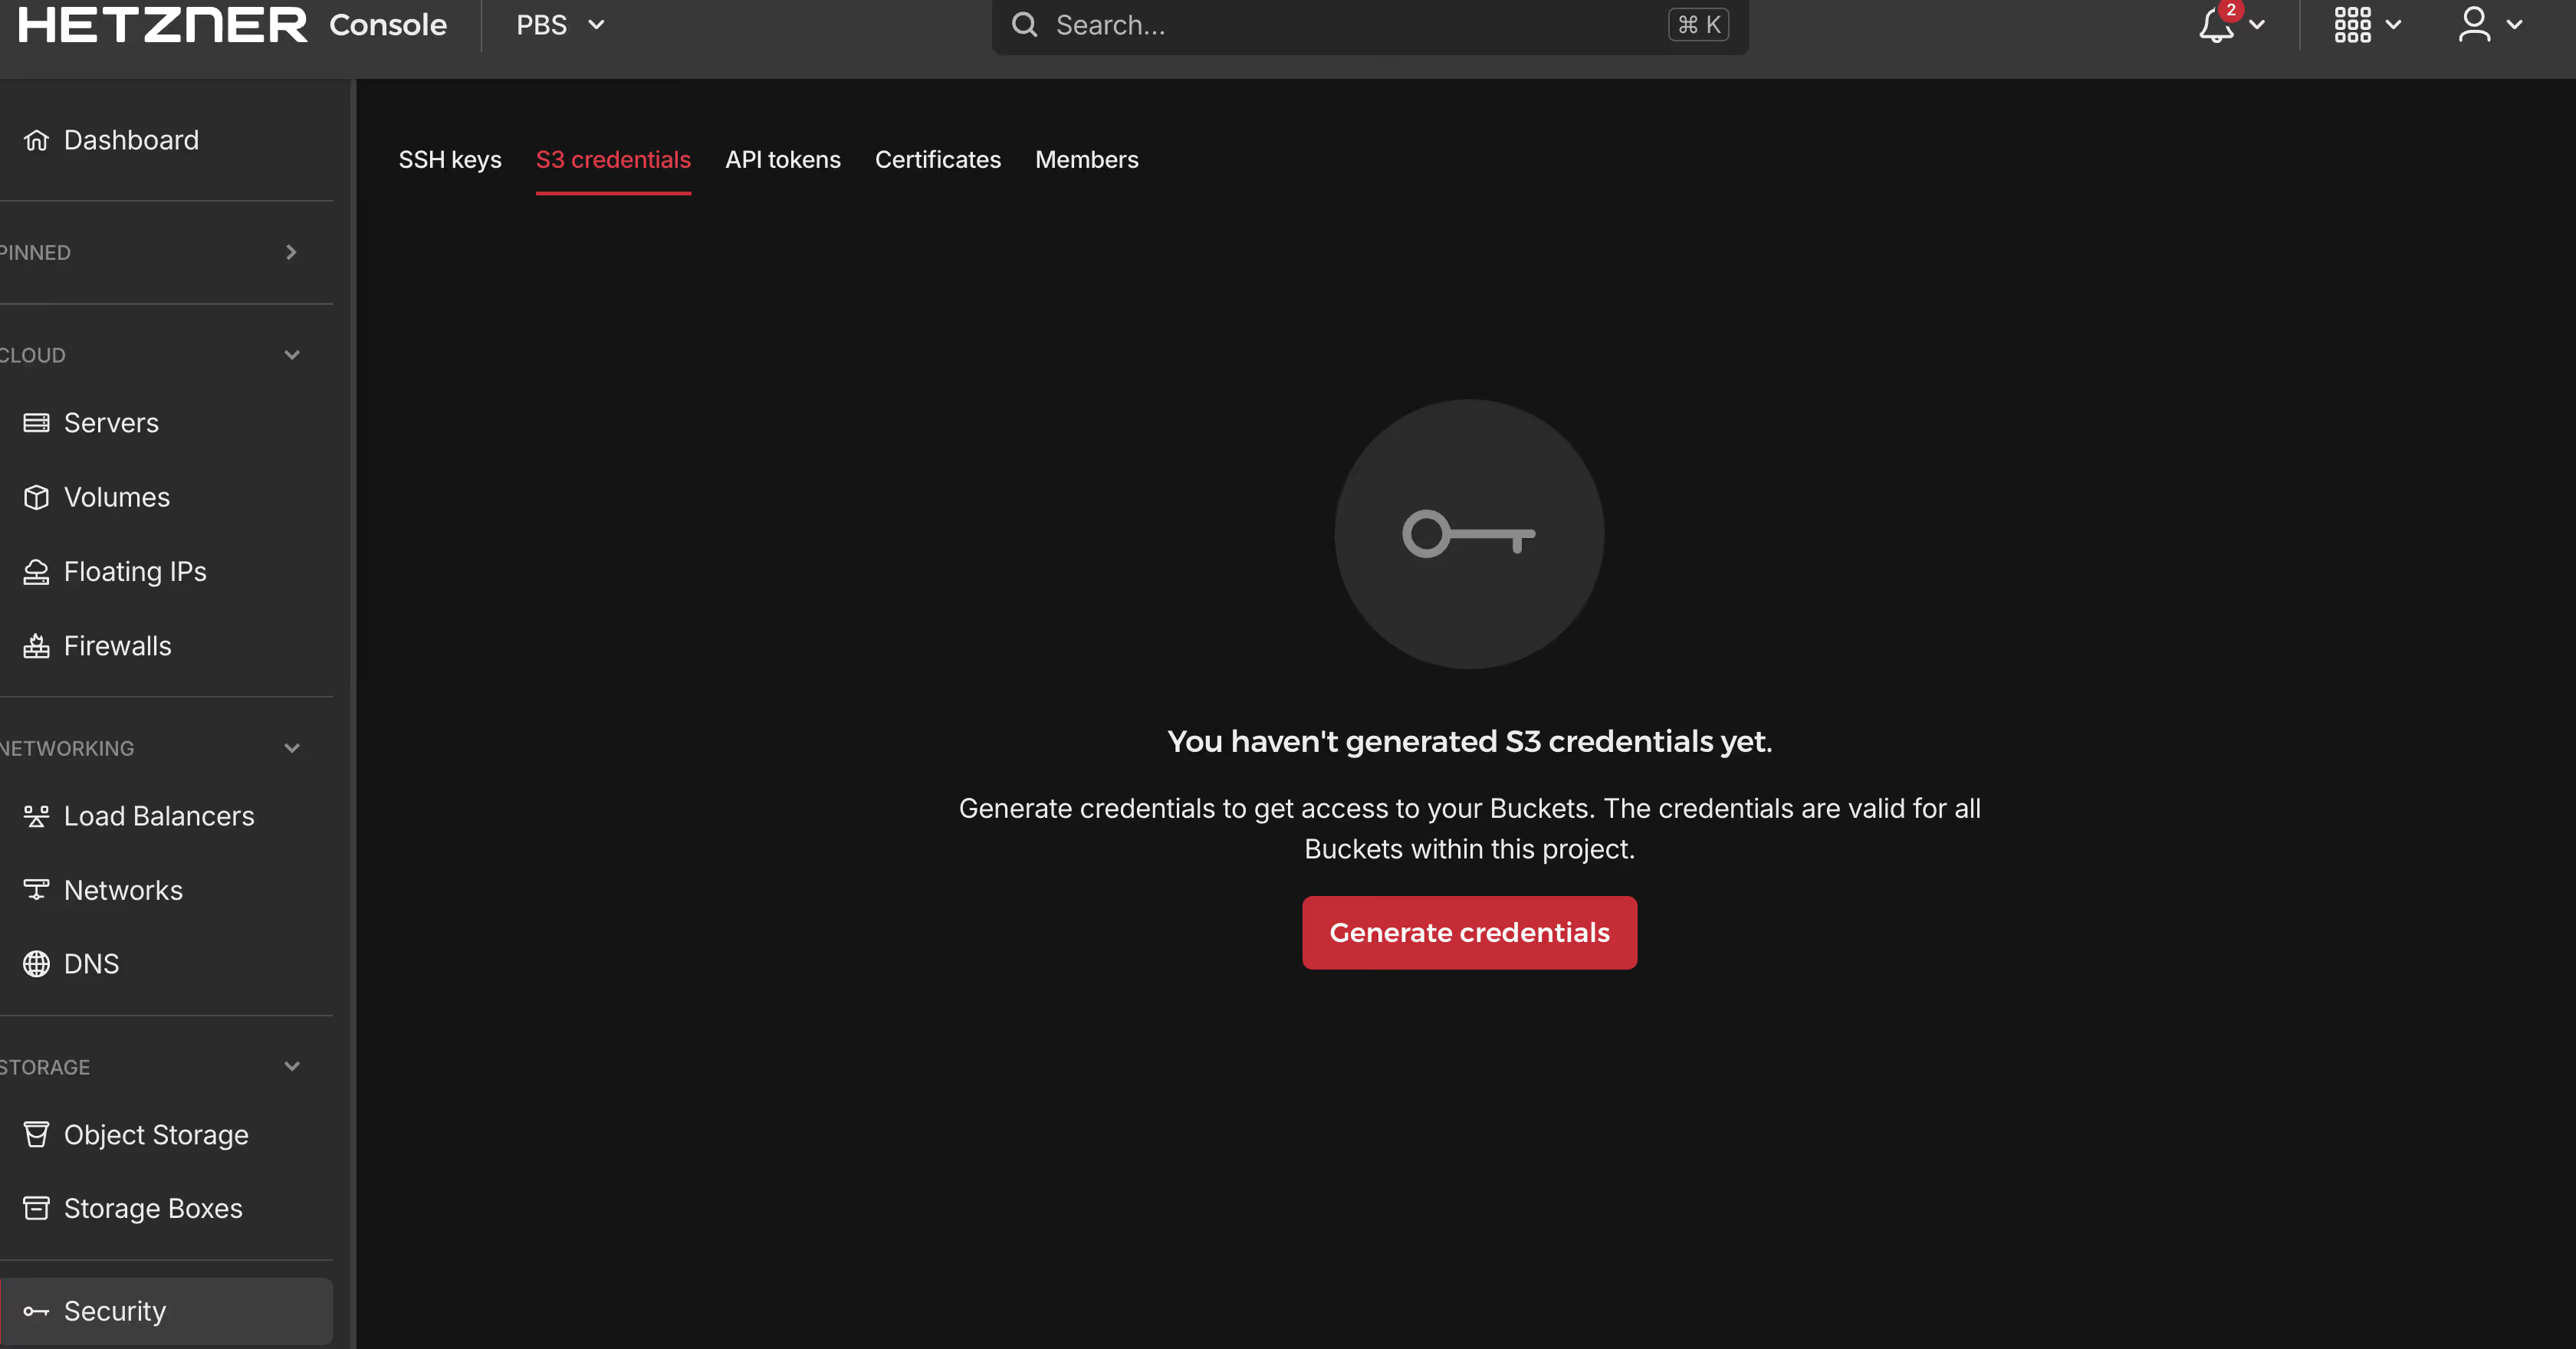
Credential SecurityThe Secret Key is only displayed once during creation. Please store it securely. If lost, you will need to generate new credentials.
Part 4: PBS Object Storage Integration Configuration
Creating S3 Endpoint Configuration
Log in to the PBS Web interface and follow these steps to configure:
- Navigate to Configuration → S3 Endpoints
- Click the Add button
Fill in the endpoint configuration:
| Field | Value | Description |
|---|---|---|
| S3 Endpoint ID | hetzner-obs | PBS internal identifier, customizable |
| Endpoint | https://<region>.your-objectstorage.com | Use the default endpoint from above |
| Region | hel1 / fsn1 / nbg1 | Fill according to the region selected when creating the bucket |
| Access Key | YOUR_ACCESS_KEY | Obtained from the Credentials page |
| Secret Key | YOUR_SECRET_KEY | Obtained from the Credentials page |
- Expand Advanced options
- Set Provider Quirks to Skip
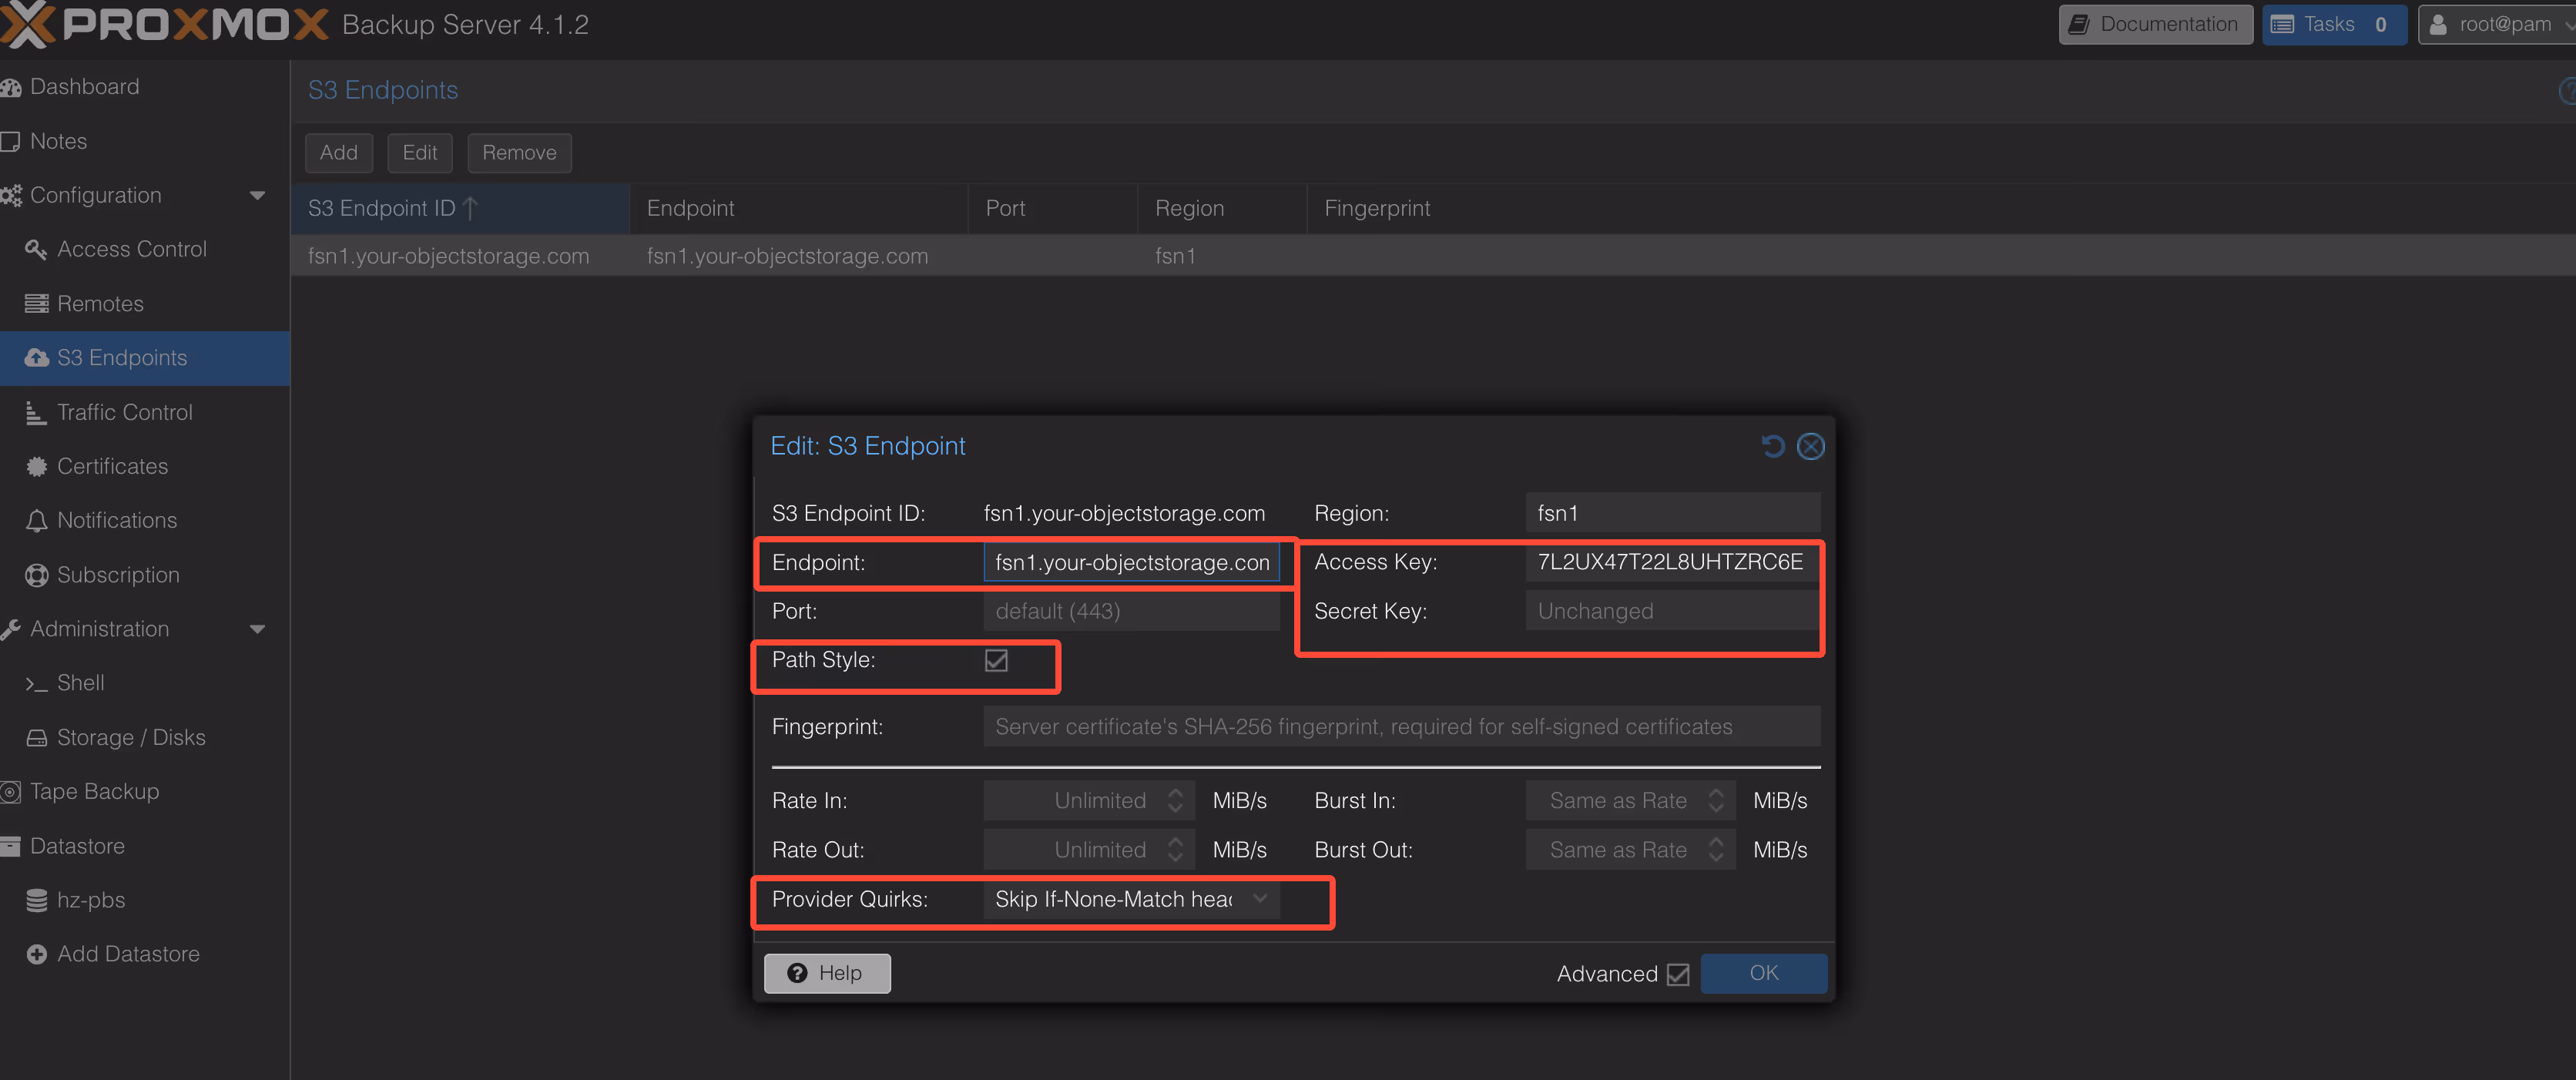
Provider Quirks ExplanationHetzner Object Storage has subtle differences from AWS S3 in certain S3 API implementations. Enabling “Skip” quirks ensures PBS handles these differences correctly, preventing backup operation failures.
Creating the Datastore
After configuring the S3 endpoint, create the actual datastore:
- Navigate to the Datastore menu
- Click Add Datastore
- Fill in the configuration:
| Field | Value |
|---|---|
| Name | hetzner-backup (customizable) |
| Type | S3 |
| Local Path | /var/lib/proxmox-backup/s3-cache (local cache directory) |
| S3 Endpoint | Select the previously created hetzner-pbs |
| Bucket | Select the automatically recognized bucket from the dropdown |
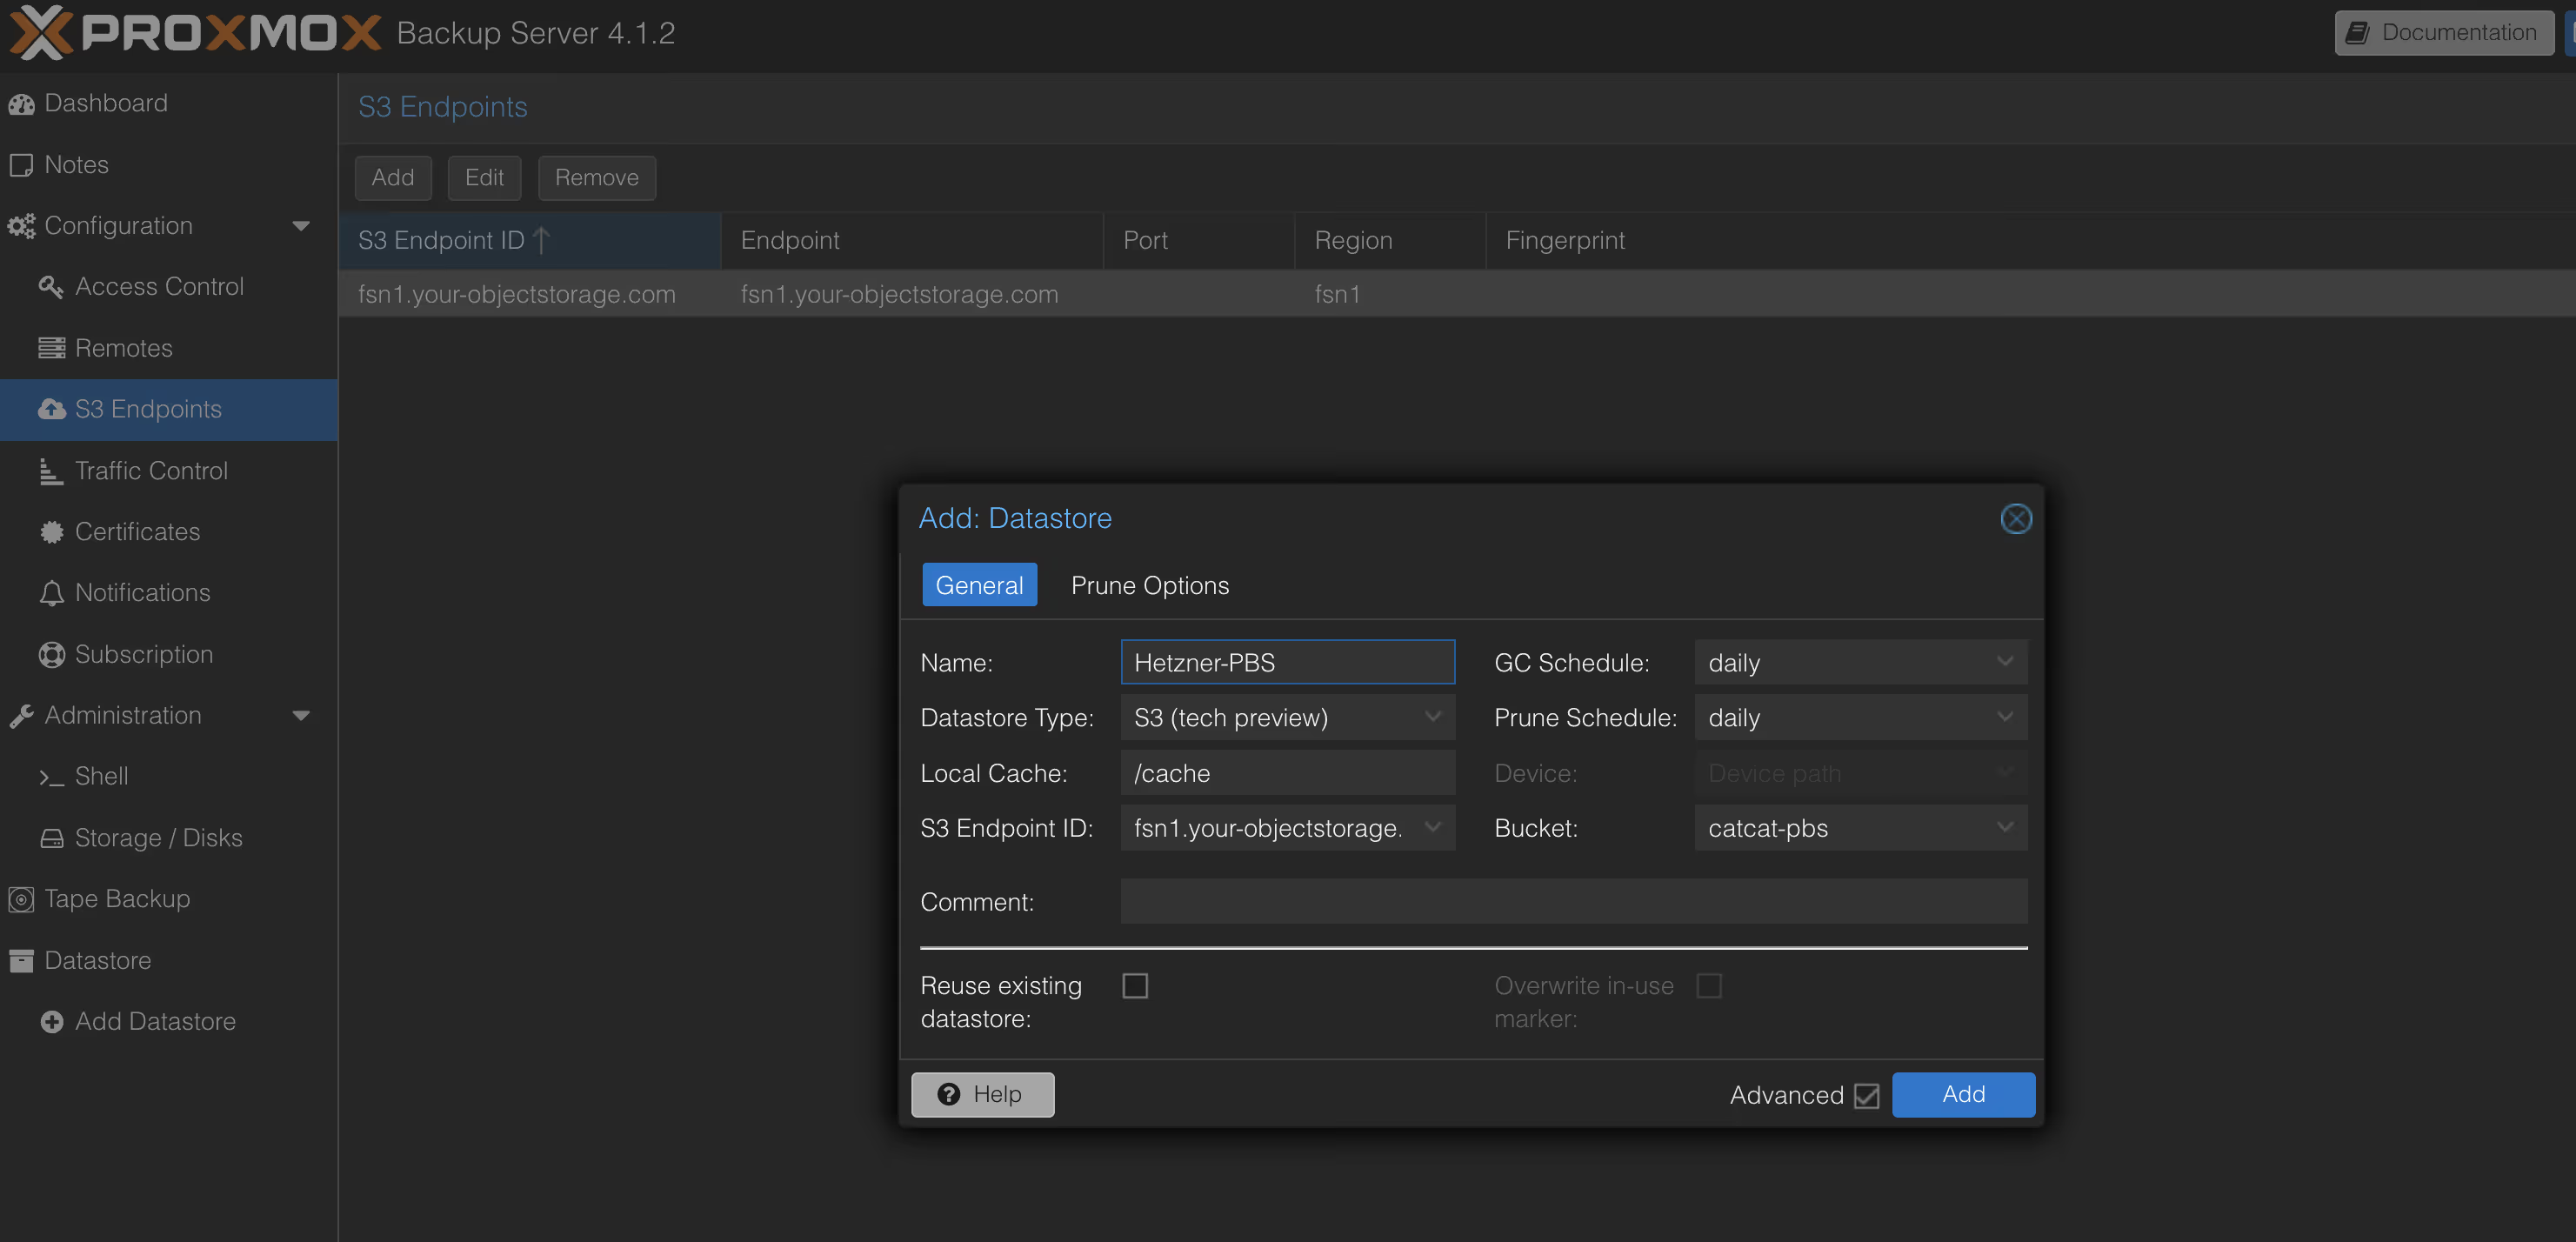
- Click Add to complete creation
PBS maintains a local cache layer for storing deduplication indexes and recently accessed data blocks, reducing API call frequency to object storage and improving backup and restore performance.
Part 5: PVE Integration and Backup Configuration
Creating a PBS Backup User
To follow the principle of least privilege, it’s recommended to create a dedicated user for PVE connections:
- In PBS, navigate to Configuration → Access Control → User Management
- Click Add
- Fill in user information:
- User name:
dataguard - Realm:
pbs(local authentication)
- User name:
- Set a strong password and record it
Configuring User Permissions
- Go to the Permissions tab
- Click Add → User Permission
- Configure:
- Path:
/hetzner-backup(select the created datastore) - User:
dataguard@pbs - Role: DatastoreBackup
- Path:
This role allows the user to create, read, and delete backups but cannot modify PBS system configuration.
Adding PBS Storage in PVE
Log in to the PVE Web interface:
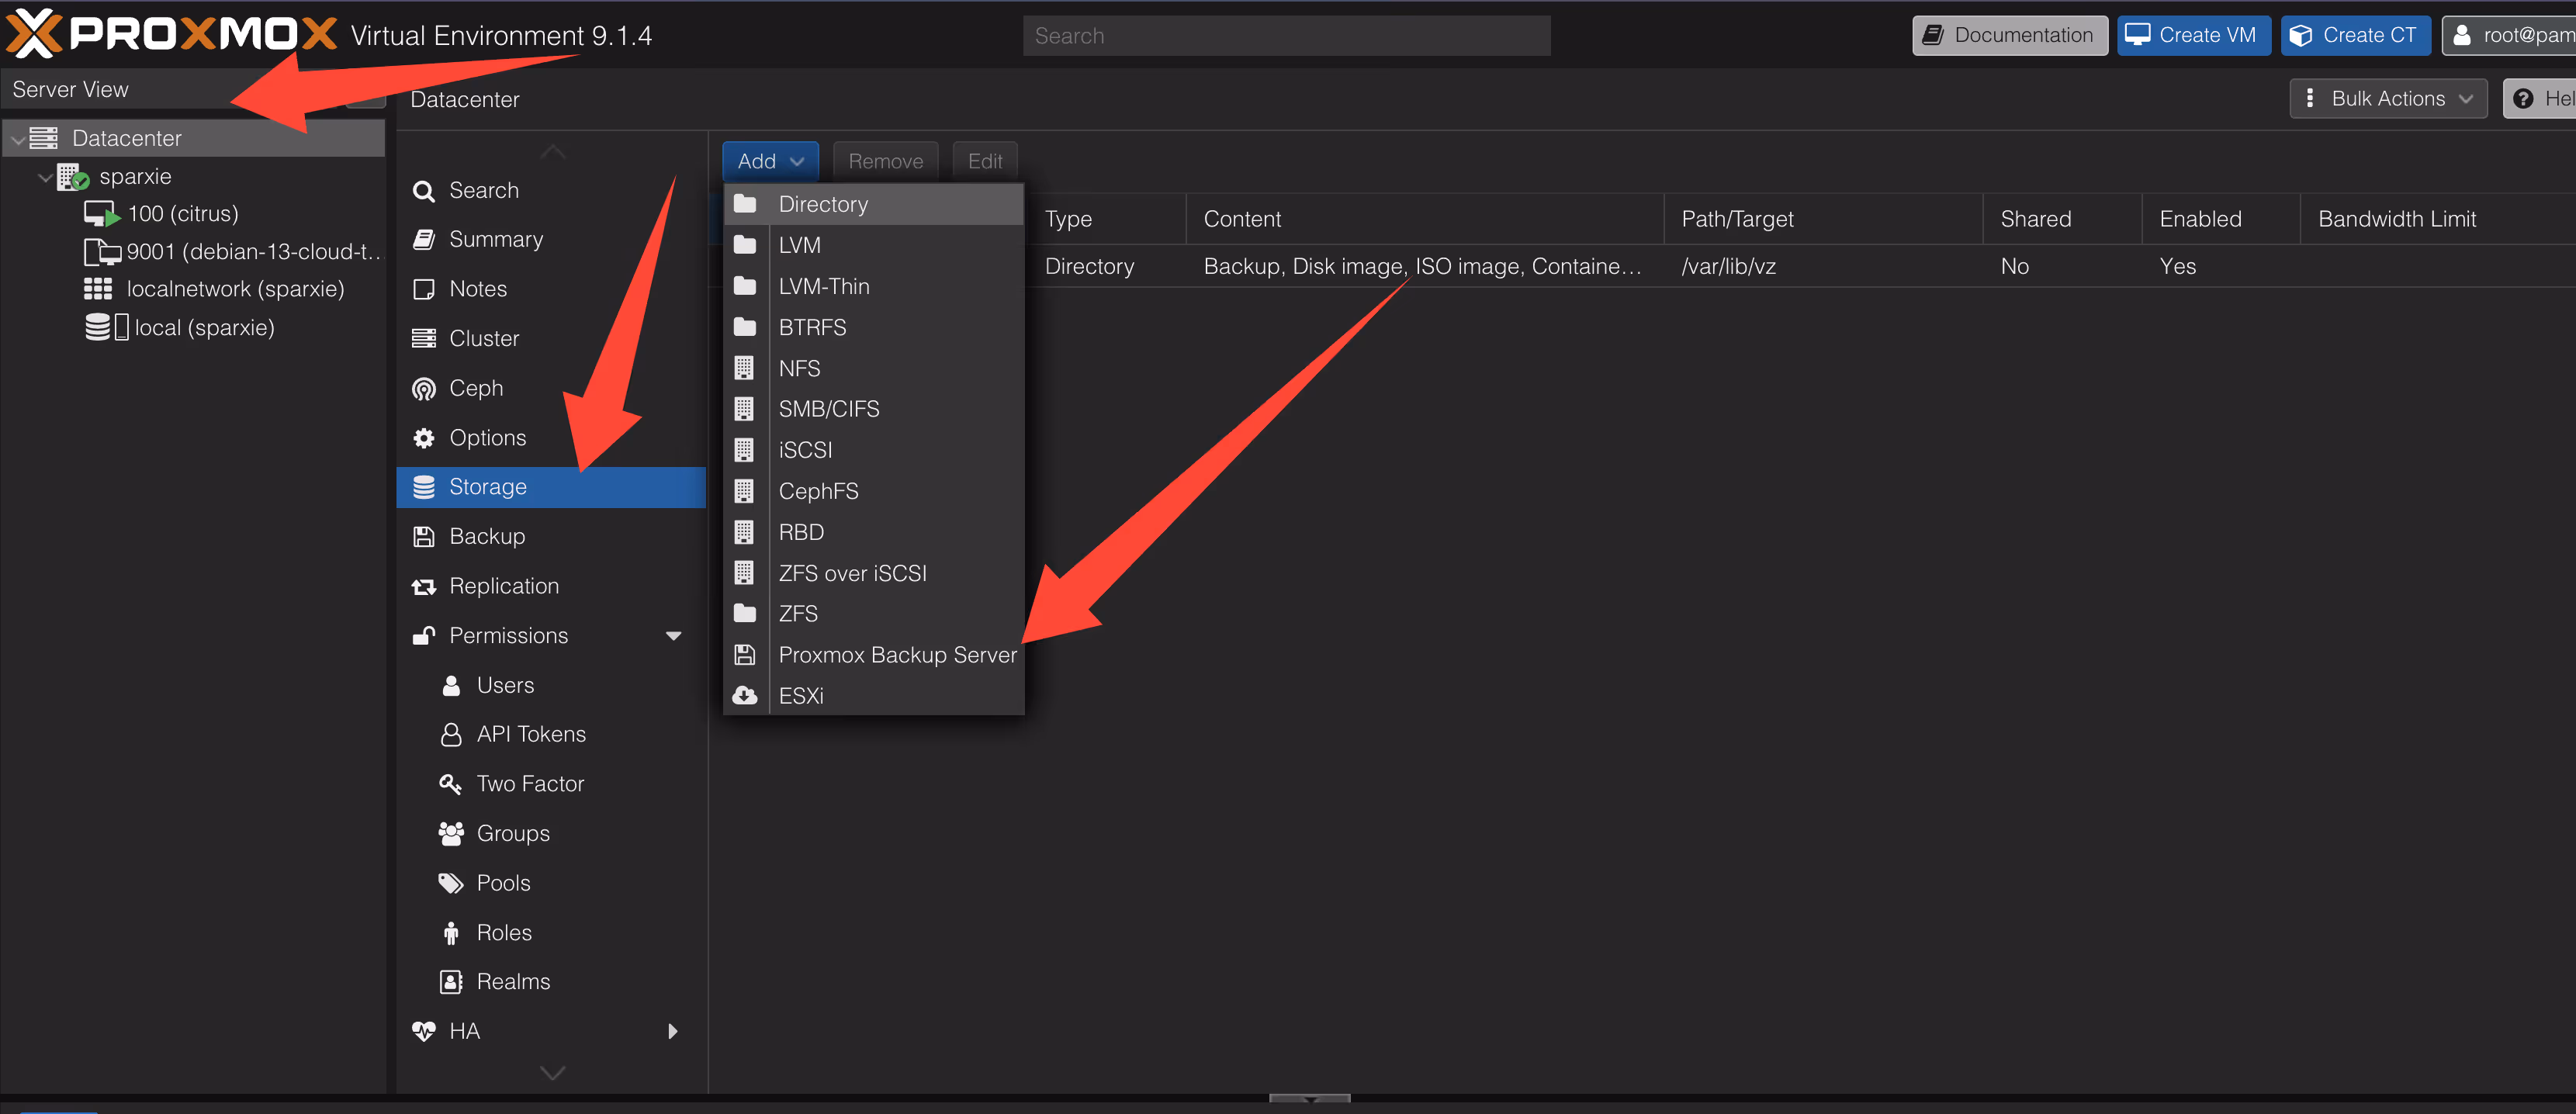
- Navigate to Datacenter → Storage → Add → Proxmox Backup Server
- Fill in the configuration:
| Field | Value |
|---|---|
| ID | pbs-hetzner |
| Server | PBS server IP or domain name |
| Username | dataguard@pbs |
| Password | The password set above |
| Datastore | hetzner-backup |
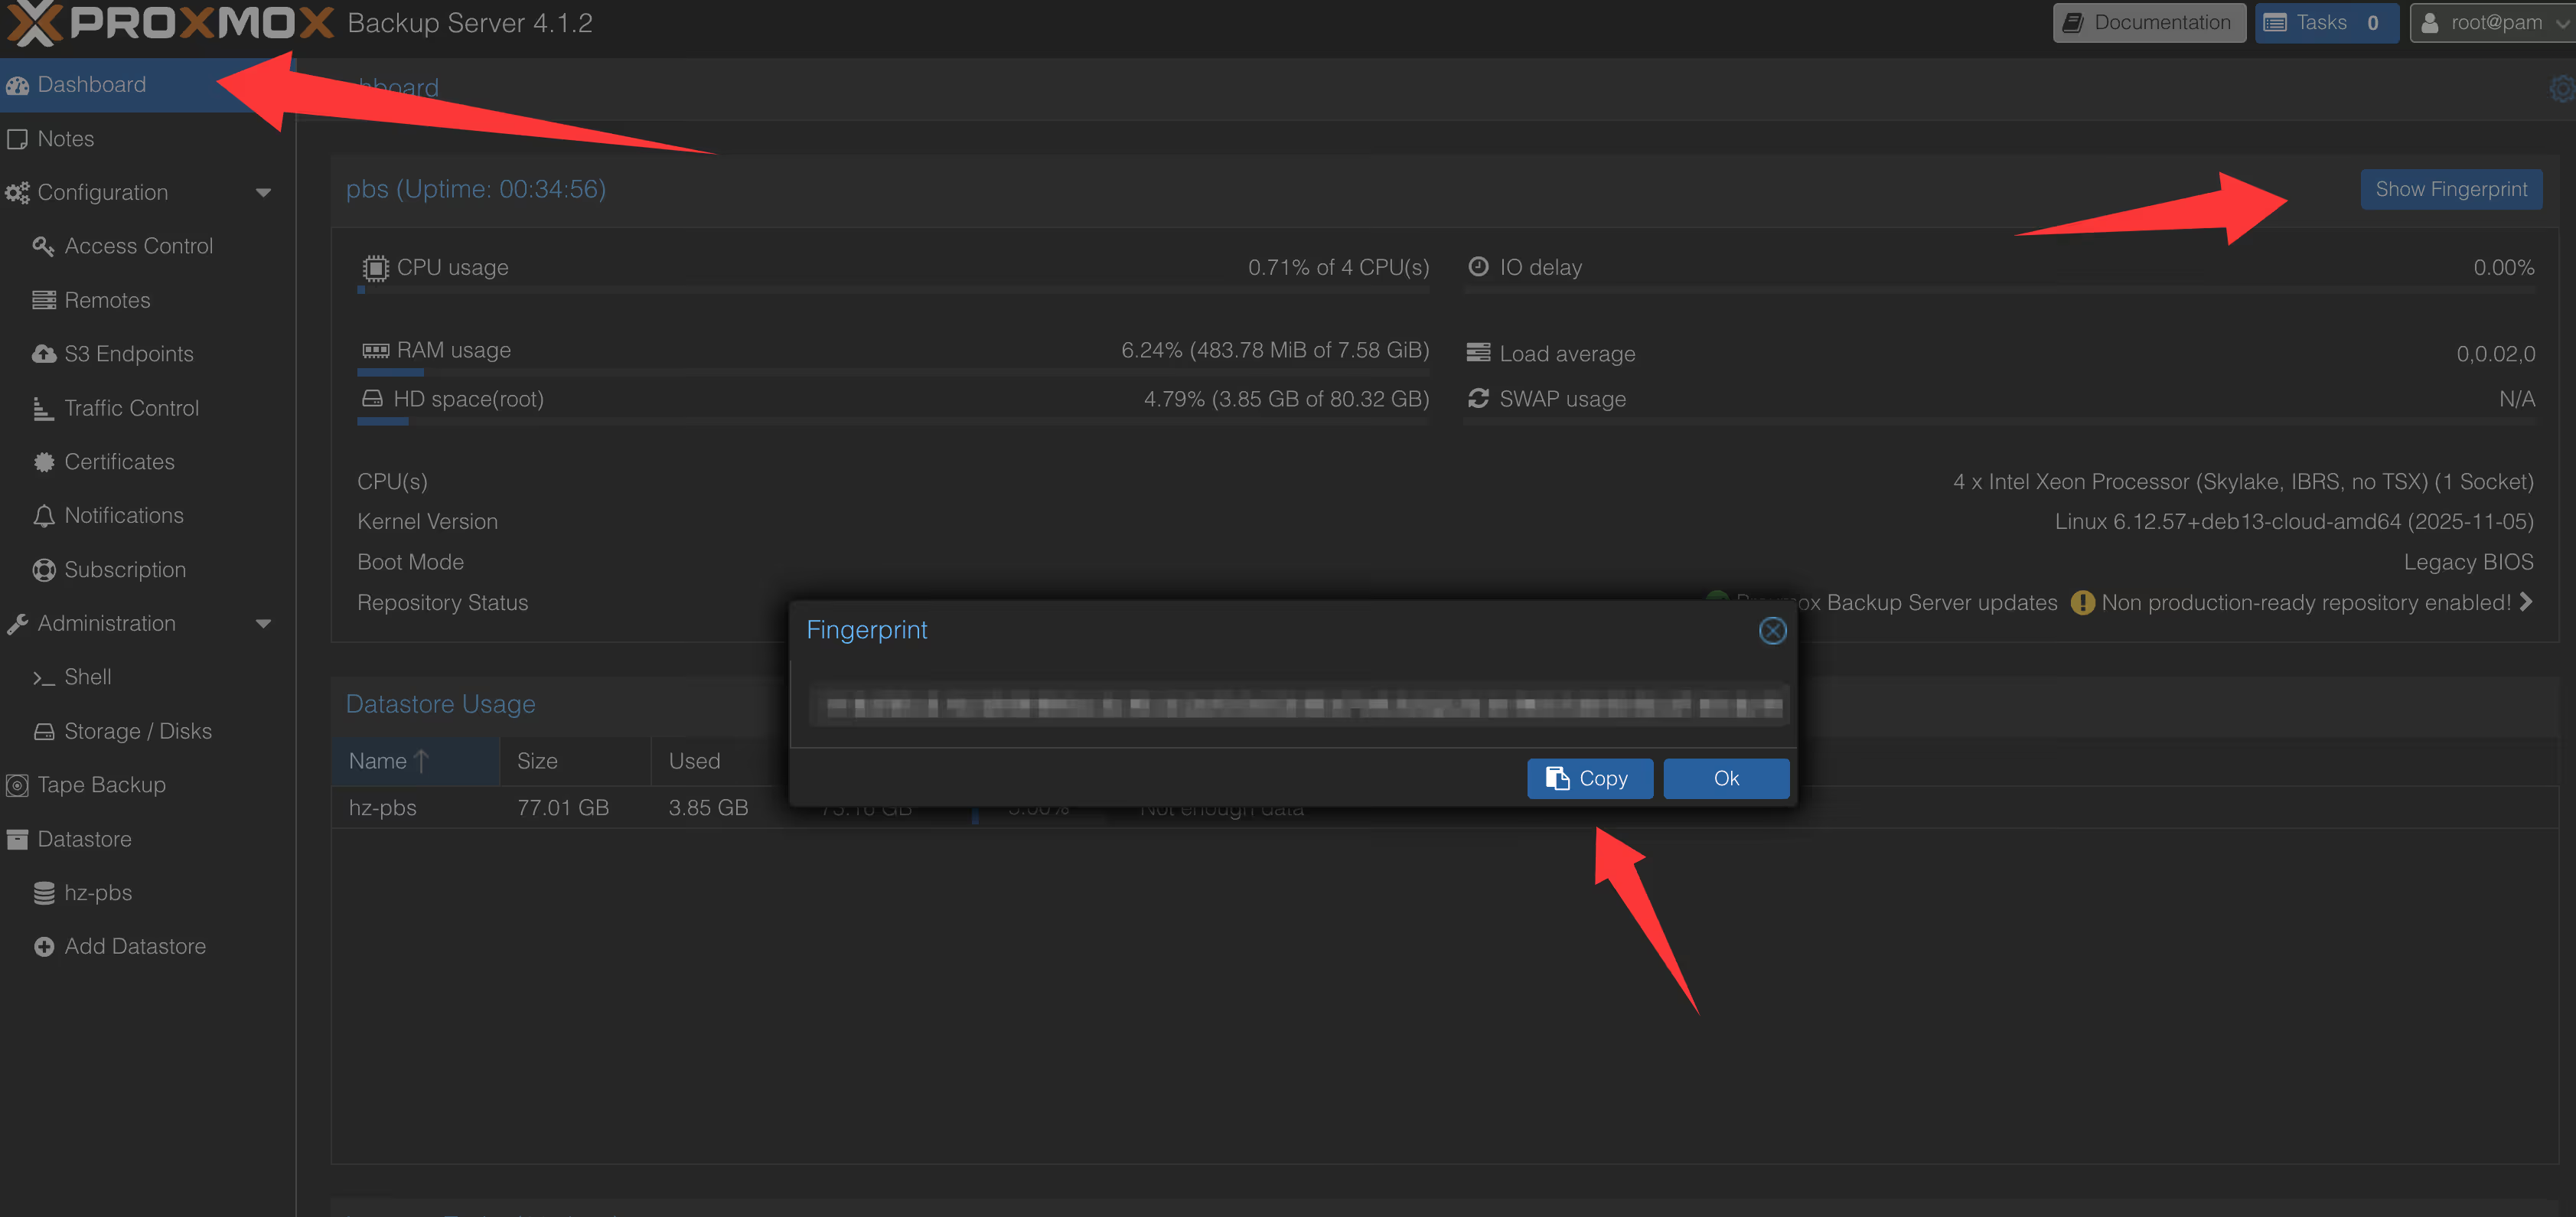
| Fingerprint | SHA-256 fingerprint obtained from the PBS certificate page |

- Click Add to complete the addition
Configuring VM Backup Tasks
- Select the target node and go to the Backup tab
- Click Add to create a backup task

Basic Settings:
| Option | Recommended Configuration |
|---|---|
| Storage | pbs-hetzner |
| Schedule | 0 2 * * * (daily at 2<00> AM) |
| Selection | Select VMs/CTs to backup |
| Mode | Snapshot (recommended, zero downtime) |
| Compression | ZSTD (balance between compression ratio and speed) |
| Encryption | Enable and set encryption key (optional but recommended) |
Configuring Automatic Pruning Policy
In the PBS Web interface, configure retention policies for the datastore:
- Go to Datastore → hetzner-backup → Prune & GC
- Click Add to create retention rules
Example Configuration (3-2-1 backup strategy variant):
| Retention Type | Count | Description |
|---|---|---|
| Keep Daily | 7 | Keep daily backups for the last 7 days |
| Keep Weekly | 4 | Keep weekly backups for the last 4 weeks |
| Keep Monthly | 6 | Keep monthly backups for the last 6 months |
- Enable Prune Jobs for automatic pruning execution
This configuration ensures:
- Short-term recovery: Rollback to any day within the last 7 days
- Medium-term recovery: Access weekly snapshots from the past 4 weeks
- Long-term archiving: Retain monthly backups for 6 months for compliance or auditing
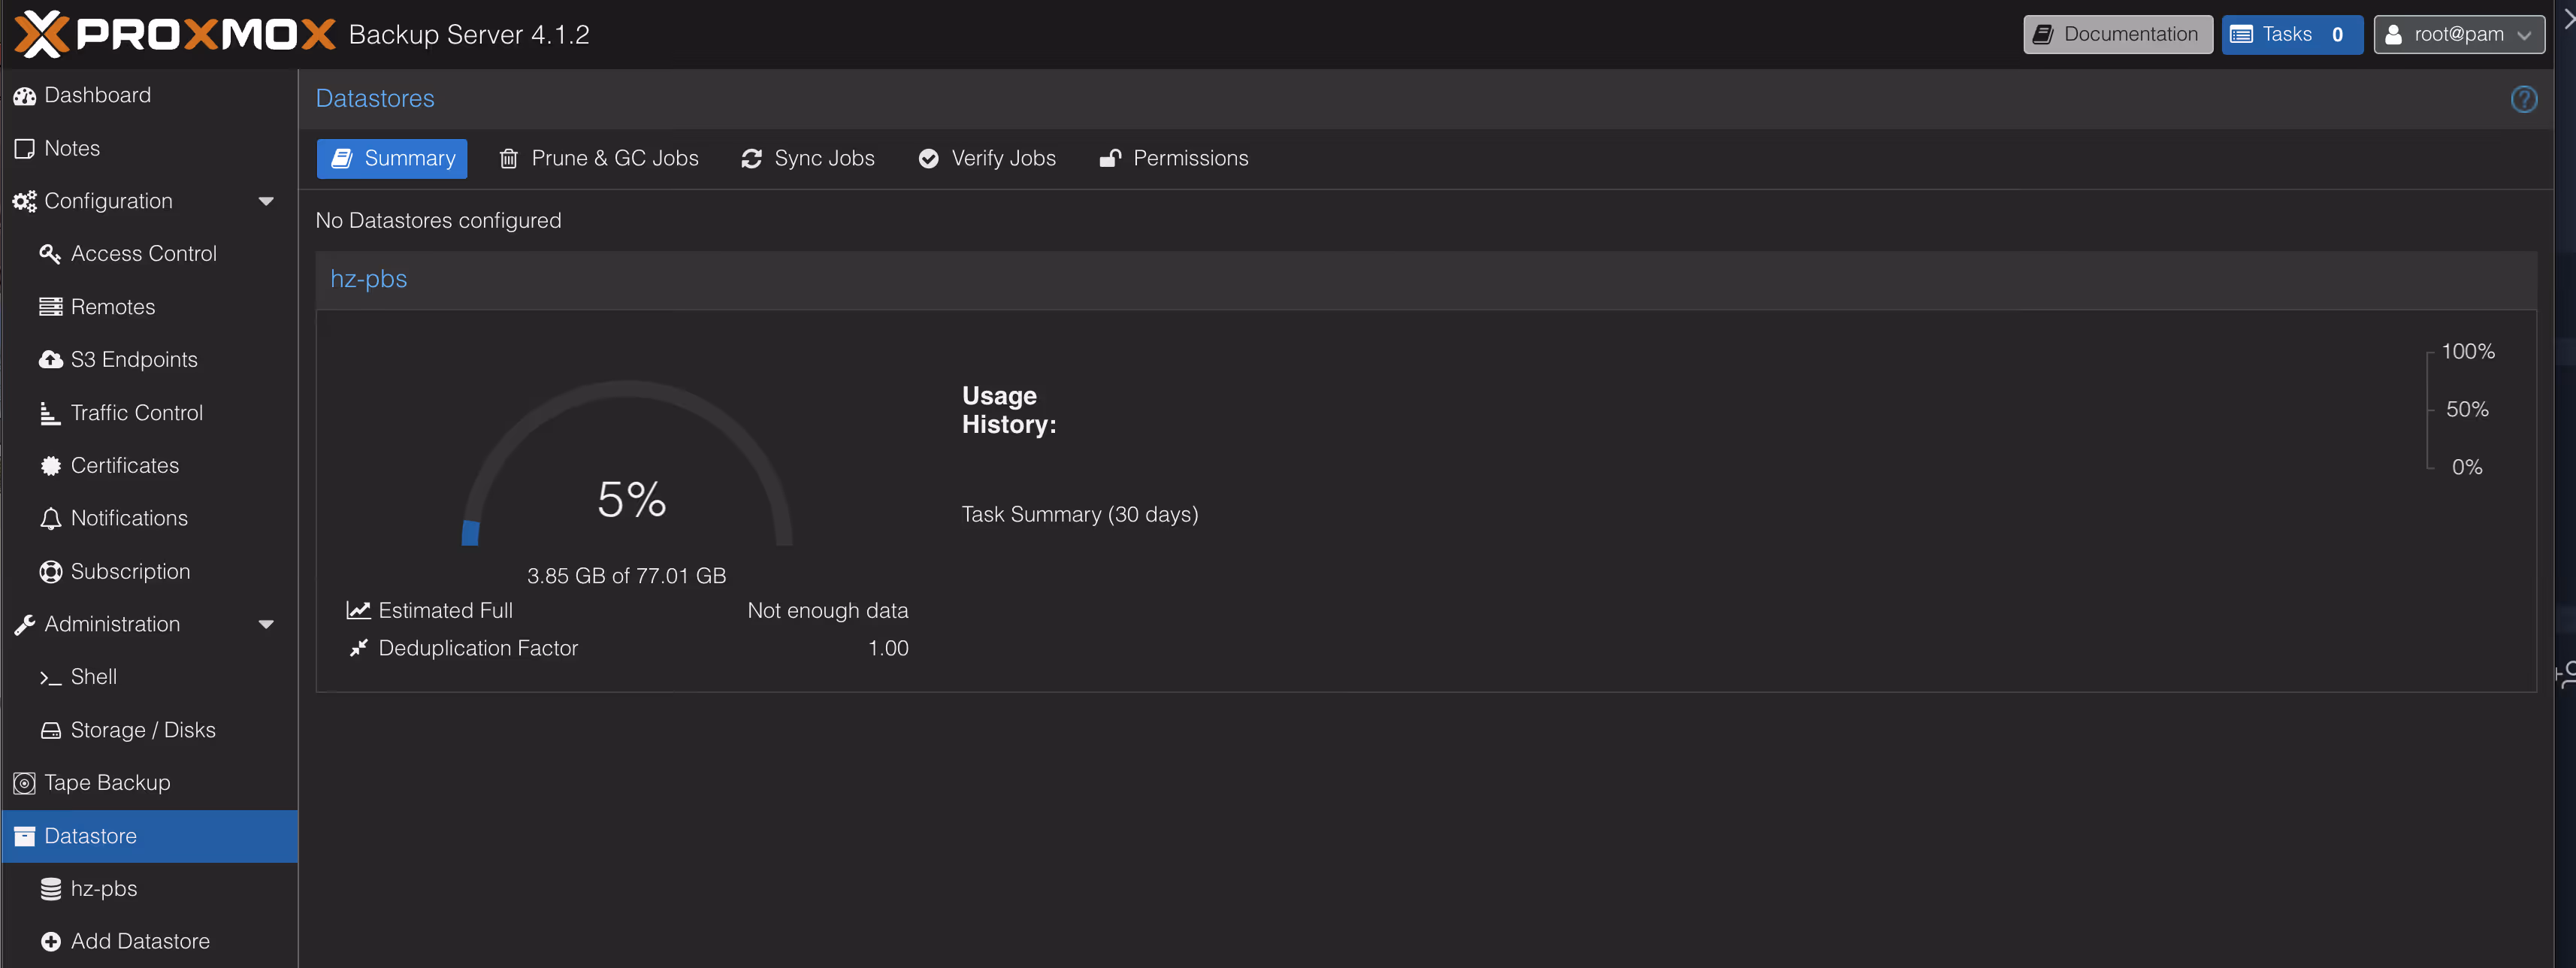
Part 6: Verification and Monitoring
Testing the Backup Process
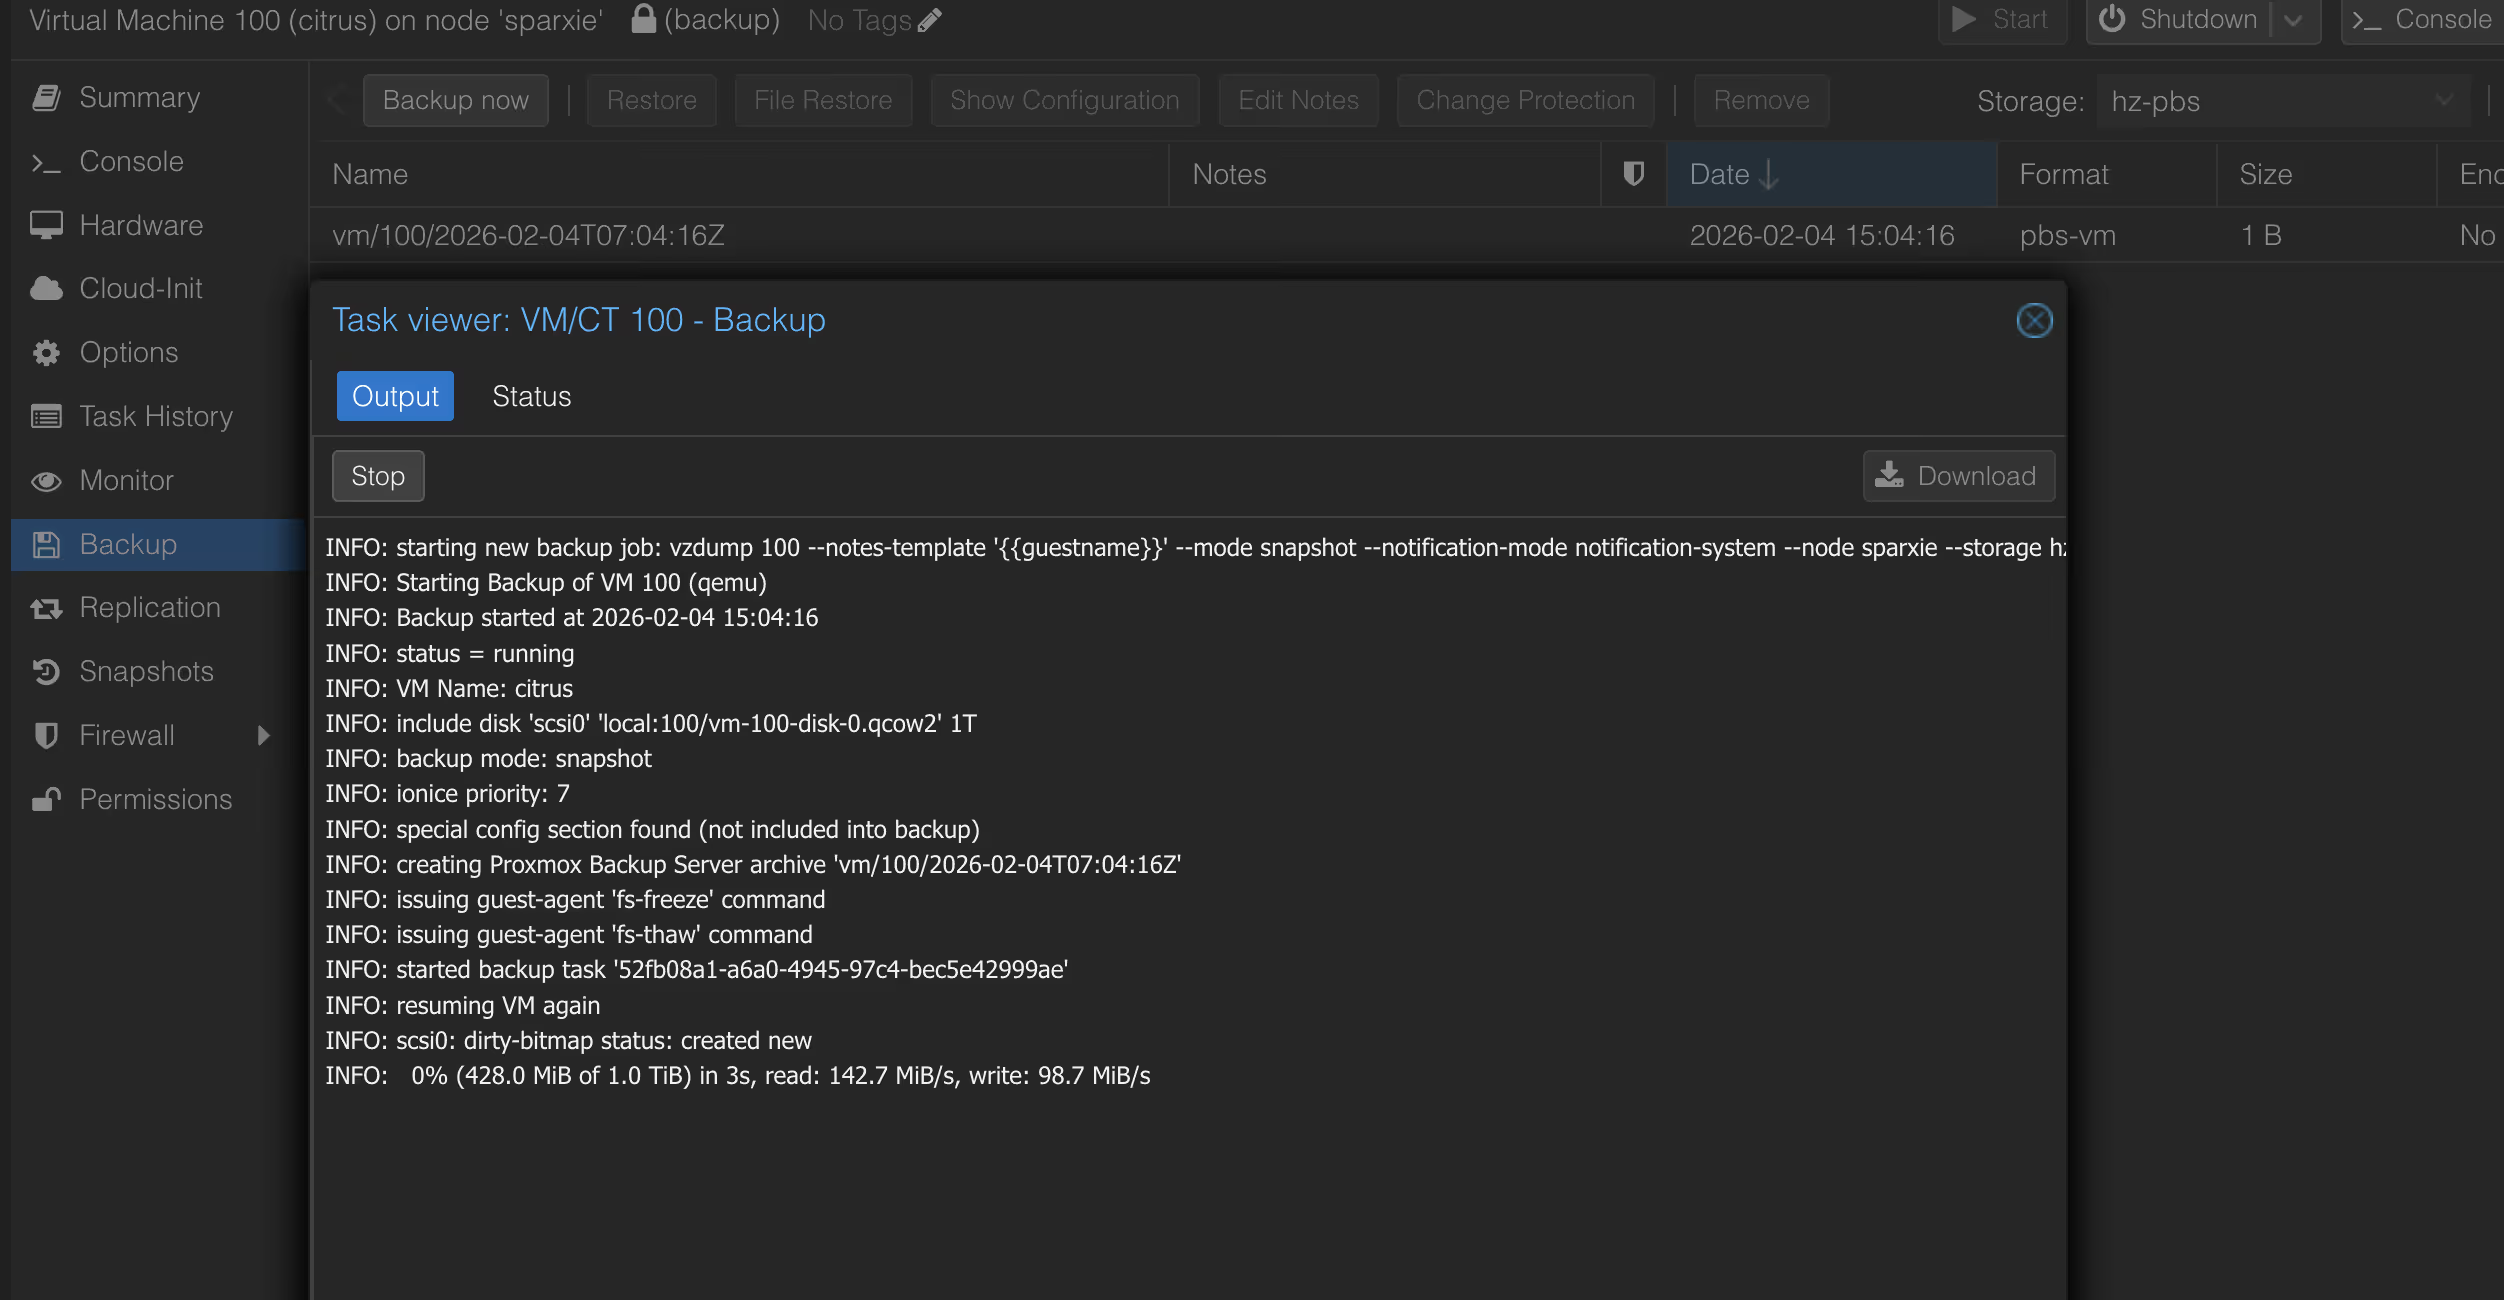
- Manually trigger a backup task in PVE
- Observe task logs to confirm no errors
- Verify in the PBS Web interface that backup snapshots have been created
Testing the Restore Process
Regular restore testing is a critical component of any backup strategy:
- In PBS, select a backup snapshot and click Restore
- Select the target PVE node and storage
- Execute the restore and verify the VM/CT starts normally
Monitoring and Alerting Recommendations
- Backup Task Notifications: Configure notification email in PVE to receive backup failure alerts
- Storage Capacity Monitoring: Monitor object storage usage through Hetzner Console
- PBS Metrics: Visit the Metrics page to view key indicators such as deduplication ratio and transfer rates
Summary
Through this tutorial, you have successfully built a Proxmox Backup Server solution based on Hetzner CX33 and Object Storage. This architecture features:
- Cost-effectiveness: CX33 instance + Object Storage, significantly lower than commercial backup solutions
- Reliability: Hetzner Object Storage is based on distributed architecture with 99.9% availability SLA
- Security: Supports TLS encryption in transit and client-side encryption for backup data
- Automation: Complete scheduled backups and automatic pruning, reducing manual intervention
For production environments, further considerations are recommended:
- Configure redundant PBS deployment or regular off-site replication
- Enable backup encryption and securely store keys
- Establish regular recovery drill mechanisms