qBitWebUI: Modern Multi-Instance Management Interface for qBittorrent
Introduction
qBittorrent is a popular open-source BitTorrent client known for its lightweight design, ad-free experience, and cross-platform compatibility. However, when you need to manage multiple qBittorrent instances (such as your home NAS, a Seedbox on a VPS, or a friend’s server), switching between different Web UIs becomes tedious.
qBitWebUI was created to solve this pain point. It provides unified multi-instance management capabilities along with a modern user experience, PWA support, Prowlarr integration, and many other powerful features.
Project Overview
qBitWebUI is a web-based qBittorrent management tool that allows you to manage multiple qBittorrent instances from a single interface. Built with modern technologies, it delivers a smooth user experience.
Core Features:
- Multi-Instance Management - Manage all qBittorrent instances from one interface
- Real-time Monitoring - Automatic refresh of torrent status and download progress
- Secure Authentication - AES-256-GCM encrypted credential storage
- Prowlarr Integration - Direct indexer search and torrent transmission
- PWA Support - Installable as a mobile app with offline access
- Multiple Themes - Catppuccin, Gruvbox, Dracula, Nord, and more
- File Browser - Browse and manage download directories directly
- RSS Management - Subscribe to RSS feeds and set automatic download rules
- Highly Customizable - Custom column layouts, filters, and display options
Technology Stack:
Built with React 19, TypeScript, Tailwind CSS v4, Vite, TanStack Query, Hono, SQLite, and Bun, ensuring modern development experience and excellent performance.
Key Advantages
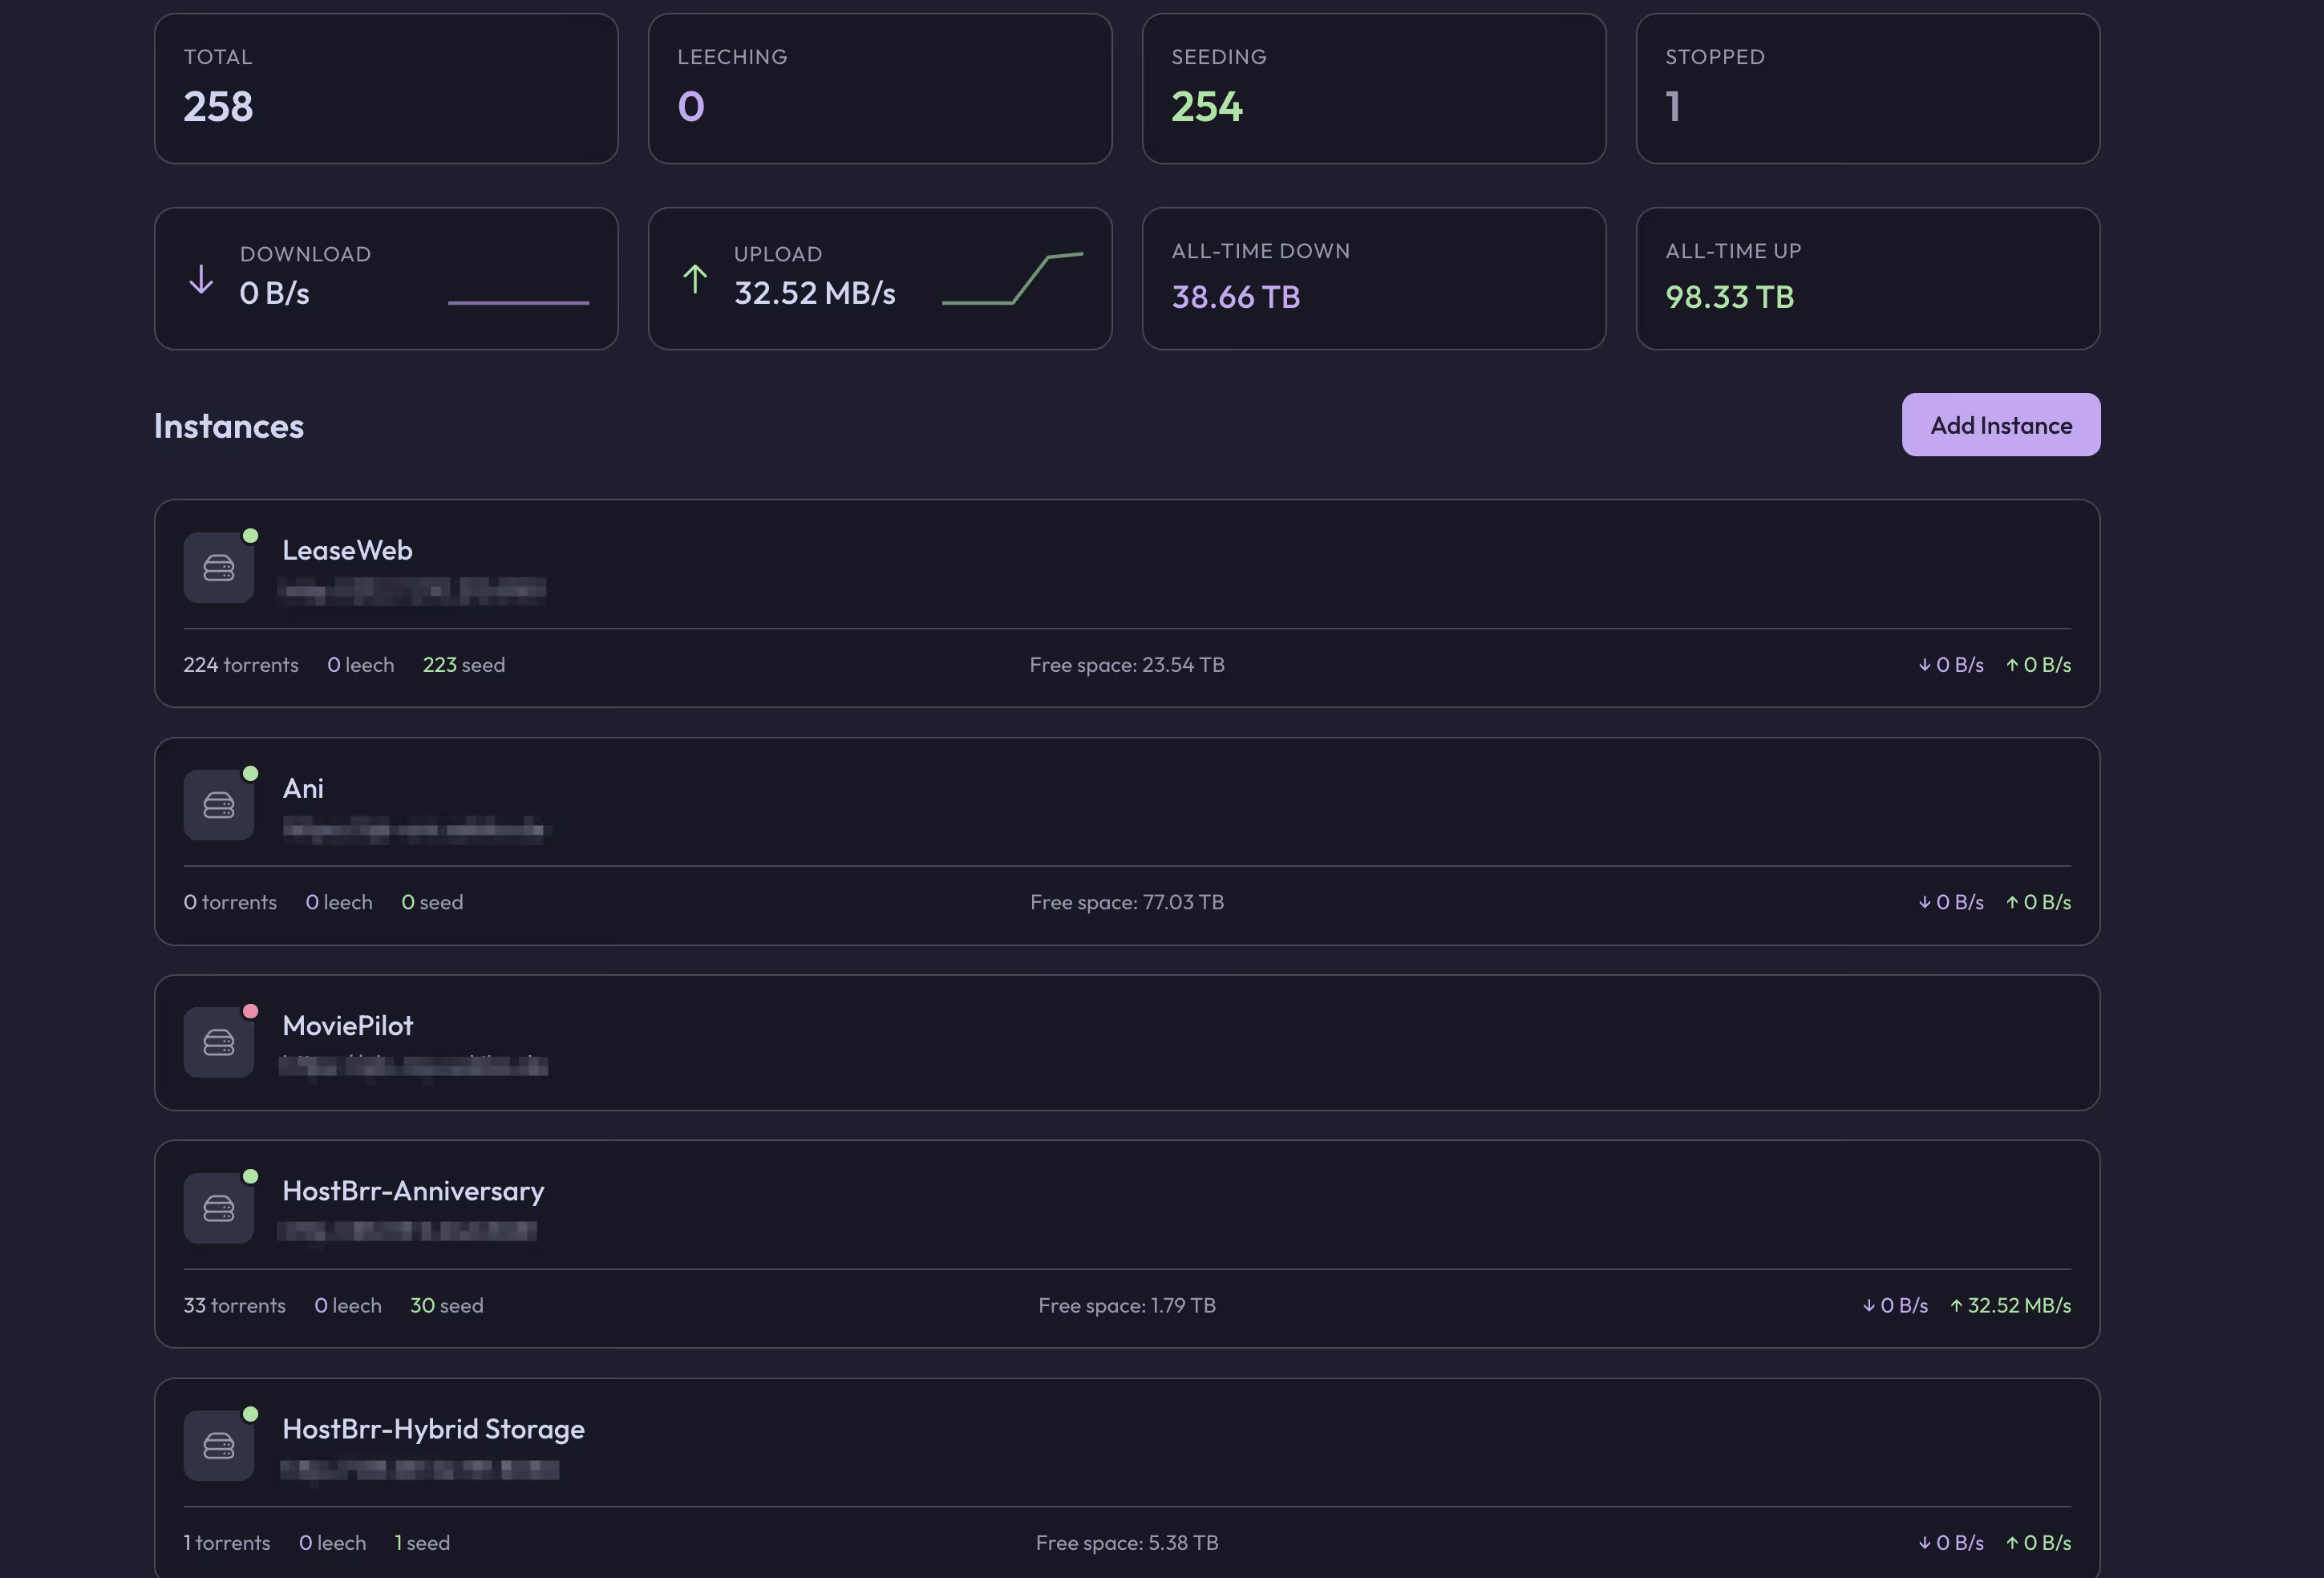
Multi-Instance Unified Management
This is qBitWebUI’s core feature. If you have multiple servers running qBittorrent, the traditional approach requires remembering each instance’s address and port, then switching between browser tabs. qBitWebUI allows you to:
- Add and manage all qBittorrent instances in one interface
- Quickly switch between instances and view their download status
- Set independent speed limits for each instance (global and alternative speeds)
- Unified operation experience without adapting to different UI versions
Modern User Interface
Compared to qBittorrent’s native Web UI, qBitWebUI offers a more modern and beautiful interface:
- Responsive design, perfectly adapted for desktop and mobile devices
- Smooth animations and interactive effects
- Intuitive information display at a glance
- Drag-and-drop support for custom column ordering
- Keyboard shortcut support for improved efficiency
TIPMost importantly: If you’ve used the original UI, you may have noticed it often freezes with large batches of torrents.
UI Preview and Usage
Homepage
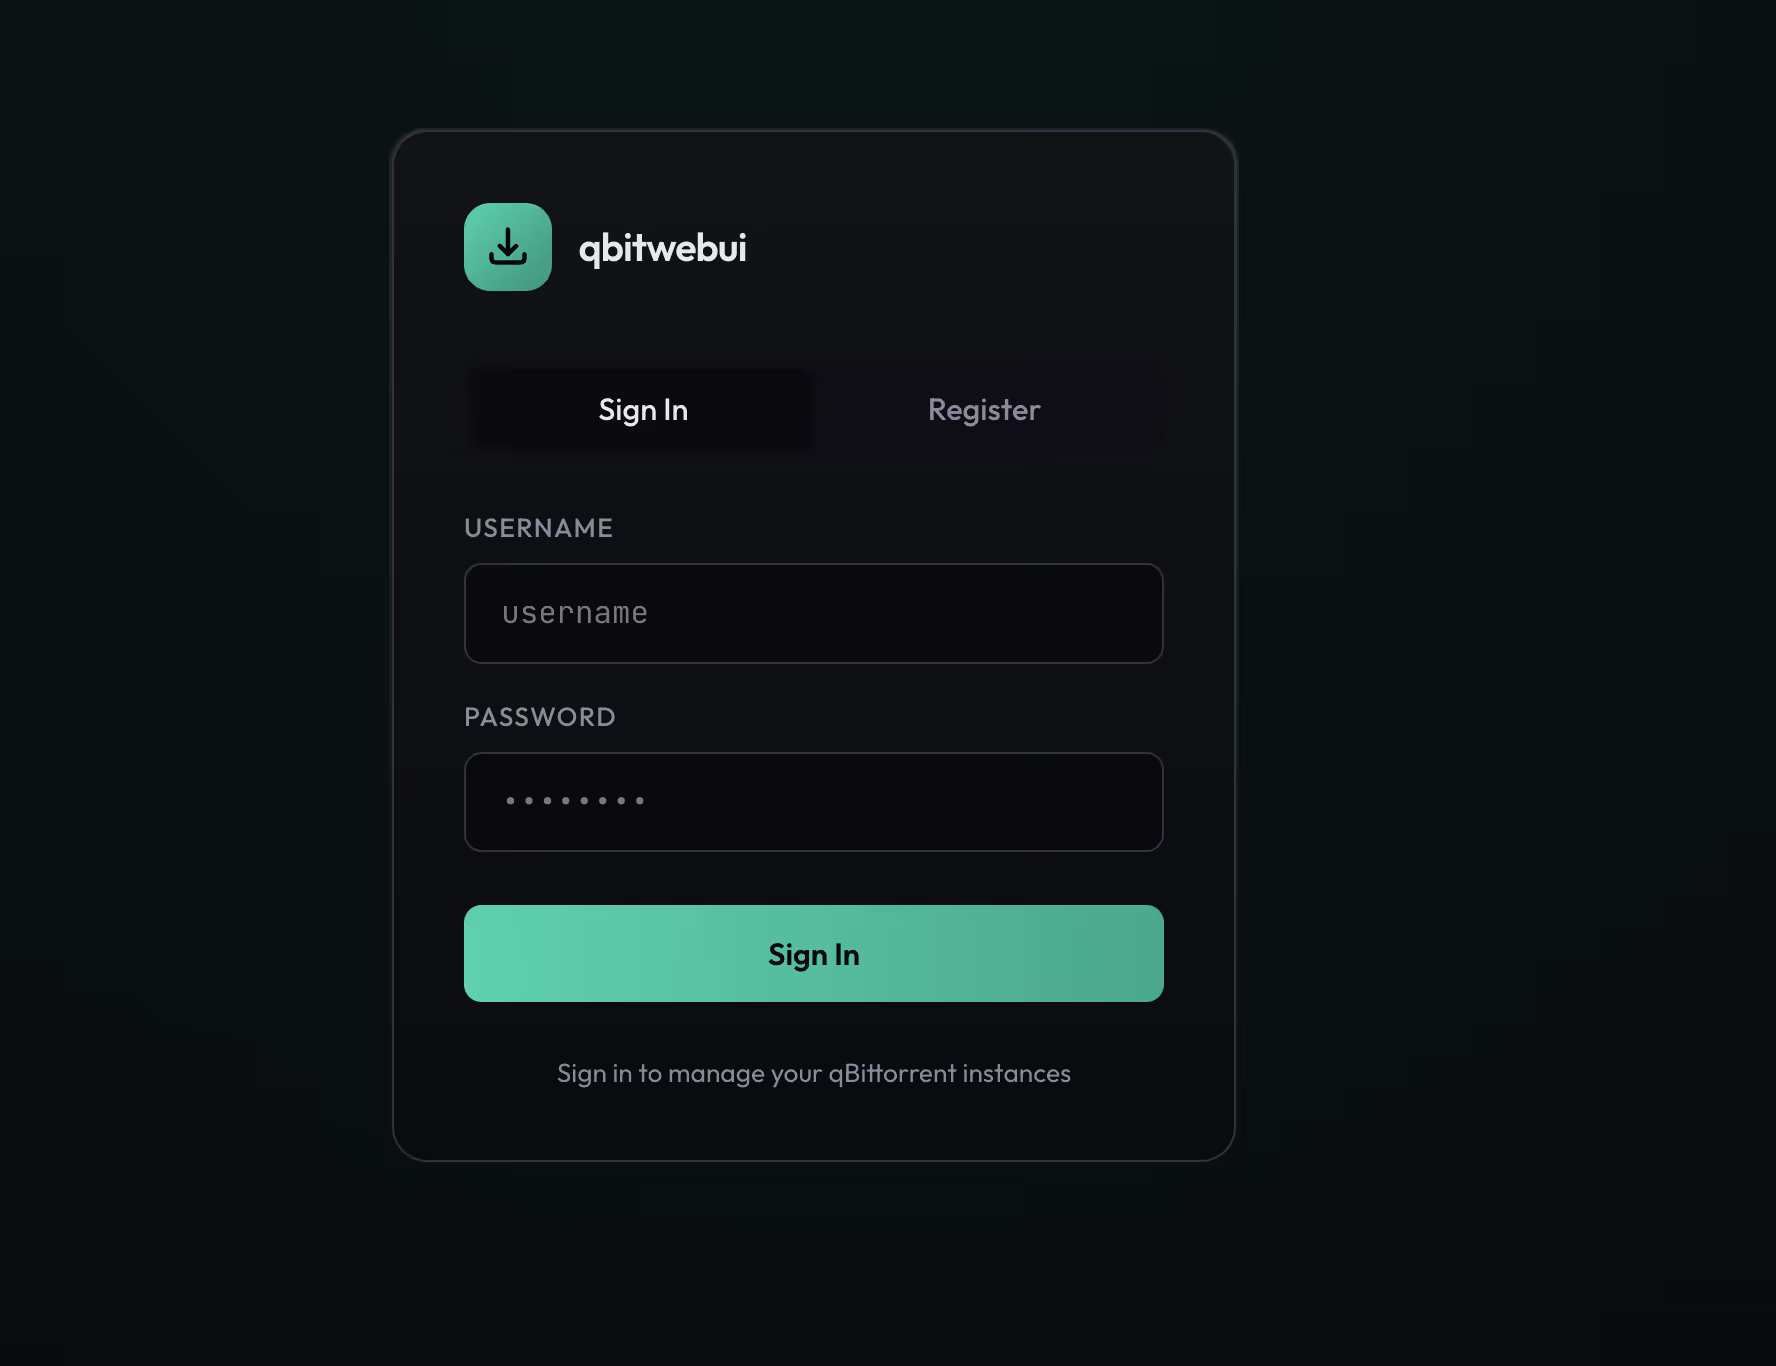
Login/Registration Page
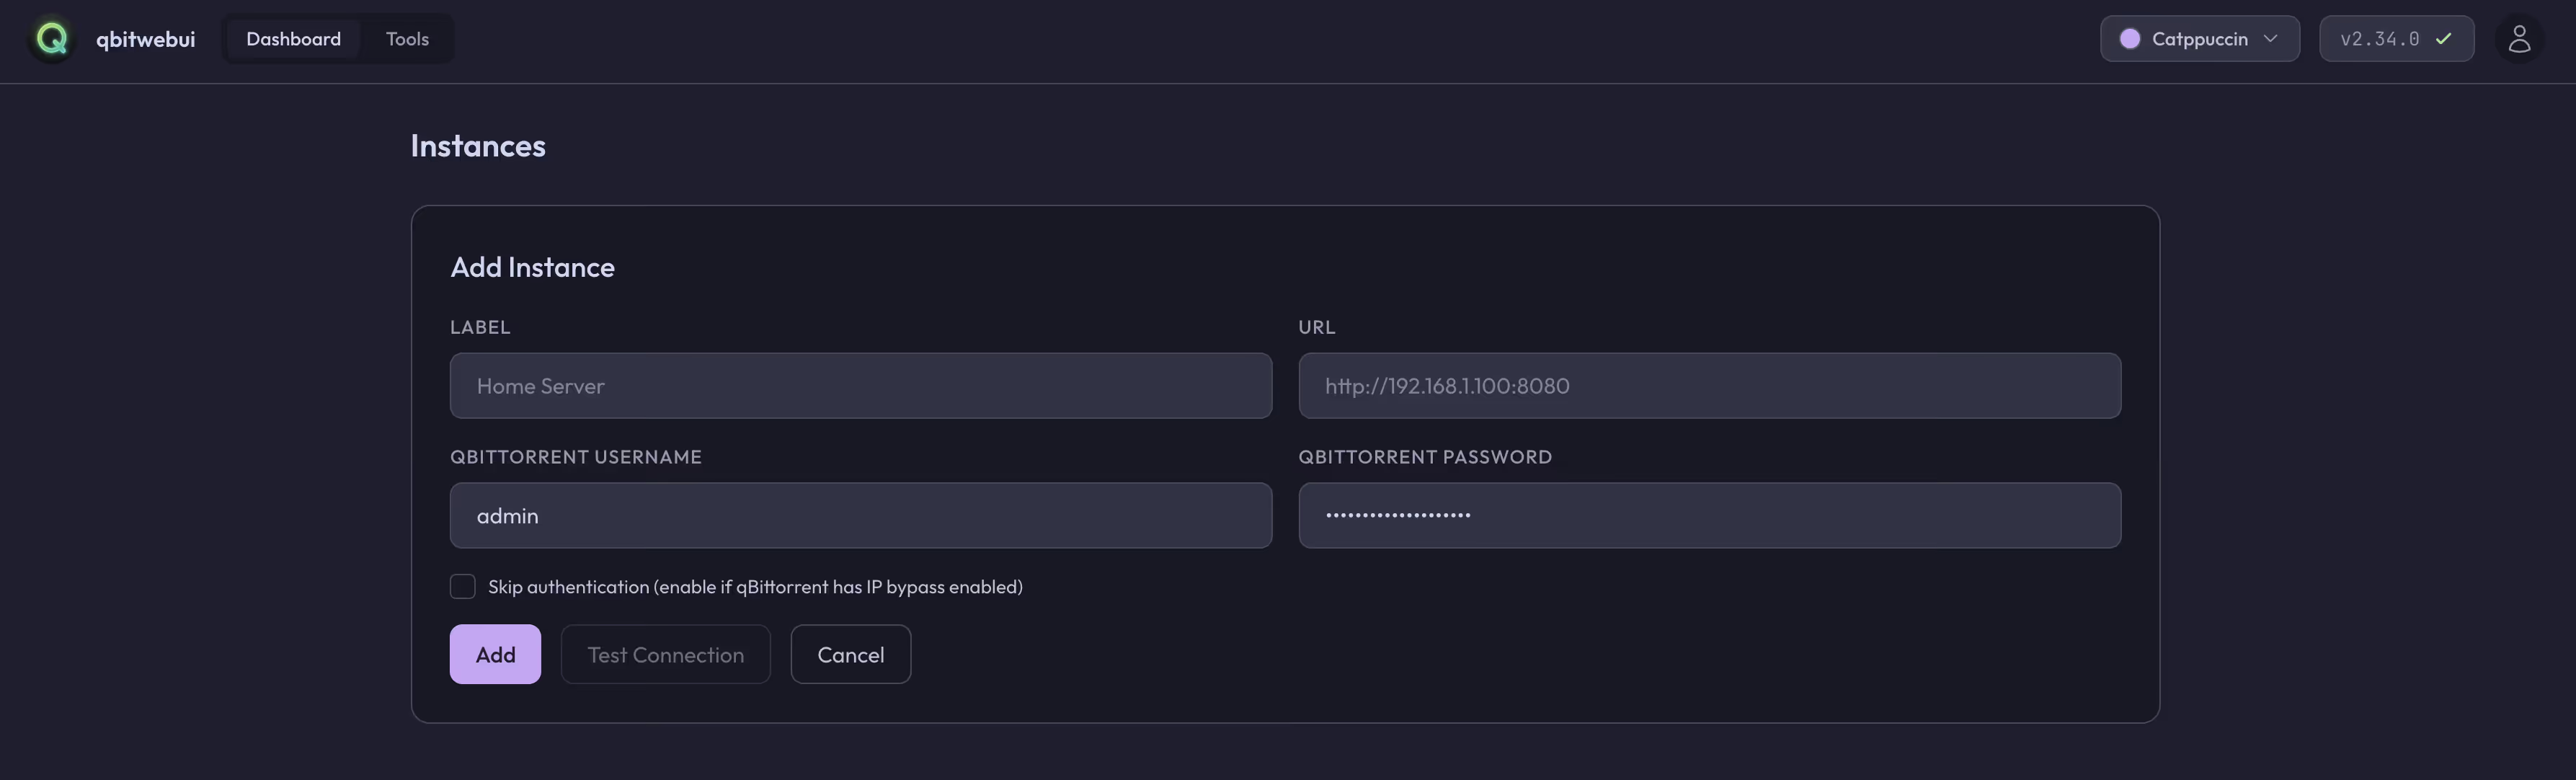
Add Instance Page
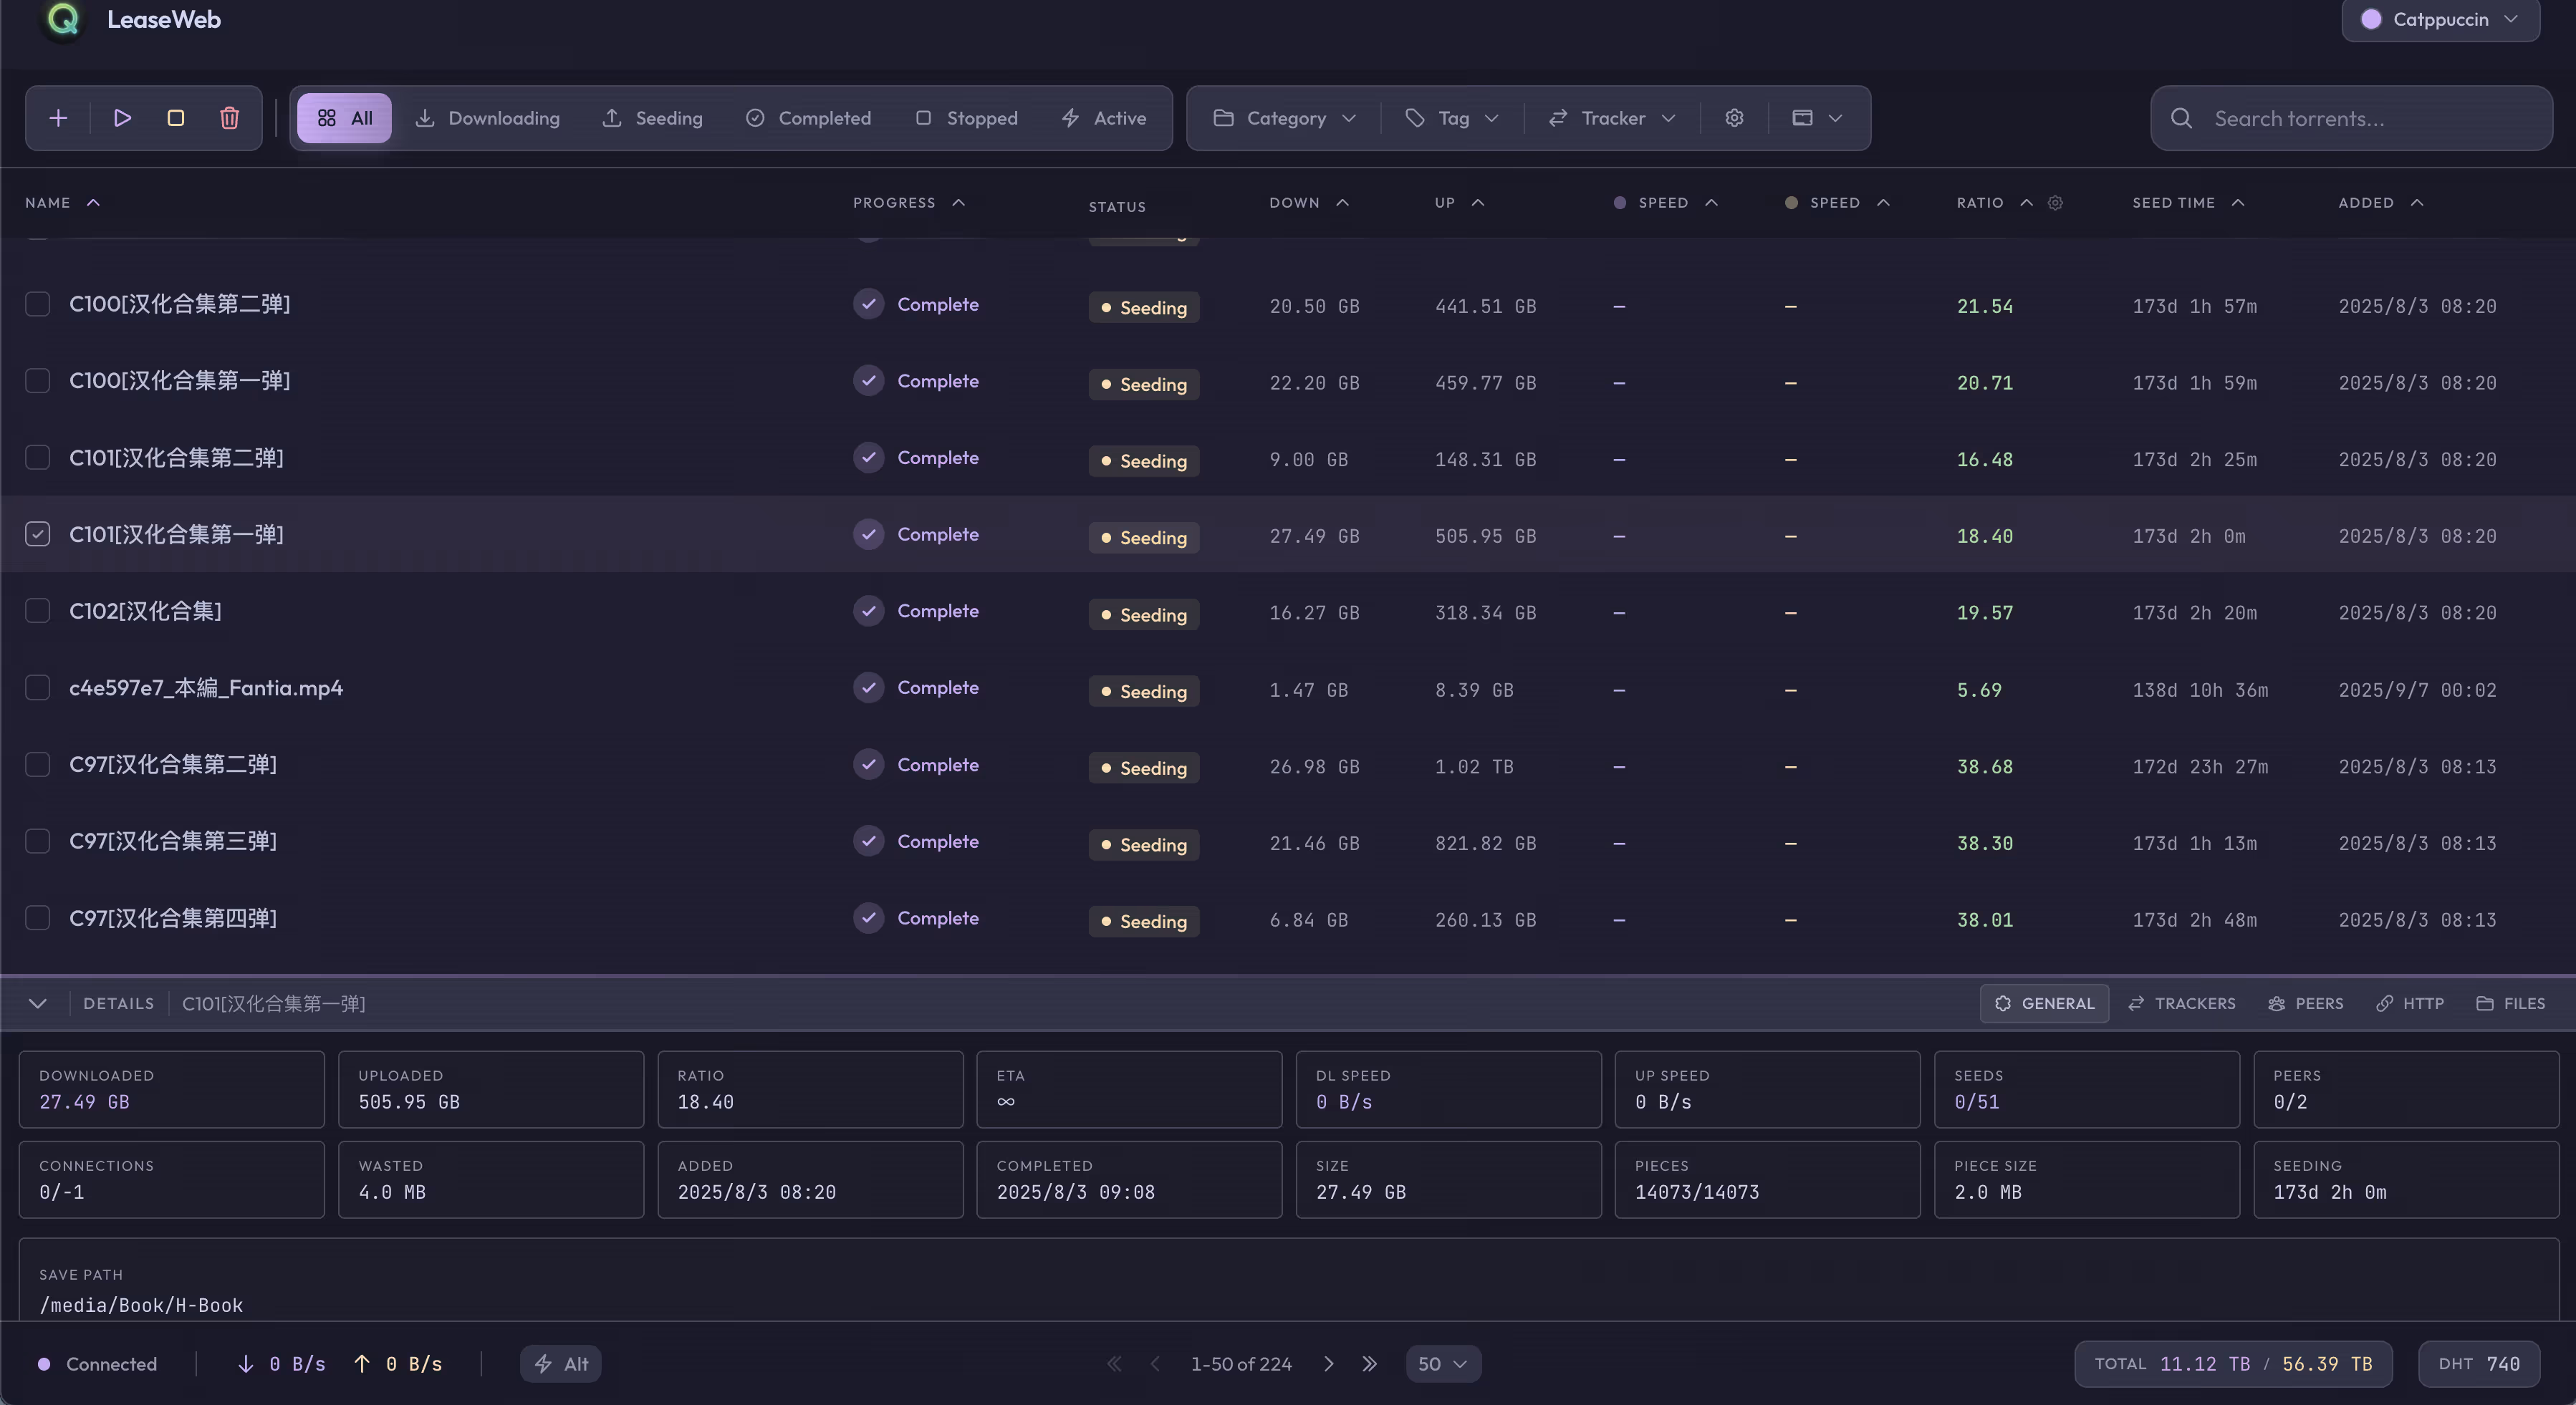
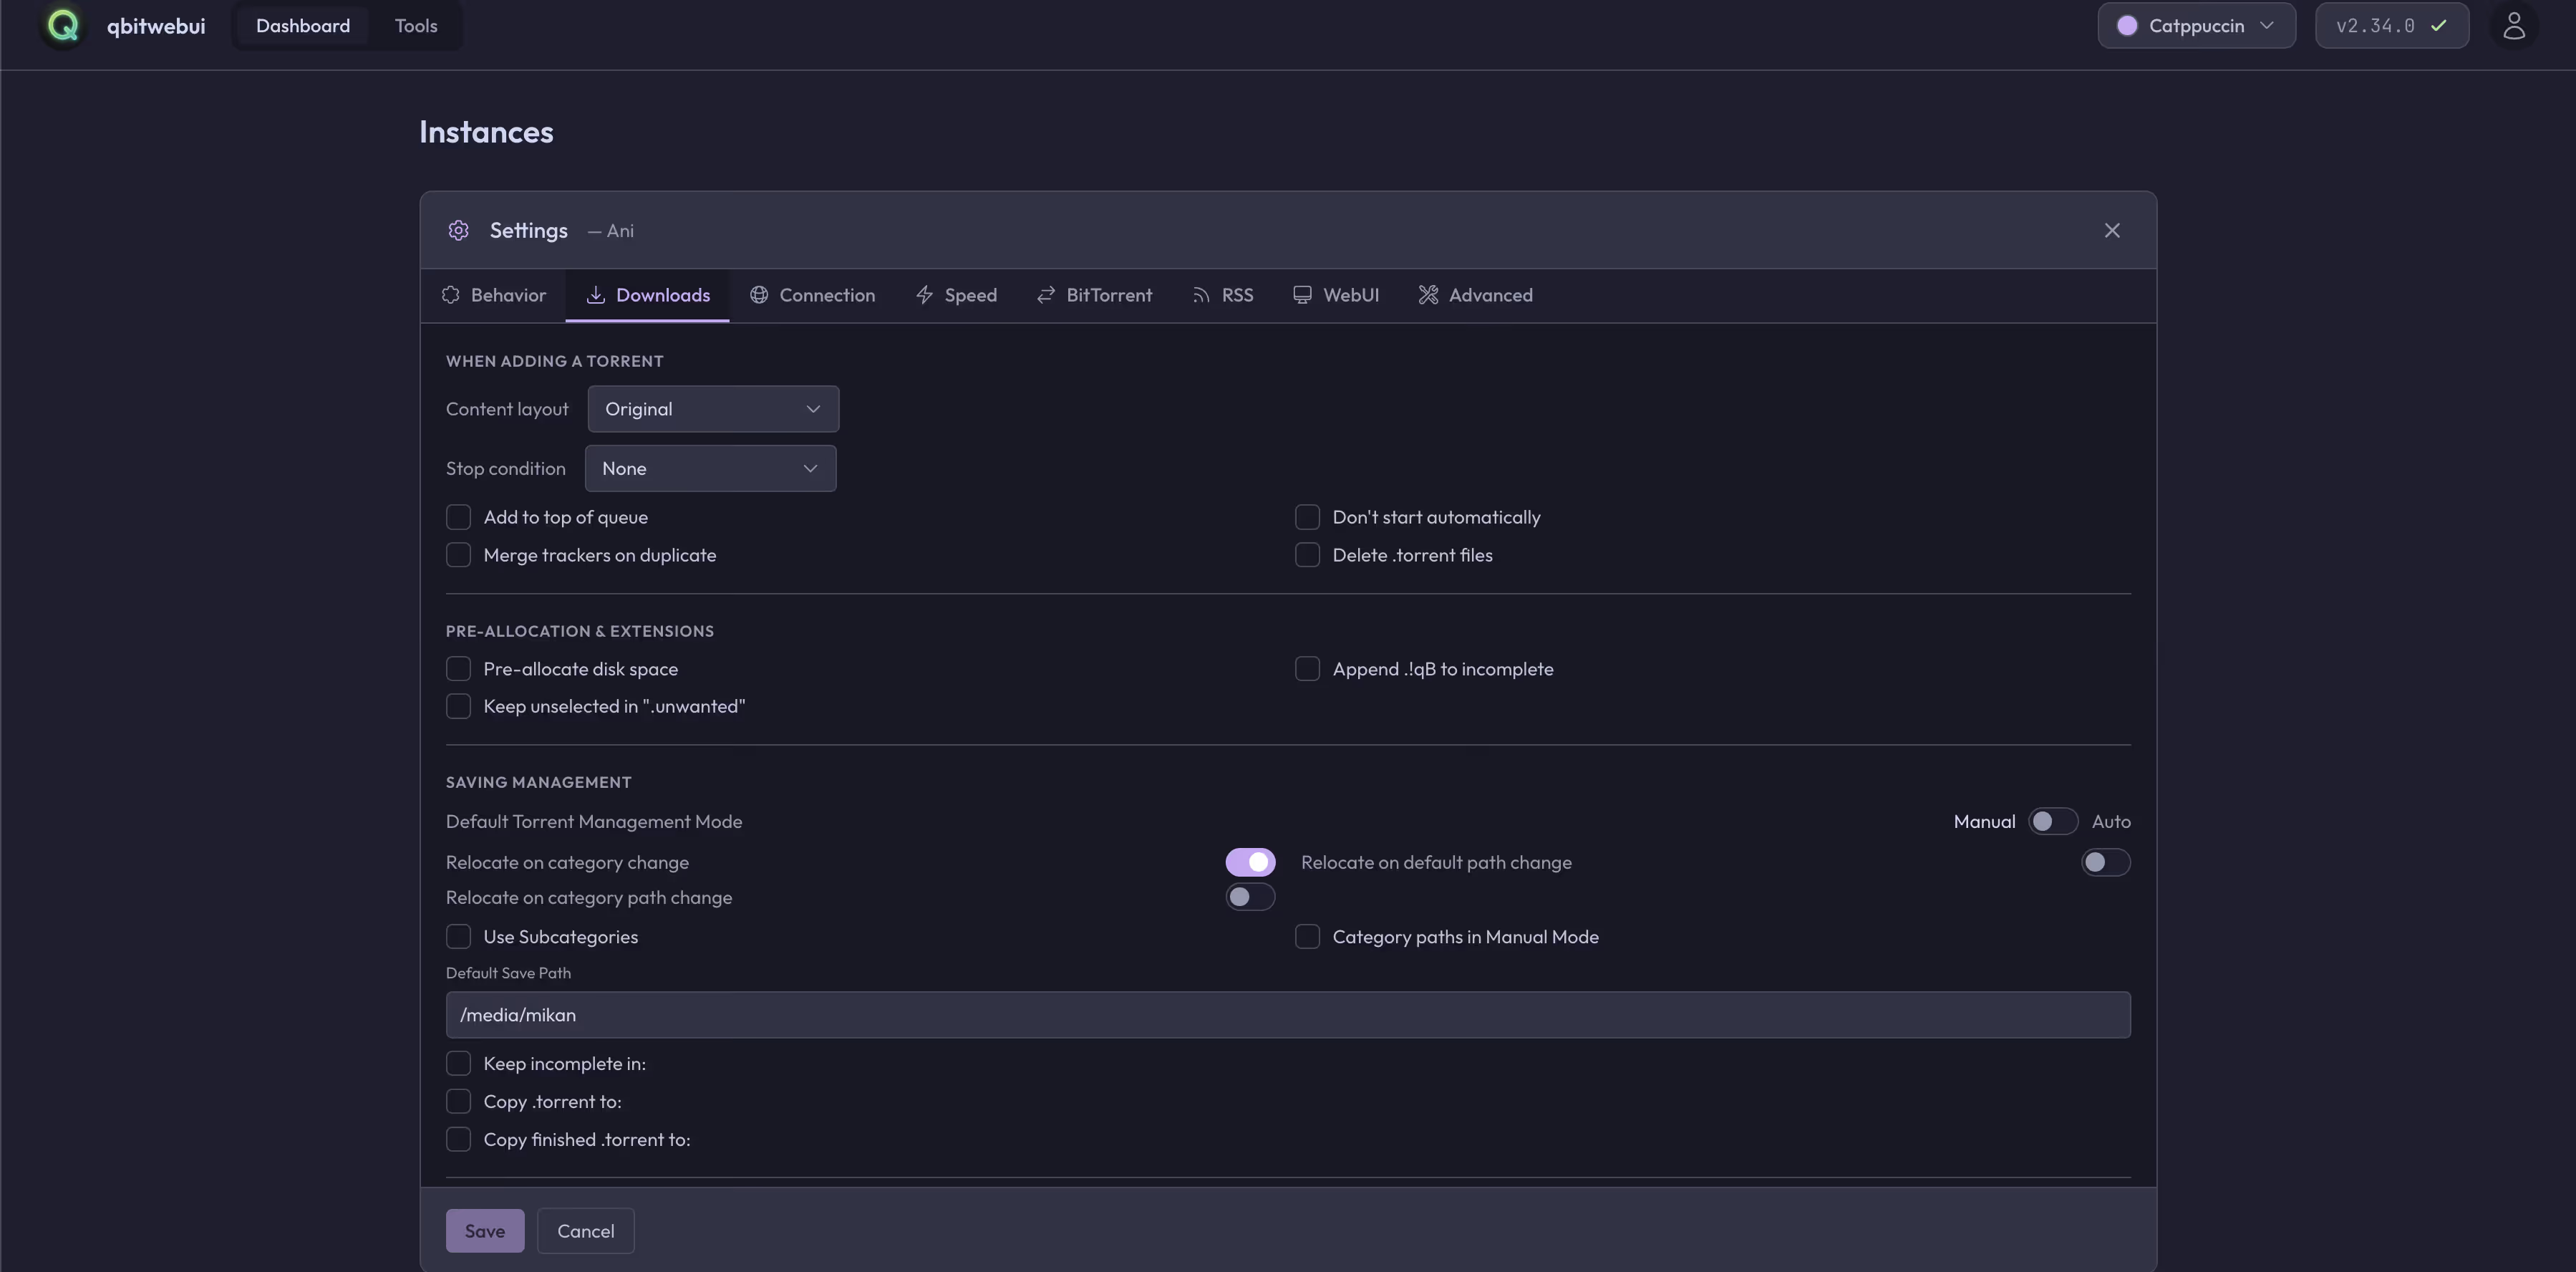
Torrent Page
Management Page
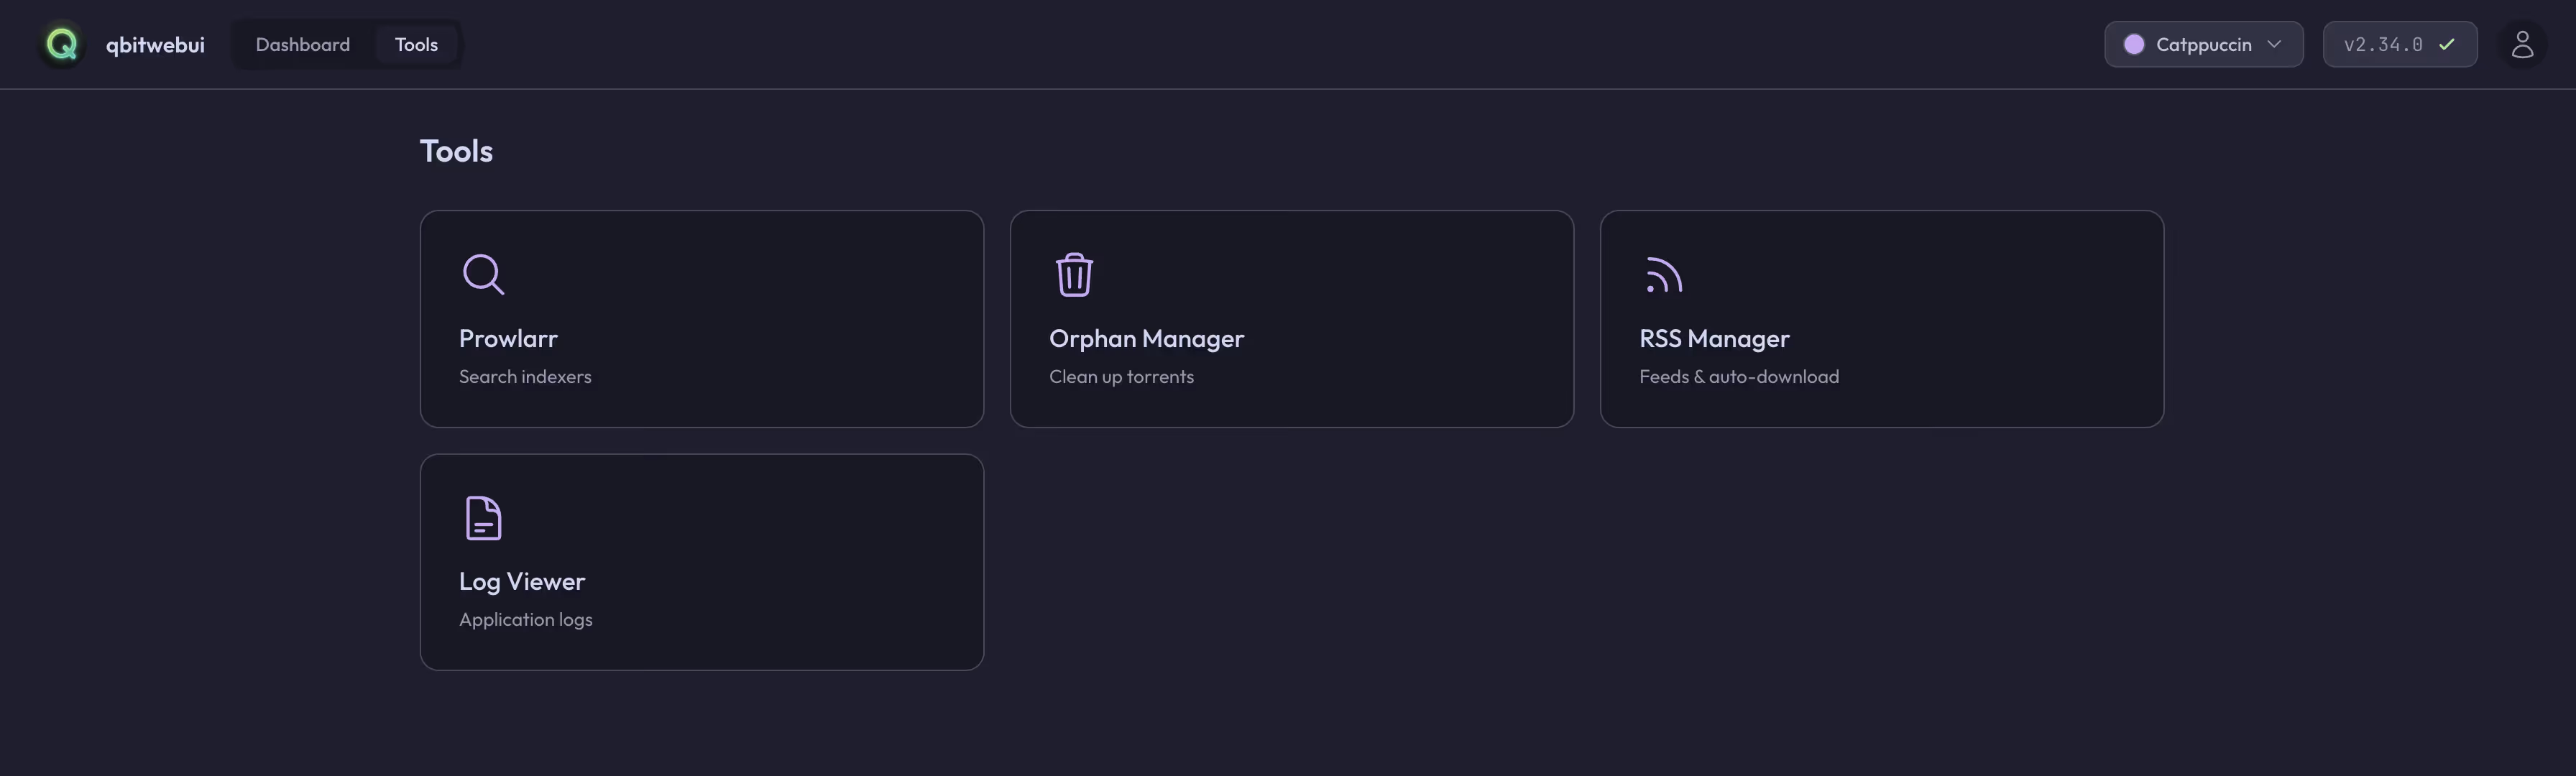
Tools Page
Deployment Methods
qBitWebUI offers multiple deployment options. Here we introduce the two most convenient methods: Docker Compose and Dokploy one-click deployment.
Method 1: Docker Compose Deployment
Docker Compose is the recommended deployment method, suitable for users with some Docker experience.
1. Create docker-compose.yml
First, create a directory for configuration files, then create docker-compose.yml:
version: "3.8"
services: qbitwebui: image: ghcr.io/maciejonos/qbitwebui:latest restart: unless-stopped ports: - "3000:3000" environment: # Required: Encryption key for storing credentials (min 32 chars) - ENCRYPTION_KEY=your-secret-key-min-32-chars-long # Optional: Server port (default: 3000) - PORT=3000 # Optional: Database location (default: ./data/qbitwebui.db) - DATABASE_PATH=/data/qbitwebui.db # Optional: Salt file location (default: ./data/.salt) - SALT_PATH=/data/.salt # Optional: Allow self-signed certificates (default: false) # - ALLOW_SELF_SIGNED_CERTS=false # Optional: Disable authentication/login, single-user mode (default: false) # - DISABLE_AUTH=false # Optional: Disable new registrations, creates default admin account (default: false) # - DISABLE_REGISTRATION=false # Optional: Enable file browser by setting downloads path # - DOWNLOADS_PATH=/downloads volumes: - qbitwebui_data:/data # Optional: Mount downloads directory for file browser feature # Read-only mount (browse & download only): # - /path/to/your/downloads:/downloads:ro # Read-write mount (enables delete/move/copy/rename): # - /path/to/your/downloads:/downloads healthcheck: test: ["CMD", "wget", "--no-verbose", "--tries=1", "--spider", "http://localhost:3000"] interval: 30s timeout: 5s retries: 3 start_period: 10s
volumes: qbitwebui_data:2. Generate Encryption Key
ENCRYPTION_KEY is a required environment variable used to encrypt stored qBittorrent connection credentials. Generate a secure key with:
openssl rand -hex 32Replace your-secret-key-min-32-chars-long in docker-compose.yml with the generated key.
3. Start the Service
docker-compose up -d4. Access the Interface
After starting, visit http://your-server-ip:3000 in your browser. First-time access will prompt you to register an account.
5. Add qBittorrent Instance
After logging in, click the add instance button and fill in:
- Name: Give the instance a name (e.g., “Home NAS”)
- URL: qBittorrent Web UI address (e.g.,
http://192.168.1.100:8080) - Username: qBittorrent username
- Password: qBittorrent password
Save to start managing the instance.
Method 2: Dokploy One-Click Deployment
Dokploy is an open-source PaaS platform, similar to Vercel/Netlify but self-hostable. If you’re already using Dokploy, you can deploy qBitWebUI with one click using the template import feature.
Using Template Deployment
The community has created a Dokploy template for qBitWebUI that you can import directly:
Note: The Dokploy template has been submitted to the official template repository (PR #675) and is awaiting merge. Once merged, you’ll be able to find it directly in the template marketplace. In the meantime, you can manually import the template configuration.
Copy the import configuration below:
ewogICJjb21wb3NlIjogInZlcnNpb246IFwiMy44XCJcblxuc2VydmljZXM6XG4gIHFiaXR3ZWJ1aTpcbiAgICBpbWFnZTogZ2hjci5pby9tYWNpZWpvbm9zL3FiaXR3ZWJ1aTpsYXRlc3RcbiAgICByZXN0YXJ0OiB1bmxlc3Mtc3RvcHBlZFxuICAgIGVudmlyb25tZW50OlxuICAgICAgIyBSZXF1aXJlZDogRW5jcnlwdGlvbiBrZXkgZm9yIHN0b3JpbmcgY3JlZGVudGlhbHMgKG1pbiAzMiBjaGFycylcbiAgICAgIC0gRU5DUllQVElPTl9LRVk9JHtFTkNSWVBUSU9OX0tFWX1cbiAgICAgICMgT3B0aW9uYWw6IFNlcnZlciBwb3J0IChkZWZhdWx0OiAzMDAwKVxuICAgICAgLSBQT1JUPSR7UE9SVDotMzAwMH1cbiAgICAgICMgT3B0aW9uYWw6IERhdGFiYXNlIGxvY2F0aW9uIChkZWZhdWx0OiAuL2RhdGEvcWJpdHdlYnVpLmRiKVxuICAgICAgLSBEQVRBQkFTRV9QQVRIPSR7REFUQUJBU0VfUEFUSDotL2RhdGEvcWJpdHdlYnVpLmRifVxuICAgICAgIyBPcHRpb25hbDogU2FsdCBmaWxlIGxvY2F0aW9uIChkZWZhdWx0OiAuL2RhdGEvLnNhbHQpXG4gICAgICAtIFNBTFRfUEFUSD0ke1NBTFRfUEFUSDotL2RhdGEvLnNhbHR9XG4gICAgICAjIE9wdGlvbmFsOiBBbGxvdyBzZWxmLXNpZ25lZCBjZXJ0aWZpY2F0ZXMgZm9yIHFCaXR0b3JyZW50IGluc3RhbmNlcyAoZGVmYXVsdDogZmFsc2UpXG4gICAgICAjIC0gQUxMT1dfU0VMRl9TSUdORURfQ0VSVFM9JHtBTExPV19TRUxGX1NJR05FRF9DRVJUUzotZmFsc2V9XG4gICAgICAjIE9wdGlvbmFsOiBEaXNhYmxlIGF1dGhlbnRpY2F0aW9uL2xvZ2luIChzaW5nbGUtdXNlciBtb2RlKSAoZGVmYXVsdDogZmFsc2UpXG4gICAgICAjIC0gRElTQUJMRV9BVVRIPSR7RElTQUJMRV9BVVRIOi1mYWxzZX1cbiAgICAgICMgT3B0aW9uYWw6IERpc2FibGUgbmV3IHJlZ2lzdHJhdGlvbnMsIGNyZWF0ZXMgZGVmYXVsdCBhZG1pbiBhY2NvdW50IChkZWZhdWx0OiBmYWxzZSlcbiAgICAgICMgLSBESVNBQkxFX1JFR0lTVFJBVElPTj0ke0RJU0FCTEVfUkVHSVNUUkFUSU9OOi1mYWxzZX1cbiAgICAgICMgT3B0aW9uYWw6IEVuYWJsZSBmaWxlIGJyb3dzZXIgYnkgc2V0dGluZyBkb3dubG9hZHMgcGF0aFxuICAgICAgIyAtIERPV05MT0FEU19QQVRIPS9kb3dubG9hZHNcbiAgICB2b2x1bWVzOlxuICAgICAgLSBxYml0d2VidWlfZGF0YTovZGF0YVxuICAgICAgIyBPcHRpb25hbDogTW91bnQgZG93bmxvYWRzIGRpcmVjdG9yeSBmb3IgZmlsZSBicm93c2VyIGZlYXR1cmVcbiAgICAgICMgUmVhZC1vbmx5IG1vdW50IChicm93c2UgJiBkb3dubG9hZCBvbmx5KTpcbiAgICAgICMgLSAvcGF0aC90by95b3VyL2Rvd25sb2FkczovZG93bmxvYWRzOnJvXG4gICAgICAjIE9yIHJlYWQtd3JpdGUgbW91bnQgKGVuYWJsZXMgZGVsZXRlL21vdmUvY29weS9yZW5hbWUpOlxuICAgICAgIyAtIC9wYXRoL3RvL3lvdXIvZG93bmxvYWRzOi9kb3dubG9hZHNcbiAgICBoZWFsdGhjaGVjazpcbiAgICAgIHRlc3Q6IFtcIkNNRFwiLCBcIndnZXRcIiwgXCItLW5vLXZlcmJvc2VcIiwgXCItLXRyaWVzPTFcIiwgXCItLXNwaWRlclwiLCBcImh0dHA6Ly9sb2NhbGhvc3Q6MzAwMFwiXVxuICAgICAgaW50ZXJ2YWw6IDMwc1xuICAgICAgdGltZW91dDogNXNcbiAgICAgIHJldHJpZXM6IDNcbiAgICAgIHN0YXJ0X3BlcmlvZDogMTBzXG5cbnZvbHVtZXM6XG4gIHFiaXR3ZWJ1aV9kYXRhOlxuIiwKICAiY29uZmlnIjogIlt2YXJpYWJsZXNdXG5tYWluX2RvbWFpbiA9IFwiJHtkb21haW59XCJcbmVuY3J5cHRpb25fa2V5ID0gXCIke3Bhc3N3b3JkOjMyfVwiXG5cbltjb25maWddXG5bW2NvbmZpZy5kb21haW5zXV1cbnNlcnZpY2VOYW1lID0gXCJxYml0d2VidWlcIlxucG9ydCA9IDMwMDBcbmhvc3QgPSBcIiR7bWFpbl9kb21haW59XCJcbnBhdGggPSBcIi9cIlxuXG5bY29uZmlnLmVudl1cbkVOQ1JZUFRJT05fS0VZID0gXCIke2VuY3J5cHRpb25fa2V5fVwiXG5QT1JUID0gXCIzMDAwXCJcbkRBVEFCQVNFX1BBVEggPSBcIi9kYXRhL3FiaXR3ZWJ1aS5kYlwiXG5TQUxUX1BBVEggPSBcIi9kYXRhLy5zYWx0XCJcbiIKfQ==If you’re looking for a better qBittorrent management solution, qBitWebUI is definitely worth trying.
Related Links
- Project Repository: https://github.com/Maciejonos/qbitwebui
- Docker Image: ghcr.io/maciejonos/qbitwebui
- Dokploy Template PR: https://github.com/Dokploy/templates/pull/675
- Template Preview: qBitWebUI Template Preview