A Handy Tool for Smooth Single-Point WebP Migration: WebP-ServerGo
It’s been quite a while since I last checked WebP support. At first glance, it seems that even QQ Browser now supports WebP perfectly. I had my eye on the WebP-Server transition tool a long time ago. Recently, Sugar sent me a Tencent Cloud Wuyou Lightweight Application Server, so I deployed WebP-ServerGo on this domestic lightweight instance to experience the improvement WebP can bring.
1. Overview
WebP is an efficient image compression format developed by Google (Google WebP). Compared to lossless PNG, in typical scenarios a 20% lossy WebP compression can achieve up to 75% size reduction. As Google advertises, WebP usually has an average compression ratio about 30% better than JPEG and JPEG 2000, without degrading visual quality.
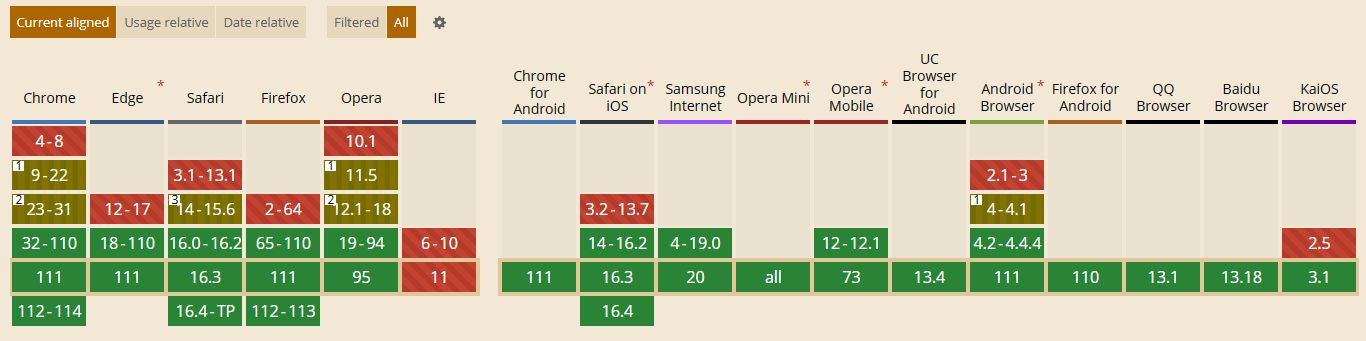
But even as of 2023, pure WebP storage still faces major legacy issues. Access-wise, the problem is relatively small: only Safari on iOS 14 and below does not support it, while almost all major modern browsers at home and abroad already support loading WebP images (support statistics). However, many productivity tools like Ps, Ai, etc. still don’t support loading WebP images. If you only keep WebP as the original file, that means giving up a small percentage of legacy devices and losing convenient editability. On the one hand, WebP offers an extremely fast media loading experience; on the other hand, you lose some editing convenience. I used to be torn between these trade-offs, and often hesitated to adopt new tech because there wasn’t a perfect solution.
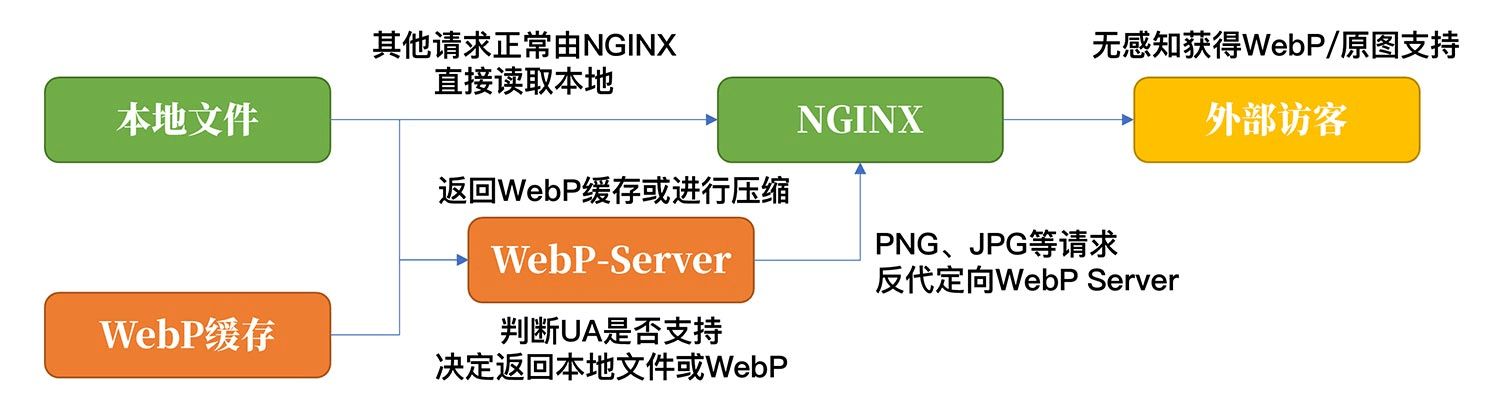
Some time ago, a friend in my chat group mentioned this transition tool, WebP-Server. It’s a WebP conversion middleware written in Go. Just like the WebP strategies provided by many CDNs, it can keep the original images on disk while determining support based on the visitor’s UA and deciding whether to return WebP or the original image. Similarly, WebP-Server can generate WebP caches, and can even work like a CDN edge node that compresses requests to the origin.
-
Project homepage: https://webp.sh
-
Documentation: https://docs.webp.sh/usage/basic-usage
Looking at the Chinese server market, for individuals within a reasonable budget, typical outbound bandwidth is only about 4–5 Mbps. Based on that, we can do a rough calculation: 5 Mbps gives you around 640 KB/s of outbound throughput. From my experience, assuming 8 images/page at 100 KB each, a single page view would need about 800 KB. That would saturate the bandwidth and take about 1.25 seconds just to load the images for one PV. With 20% lossy WebP compression, however, the average image size may drop to 16–25 KB, which can increase the per-second PV concurrency capacity by about 5x. In a domestic network environment where server bandwidth is often very tight, the improvement to site load capacity is immediate and obvious. Under these circumstances, if your self-hosted image bed can be configured with WebP, you may no longer need to pay extra for a CDN and can simply rely on a high-quality BGP network to serve content.
In the post-COVID climate of cost-cutting and efficiency, Tencent Cloud is pretty much the only one still offering 3-year Lightweight Application Servers under the April Cloud Promotion: 2C/2G/4M for 408 CNY and 2C/4G/5M for 628 CNY. Recently, Sugar gifted me a Tencent Cloud Wuyou Lightweight instance with 1C/2G/5M, which has roughly the same bandwidth as the promotion models. As an aside, Tencent Cloud has now opened paid upgrade channels for Wuyou; if you already have a Wuyou instance, you can upgrade to a higher spec on demand if needed.
2. WebP Server
Because WebP-Server requires the libaom component and libc6 > 2.34, I recommend using CentOS 8 / Debian 11 or newer. Although you can technically upgrade libc6 via compilation on older systems, that is a very risky operation and can easily break critical system components. For older systems, I suggest deploying via Docker instead (official docs). Docker images support ARMv7 (32-bit), ARM64 (Aarch64) and AMD64 (x86-64), which you can find on DockerHub (click to visit).
# [/path/to/pics ] means the source image path, [/opt/pics ] is the generated WebP cache pathdocker run -d -p 3333:3333 -v /path/to/pics:/opt/pics --name webp-server webpsh/webp-server-goFor manual installation, the key dependency is libaom3. This one is slightly tricky: the precompiled binary tries to load libaom.so.3, and after installation you might still see errors about missing libaom3. In that case, you can try creating a symlink with ln -s.
# Install libaom libraryapt install libaom-devyum install libaom-devel# Fix missing dependency issue on RHEL family (CentOS)ln -s /usr/lib64/libaom.so.0 /usr/lib64/libaom.so.3# Fix missing dependency issue on Debian familyln -s /usr/lib/x86_64-linux-gnu/libaom.so.0 /usr/lib64/libaom.so.3You can download precompiled binaries from GitHub (click to visit). Choose the mode according to your actual use case and edit the configuration accordingly. Explanations for each parameter are in the comments. After editing, save it as config.json.
# Proxy mode{ "HOST": "127.0.0.1", // listen on localhost; use 0.0.0.0 to listen on all "PORT": "3333", // local port used by WebP Server "QUALITY": "80", // compression quality; lower = higher compression ratio "IMG_PATH": "https://test.webp.sh", // upstream site to reverse proxy "EXHAUST_PATH": "/path/to/exhaus", // path to store cached WebP files "ALLOWED_TYPES": ["jpg","png","jpeg","bmp","gif"], // file extensions to compress}# Local mode{ "HOST": "127.0.0.1", // listen on localhost; use 0.0.0.0 to listen on all "PORT": "3333", // local port used by WebP Server "QUALITY": "80", // compression quality; lower = higher compression ratio "IMG_PATH": "/path/to/pics", // local image directory, usually site root "EXHAUST_PATH": "/path/to/exhaust", // path to store cached WebP files "ALLOWED_TYPES": ["jpg","png","jpeg","bmp","gif"], // file extensions to compress "ENABLE_AVIF": false // AV1 compression support; not recommended for now}If you install directly on the host, it’s recommended to use systemd to manage the service. Below is an example that writes webp.service in one go. Update the paths to the webp-server binary and config.json, then paste it into your SSH session.
cat > /etc/systemd/system/webp.service <<EOF[Unit]Description=WebP ServerDocumentation=https://github.com/n0vad3v/webp_server_goAfter=nginx.target
[Service]Type=simpleStandardError=journalAmbientCapabilities=CAP_NET_BIND_SERVICEWorkingDirectory=/[program-path]/webp-serverExecStart=/[program-path]/webp-server/webp-server-linux-amd64 --config /[program-path]/webp-server/config.jsonExecReload=/bin/kill -HUP $MAINPIDRestart=alwaysRestartSec=3s
[Install]WantedBy=multi-user.targetEOFAt this point, you can control WebP Server using service webp start|stop|status. Once everything looks good, run systemctl enable webp to enable auto-start on boot.
3. NGINX Configuration
Once WebP-Server is running properly, we need to configure a reverse proxy in NGINX so that media files with the extensions jpg|jpeg|gif|png|bmp are handled by WebP-Server. Below is an example you can add to the corresponding vhost in NGINX. One important point: after enabling automatic WebP responses, you should also remove any existing NGINX cache rules for these media types, otherwise WebP responses might get served to devices that don’t support it.
# Forward jpg|jpeg|gif|png|bmp requests to local port 3333location ~* \.(?:jpg|jpeg|gif|png|bmp)$ { proxy_pass http://127.0.0.1:3333; proxy_set_header X-Real-IP $remote_addr; proxy_hide_header X-Powered-By; proxy_set_header HOST $http_host; add_header Cache-Control 'no-store, no-cache, must-revalidate, proxy-revalidate, max-age=0';}4. Notes & Summary
While I was writing this article, a friend reminded me that there is currently a memory leak issue in this program (click to visit). The author suggests using Docker and limiting memory usage to mitigate the problem. This occurs when multiple users request the same media resource simultaneously: WebP-Server spawns multiple compression processes for the same file, which leads to abnormal memory usage. If you install it directly on the host and want better performance, cache preheating is a very sensible choice.
# Use 4 processes to preheat the cache for the configured directories./webp-server -prefetch -jobs=4 --config /[program-path]/webp-server/config.jsonOn GitHub, the author only provides precompiled binaries for the 64-bit x86 architecture. It feels like they were built on RHEL8. If you want to run it on other platforms, consider using Docker or compiling it yourself according to the docs (click to visit); the whole process is not complicated. After configuration, open the F12 Network tab, filter by image type or check the Content-Type of each image, and you’ll see that the images you are actually accessing have already been compressed into WebP. Finally, many thanks to the author for creating such a handy little tool!
Original article: https://luotianyi.vc/6907.html
If you spot any issues, feedback and corrections are very welcome!